
User Manual

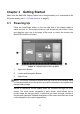


Table Of Contents
- Trademarks
- Copyright Information
- Disclaimer of Warranties and Limitation of Liabili
- For Services and Support:
- Safety Information
- Chapter 1 Using This Manual
- Chapter 2 General Introduction
- Chapter 3 Getting Started
- Chapter 4 Diagnostics Operations
- Chapter 5 Data Manager Operations
- Chapter 6 ADAS
- Chapter 7 MaxiFix Operations
- Chapter 8 Settings Operations
- Chapter 9 Shop Manager Operations
- Chapter 10 Update Operations
- Chapter 11 VCI Manager Operations
- Chapter 12 Remote Desk Operations
- Chapter 13 Support
- Chapter 14 Academy
- Chapter 15 Quick Link Operations
- Chapter 16 MaxiScope Operations
- Chapter 17 Function Viewer
- Chapter 18 Digital Inspection Operations
- Chapter 19 Maintenance and Service
- Chapter 20 Compliance Information
- Chapter 21 Warranty

23
OBD II Vehicle Connection
This type of connection only requires the main cable without any additional
adapter.
To connect to an OBD II vehicle
1. Connect the main cable’s female adapter to the Vehicle Data
Connector on the VCI device, and tighten the captive screws.
2. Connect the cable’s 16-pin male adapter to the vehicle’s DLC,
which is generally located under the vehicle dash.
NOTE: The vehicle’s DLC is not always located under the dash; refer to the
user manual of the test vehicle for additional connection information.
Non-OBD II Vehicle Connection
This type of connection requires both the main cable and a required OBD I
adapter for the specific vehicle being serviced.
There are three possible conditions for Non-OBD II vehicle connection:
DLC connection supplies both communication and power.
DLC connection supplies communication and power is to be supplied via the
cigarette lighter connection.
DLC connection supplies communication and power is to be supplied via
connection to the vehicle battery.
To connect to a Non-OBD II Vehicle
1. Connect the main cable’s female adapter to the Vehicle Data
Connector on the VCI device, and tighten the captive screws.
2. Locate the required OBD I adapter and connect its 16-pin jack to
the main cable’s male adapter.
3. Connect the attached OBD I adapter to the vehicle’s DLC.
NOTE: Some adapters may have more than one adapter or may have test
leads instead of an adapter. Whatever the case, make the proper connection
to the vehicle’s DLC as required.
To connect the cigarette lighter
1. Plug the DC power connector of the cigarette lighter into the DC