
User Manual

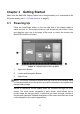


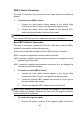
Table Of Contents
- Trademarks
- Copyright Information
- Disclaimer of Warranties and Limitation of Liabili
- For Services and Support:
- Safety Information
- Chapter 1 Using This Manual
- Chapter 2 General Introduction
- Chapter 3 Getting Started
- Chapter 4 Diagnostics Operations
- Chapter 5 Data Manager Operations
- Chapter 6 ADAS
- Chapter 7 MaxiFix Operations
- Chapter 8 Settings Operations
- Chapter 9 Shop Manager Operations
- Chapter 10 Update Operations
- Chapter 11 VCI Manager Operations
- Chapter 12 Remote Desk Operations
- Chapter 13 Support
- Chapter 14 Academy
- Chapter 15 Quick Link Operations
- Chapter 16 MaxiScope Operations
- Chapter 17 Function Viewer
- Chapter 18 Digital Inspection Operations
- Chapter 19 Maintenance and Service
- Chapter 20 Compliance Information
- Chapter 21 Warranty

21
page 79 for more information.
3. Run the MaxiCOM Printer program on the computer to open up the
printer interface.
4. Click Test Print to make sure the printer is working successfully.
5. Tap the Print button on the toolbar displayed in various applications of
the MaxiCOM system. A temporary file will be created and sent to
the computer for printing.
6. The MaxiCOM Printer will print the received file automatically when the
Auto Print option is checked.
If you need to print the document later, click the Open PDF file and
select the document, and double click the Print on the MaxiCOM
Printer interface to start the printing.
NOTE: Make sure the computer installed with the Printing Services program is
connected to a printer.