
Manual
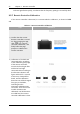
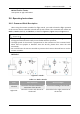

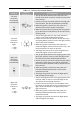
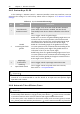
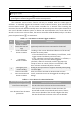
Table Of Contents
- Chapter 1 Aircraft
- Chapter 2 Remote Controller
- Chapter 3 Smart Battery
- Chapter 4 Autel Enterprise App
- Chapter 5 First Flight
- 5.1 Instructions for First Flight
- 5.2 Flight Precautions
- 5.3 Pre-Flight Preparations
- 5.3.1 Unpacking
- 5.3.2 Charging
- 5.3.3 Preparing the Aircraft
- 5.3.4 Installing/Removing Propellers
- 5.3.5 Preparing the Remote Controller
- 5.3.6 Login, Pairing, Activation (activation only upon first use)
- 5.3.7 Novice Guide (first time use only)
- 5.3.8 Reconnect the aircraft (not required by default, required after disconnection)
- 5.4 Pre-Flight Inspection
- 5.5 Basic Flight Process
- Chapter 6 Firmware Update and Maintenance
- Appendix A Product Specifications

Chapter 2 Remote Controller 21
EVO Max 4T User Manual
Table 2-5 Aircraft Pairing
Step Reference
1)
Confirm that the current
remote controller and
aircraft are turned on. After
entering the main interface
of the remote controller App,
click" ", then click" ",
finally clicking "Connect to
Aircraft".
2)
After the dialog box pops up,
double-click the power
button on the fuselage to
complete the pairing process
with the remote controller.
When pairing the aircraft and remote controller, please keep the distance between them
within 50cm.
2.2.6 Forced Frequency Pairing
When you need to perform forced pairing, please turn off the remote controller first.
1) Press and hold the power button and the Home button of the remote controller at the
same time, and the power indicator of the remote controller will flash quickly, indicating
that it has entered the forced frequency pairing state.
2) Make sure the aircraft is turned on, and then double-click the power button of the
aircraft, and the indicator light on the arm of the aircraft will flash quickly.
3) After the aircraft arm indicator light flashes quickly and the remote controller battery