
Manual
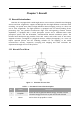
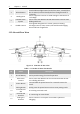
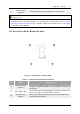
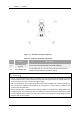
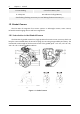
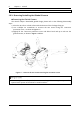
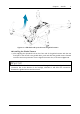
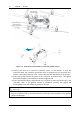
Table Of Contents
- Chapter 1 Aircraft
- Chapter 2 Remote Controller
- Chapter 3 Smart Battery
- Chapter 4 Autel Enterprise App
- Chapter 5 First Flight
- 5.1 Instructions for First Flight
- 5.2 Flight Precautions
- 5.3 Pre-Flight Preparations
- 5.3.1 Unpacking
- 5.3.2 Charging
- 5.3.3 Preparing the Aircraft
- 5.3.4 Installing/Removing Propellers
- 5.3.5 Preparing the Remote Controller
- 5.3.6 Login, Pairing, Activation (activation only upon first use)
- 5.3.7 Novice Guide (first time use only)
- 5.3.8 Reconnect the aircraft (not required by default, required after disconnection)
- 5.4 Pre-Flight Inspection
- 5.5 Basic Flight Process
- Chapter 6 Firmware Update and Maintenance
- Appendix A Product Specifications

Chapter 1 Aircraft 9
EVO Max 4T User Manual
Figure 1-8 Slide back and up to take out the gimbal camera
Installing the Gimbal Camera
1) After aligning the cylindrical hole on the front end of the gimbal camera with the two
fixed pins in the aircraft nose gimbal cabin, push and slide the gimbal camera forward
until the connector protection cover is aligned Connector slot, as shown in Figure 1-9.
Please make sure that the Connector Cover of the gimbal camera is aligned with the
Connector Slot at the bottom of the fuselage, otherwise it will affect the connection
between the gimbal camera and the aircraft.