EVO II Enterprise User Manual 1
Legend keys Please pay attention to the legend keys in this Manual. Warning: remind the possible danger Important: Matters needing attention in flight operation. Remark: supplementary information Reminding: reminding information to get the best operating experience of the EVO Ⅱ Enterprise series. References: Page numbers to help you find chapters that contain relevant information in this Manual.
US10399699 US10414514 Disclaimer In order to ensure successful operation of your EVO Ⅱ Enterprise aircraft, please abide by the operating instructions and procedures of this Manual. Children must use this aircraft under the supervision of an adult. The aircraft shall be kept out of the reach of children when it is not used.
Warning Only the battery and charger provided by Autel Robotics are allowed. Neither modify battery and its charger nor use replace them with the third party equipment. The electrolyte in the battery has strong corrosion. If the electrolyte accidentally touches your eye or skin, immediately rinse with clear water and timely see a doctor. Battery use When the aircraft battery is installed or removed, be sure to turn off the aircraft power.
chemical. The storage of the battery in extreme temperature will shorten the battery service life. If the battery is not used for 6 day above, it shall be stored in -10°C-30°C. If the battery is not used for long, the battery service life will be shortened. Battery disposal The battery must be thoroughly discharged before it is discarded. The battery shall be sent to designated recycling station for proper disposal.
Warning If any part of the aircraft or the remote controller fails to work normally or is visibly damaged, please do not fly any longer and contact the Autel Robotics customer service team: www.autelrobotics.cn/page/service Storage and maintenance Carefully check each part of the aircraft after any collision or extrusion. Store the aircraft and its accessories out of the reach of children and pets. Store the aircraft and its accessories in a cool and dry place.
Catalog Chapter 1 ........................................................................................................................................... 9 About the Manual .............................................................................................................................9 1.1 Instructions for the first flight ...................................................................................................9 1.1.1 Documents .....................................................
6.1 Authentication information and restricted area ....................................................................54 6.1.1 Authentication information .......................................................................................... 54 6.1.2Diagram of restricted area .............................................................................................55 6.2 Specifications ....................................................................................................................
Chapter 1 About the Manual Thank you for your purchase of EVO II Enterprise UAVs. With this Manual, you can understand the features of EVO II Enterprise products and learn to operate this aircraft and remote controller optimally. Before first use of EVO II Enterprise products, please read this Manual and attached documents and get ready this Manual at any moment for reference. 1.1 Instructions for the first flight 1.1.
Chapter 2 Be familiar with your smart UAV. The EVO II Enterprise integrate a 16x zoom imaging system and customized extension accessories to optimize the aerial operation mechanism to meet the flight needs of inspection, search and rescue, law enforcement, and fire protection in various professional fields. The EVO II Enterprise come standard with a 7.9-inch 2000nit high-brightness screen remote controller, which can realize 1080P real-time picture return.
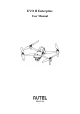
⑦ Power button ⑧ Backward vision system ⑨ Rear LED indicator ⑩ Left vision system ⑪ SD card slot ⑫ Right vision system ⑮ USB-C port ⑯ Remote controller pairing button/pairing indicator ⑬ Aircraft battery ⑭ Fan outlet 11
⑰ Upper visual system ⑱ Extension accessory interface ⑲ Ultrasonic sensor ⑳ LED fill-in light ㉑ Lower visual system Remark The right side is equipped with a protective cover, for protecting the USB-C port and Remote controller pairing button/pairing indicator.
closed state during flight. 2.1.2 Flight indicator The aircraft has one LED indicator at the end of each arm. The front LED shows steady red to help you to find the head direction. The rear LED shows the current flight status of aircraft. The following table shows the meaning of each status indicator.
G - Normally on Calibration successful R - Normally red Calibration failed Gesture instructions R - Quick flash Receive gesture instructions 2.1.3 Aircraft battery The rechargeable lithium polymer battery used in the EVO II RTK series has the characteristics of high energy density and large capacity. It shall be charged with the provided special charger.
Battery level indicator status (non-charging status) - Green is normally on - Green is flashing - Off LED warning description LED 1 LED 2 LED 3 LED 4 Warning description The charging temperature is too high or too low. The charging current is high enough to cause short circuit. There is overcurrent, overload or short circuit problem in the case of discharging. - Indicator is flashing - Off Additional functions The following functions can protect and prolong the battery service life.
Charging temperature detection the battery will stop charging in the case of charging temperature lower than 5℃ or higher than 45℃. Overcurrent protection The battery will stop charging if the charging current exceeds 8A. Overcharge protection The battery will automatically stop charging after it is fully charged. Balanced protection Each battery unit shall maintain voltage balance to avoid overcharge or overdischarge.
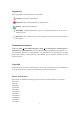
Gimbal of EVO II Pro Enterprise ① MCU installation disc ⑤ Pitching axis motor ② Shock absorber ⑥ Rolling axis motor ③ Camera ⑦ Yawing axis motor ④ Filter Gimbal of EVO II Dual 640T Enterprise 17
① MCU installation disc ⑤ Pitching axis motor ② Shock absorber ⑥ Rolling axis motor ③ Infrared ray camera ⑦ Yawing axis motor ④ 8K Camera Important The EVO II Enterprise camera gimbal is fixed by one gimbal protective cover that can protect the gimbal from accidental rotation or damage during storage. Please be sure to take down the gimbal protective cover before startup. Otherwise the gimbal camera and circuit may be damaged.
3. Gently pinch the tail of the shock absorber with your thumb and index finger. Slide the gimbal back and up in a straight line along the gimbal compartment slot. Gimbal installation 1. Pinch the tail of the shock absorber with your thumb and index finger. Slide the gimbal down and forward in a straight line along the gimbal compartment slot.
Important: Please make sure that the ring at the front end of the gimbal is aligned with the two pins in the gimbal compartment of the machine head. Please make sure that the gimbal is in flush with the slot of the gimbal compartment. 2. Insert the connector cable port into its slot, and gently push it to the end when inserting. Place the gimbal cover on the top of the gimbal compartment, and tighten the cover with a cross screwdriver. 3.
Camera The EVO II Enterprise can be equipped with two cameras to use: EVO II Dual 640T Enterprise: including 8K visible camera and an infrared camera. The camera can work with visible light and infrared rays and in a dual-image mode. The 8K camera can record 7680×4320 resolution video, which is 4 times 4K super-definition images, and directly takes images of 48m pixels. The resolution of the infrared camera is up to 640x 512.
2.1.5 Flight control system EVO II Enterprise is to conduct stable and convenient flight control by its built-in intelligent flight control system. This system can support multiple advanced functions, including course reversal, fail-safe, StarpointTM positioning system, etc. The working description of each module is as shown in the table below. Intelligent flight control system module Module Description IMU Use one 3-axis gyroscope and 3-axis accelerometer to measure acceleration and angular speed.
GPS mode ATTI mode Starpoint mode When the aircraft detects an appropriate GNSS signal, it will activate the GPS mode. With the assistance of the forward and downward vision systems, GPS can locate and avoid obstacles, provide stable and smooth flight control, and support safety functions such as return, fail-safe, etc. When the GPS signal is weak and the light conditions cannot meet the vision system, the ATTI mode is activated.
current position when necessary. The fail-safe will be activated in the following situations. Communication outage If the communication between the aircraft and the remote controller interrupts for 3s, the fail-safe function will be activated. If there is available GPS signal when the fail-safe function is activated, the aircraft will enable the auto return function. Otherwise the aircraft will land on the spot.
When the precise landing function is activated, the aircraft will land as close to the take-off point. Important The aircraft will record the take-off point as the default return point. The precise landing can take effect only when the return point is not refreshed during flight. Select an open and well-lit area as the take-off point. When the aircraft is ready for precise landing, it is necessary to ensure that the take-off environment has no change.
Remark Omnidirectional obstacle sensing directions include front, back, up, down, left and right. However, there are blind spots in the four diagonal directions. In manual flight, attention should be paid to the surrounding environment and App prompts to guarantee safety. Do not operate the aircraft in a complex environment where there is insufficient light, small object (such as twig, line, net), moving object, transparent surface (such as window) or reflected surface (such as mirror).
Gesture recognition The main camera uses deep learning algorithms to recognize and respond to three gesture instructions: straighten your arms up to set yourself as a target, raise your arms to take a photo, and raise one arm to start or stop recording. Precise landing Regarding precise landing, the binocular vision system below the aircraft is used to record the information at its take-off position.
Night flight light RTK module Megaphone To realize long-distance massage transmission and loop playback of audio, and efficiently manage on-site order in emergencies. 1. Record audio Enter the App camera interface, select the settings button ( ) in the upper right corner, select "Megaphone", click "Record Audio" to start recording directly, and select "Save" after recording. 2.
Searchlight To provide long-distance aerial lighting in a low-light environment to solve the lighting problem when searching and shooting at night. 1. User searchlight Enter the App camera interface, and click the searchlight icon ( ) in the lower left corner of the camera interface. The user can turn off the searchlight or choose searchlights with different light intensities (strong/medium/weak).
automatically fly along the route and perform corresponding actions at each waypoint. 1. Click "Task Flight" on the main interface of the App, and select "Waypoint Task" to enter the planning interface. 2. Add a waypoint on the map, and set corresponding parameters and actions of the aircraft at the point. Flight height: the height relative to that of the return point when the aircraft flies to this waypoint.
Polygon task: Generate an irregular rectangular flight area. When the double grid is turned off, the aircraft flies along a bow shape, which is applicable to orthophoto data acquisition. When the double grid is turned on, it flies along a tic-tac-toe shape, which is applicable to 3D modeling. Oblique photography: The generated route is composed of one orthographic route and four oblique routes, applicable to accurate 3D modeling.
flight direction; sidelap rate: the overlap rate between two adjacent flight imaging zones. When the aircraft is shooting at a low altitude or shooting areas with uniform surfaces (such as water, desert, fields and vegetation), increasing the overlap rate is conducive to image splicing and processing later. Ground resolution: it describes the actual physical size of a pixel. The smaller the value is, the clearer the image is.
2.2 Remote controller The Autel smart remote controller integrates portability and high reliability. A 7.9-inch high-brightness display is not afraid of strong light, and clearly displays real-time information about UAV flight. Due to the superior low temperature and heat dissipation performance, it is perfectly adaptive to harsh environments. It has a long-lasting battery life of 4.5 hours, meeting the needs of long-term outdoor operations.
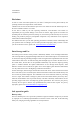
14 Battery level indicator 15 Antenna 16 Display screen 17 Pause button 18 Return button 19 Microphone To display remaining remote controller battery level The frequency for communication with aircraft is 2.4GHz/5.
20 Horn hole 21 Standard 1/4 interface 22 Air inlet 23 Lower hook 24 Protective cover To broadcast the sound and aircraft status message To connect foot stool To dissipate heat of the remote controller To fix remote controller sling To prevent the remote controller from external damage such as collision and abrasion 2.2.2 Use remote controller Check the battery level Short-press the power supply button to check the remote controller battery level.
Three lights normally on: battery level ≥75% Four lights normally on: battery level ≥100% Remark The indicators in the charging process flash sequentially, and are all normally on after full charging. Adjust antenna Unfold the remote controller antenna and adjust the antenna position. Antennas in different positions receive signals of different intensities.
Remark Do not use communication equipment of other frequency bands at the same time, otherwise the remote controller signal may be interfered. In actual operation, Autel Explorer prompts when the image transmission signal is poor, please adjust the position of the antenna according to the prompt, and ensure that the When controlling the aircraft, it is necessary to timely adjust the aircraft is in the optimum communication range.
Chapter 3 Flight preparation The EVO Ⅱ Enterprise series is convenient and unique in design and is fully assembled before delivery. To ensure the safe operation of the UAV, please read the following instructions and warnings before the first flight. 3.1 Battery preparation 3.1.1 Install aircraft battery 1. Turn off the battery power switch before installing battery. 2. Insert the battery into the battery compartment. There will be clicking sound when the battery is installed in place. 3.1.
Charge the aircraft and the remote controller 1. Insert the charge wire by the following steps: Aircraft battery: Insert the charge connector into the charge interface of the battery. Battery level indicator: The LED indicators on the aircraft battery light up in order from left to right to indicate the current battery level during the charging cycle, and turn off when the battery is fully charged. Battery level indicator status (Charging status) - Green is normally on - Green is flashing 2.
Remark The batteries of the aircraft and the remote controller shall be always fully charged before flying. At most 90 minutes are required to fully charge the aircraft battery, and approximately 120 minutes are required for the remote controller. After charging is complete, disconnect the charger from the aircraft battery/remote controller. 3.2 Remote controller preparation 3.2.1 Extend remote controller The remote control is folded in the packing box. Please extend the antenna before use.
3.3 Aircraft preparation 3.3.1 Extend aircraft Take down and reinstall the gimbal protective cover First take down the gimbal support, and turn on the aircraft. As shown in the figure below. After the aircraft is used, the gimbal protective cover shall be reinstalled to prevent the gimbal from damage. Extend the arm and propeller Please remember to always extend the arm of the aircraft before turning on the aircraft power switch. Please first extend the front arm, and then the rear arm.
Important Wear protective gloves when installing or disassembling the propeller. Install propeller 1. Confirm that the aircraft has been turned off. 2. Select the propeller matched for each motor. 3. Forcibly press down the propeller and rotate it along the locking direction till that it is installed firmly.
3.3.3 Compass calibration The compass has been calibrated in factory, with no need for calibration by user normally. If the compass indicates the error information, or the flight direction of the aircraft is not consistent with the control input, or the flight place is far from the calibrated distance, please carry out the following calibration procedure. Warning The compass is very sensitive to the electromagnetic interference that may cause the compass error and the flight quality reduction.
Chapter 4 Flight Operation 4.1 Check list before flight Perform comprehensive check before flight by the following steps: Fully charge the aircraft battery, remote controller and your mobile device. Take down the gimbal protective cover. Confirm that the propeller is intact and correctly installed. Set the position of the remote controller antenna as per 2.2.2. Pair the aircraft battery and the remote controller. Check that the firmware has been upgraded to the latest version indeed.
Slowly push up the left rocker: Warning Motor will generate heat during operation. Please operate with care. The aircraft cannot fly when the battery level is 15% or below. 4.2.2 Manipulator control (American manipulator) Reminding If you are the first time to control the aircraft, please move the rocker gently till that you are familiar with its operation.
Right rocker Right rocker Left view Left view Forward Backward Tail Head Tail Head Push up Push down Rear view Rear view Rightward Leftward Push left Push right 4.2.3 Landing and motor off EVO II Enterprise can be manually or passively landed. Steps to operate the aircraft to land down are as follows: Manual landing 1. Find an appropriate aircraft landing position (open and flat area). 2.
Remark When the low battery level warning (25%) is displayed, the LED on the back of the aircraft turns red and flashes, and the aircraft shall return to the safe landing point as soon as possible. Passive landing When any of the following conditions are met, the fail-safe protection will be triggered and the aircraft will automatically land from its current position. The alarm of low battery level can be activated in a non-GPS environment. Alarm of very low battery level is activated.
Chapter 5 Maintenance and service 5.1 Firmware update In order to optimize the system performance of EVO II Enterprise UAVs, Autel Robotics will update relevant firmware when necessary. You can download a unified firmware upgrade package on the official website, which contains the latest versions of various firmware such as flight controller, gimbal, camera, smart battery and remote controller.
Hardware problems are detected. Please contact the intelligent customer support of Autel Robotics here: www.autelrobotics.cn/page/service Q2. If the motor cannot be started, please check the following: Whether the remote controller and the aircraft are paired. Whether the remote controller is correctly calibrated. Whether the aircraft battery is fully charged. Whether the compass is correctly calibrated. Whether the GPS can be used (when the beginner mode is started). Q3.
realized normally. Q11. The omnidirectional binocular vision system cannot work normally: Restart the aircraft, and check whether it can work normally or not again. Q12. The video is obliqued during flight: Horizontally place the aircraft and keep it steady. Calibrate the gimbal according to the "Gimbal Calibration" function in the APP. If the problem is still not solved, adjust the gimbal according to the instructions in the "Gimbal Fine Tuning" function. Q13.
Within the warranty period, the product has the non-human performance fault during normal use; The product is not disassembled without approval or modified or added as instructed by non-official manual, or has other non-human faults; The equipment serial number, factory label and other marks are not torn away or altered; The effective proof of purchase, document and document number are provided; This service is only applicable to the China mainland, and other countries and regions shall be subjec
Tel: (844) 692-8835 Email: support@autelrobotics.com / support.eu@autelrobotics.com Website: www.autelrobotics.com 5.5.2 Maintenance service If you want to return your equipment for repair, please mail to support@autelrobotics.com or call the customer support of Autel Robotic: 400-800-1866.
Chapter 6 Annex 6.1 Authentication information and restricted area 6.1.1 Authentication information FCC Warning Message Any Changes or modifications not expressly Approved by the party responsible for compliance could void the user’s authority to operate the equipment. This device complies with part 15 of the FCC Rules.
(1) this device may not cause interference, (2) this device must accept any interference, including interference that may cause undesired operation of the device. Le présent Appareil est conforme aux CNR d’Industrie Canada Applicables aux Appareils radio exempts de licence.
aircraft is limited and such height limit varies with the radius. When the radius decreases from 8km to 2.4km, the maximum flight height will decrease from 120m to 10.5m. Warning area APP will give a warning information when the aircraft enters the area of 8.1km from the airport. Remark When the aircraft enters any take-off restricted area, it will land automatically. When the aircraft enters the altitude restricted area, its maximum allowable altitude will be lowered accordingly.
6.2 Specifications Aircraft Weight (including propeller and battery) Size (L*W*H, propeller included) Wheel base Max. flight time (wind-free environment) Hover time (wind-free environment) Max. horizontal flight speed EVO II Pro Enterprise: 1110 g EVO II Dual 640T Enterprise: 1136.
Vertical: ± 0.1m (vision positioning works normally); ± 0.5m (GNS positioning works normally) Horizontal: ± 0.3m (vision positioning works normally); ± 1.5m (GNSS positioning works normally) Gimbal Mechanical range Pitch: -135° to +45° Course: -100° to +100° Controllable range Pitch: -90° to +30° Course: -90° to +90° Stability 3-axis stabilization Max. control speed (Tilt) 300°/s Angle vibration range (°) ±0.005° Extension accessories Megaphone Size: 46*80*77 mm Weight: 98.
Power: about 3W "Position accuracy: 1.5 cm + 1 ppm (vertical) 1 cm + 1 ppm (horizontal)" Vision system Type of video system Omnidirectional binocular vision system Forward vision Accurate measurement range:0.5 - 20m Detection range: 0.5 - 40m Effective sensing speed:< 15m/s Field of view:horizontal: 60°, vertical: 80° Backward vision Accurate measurement range:0.5 - 16m Detection range: 0.
Field of view 82° Equivalent focal length: 28.6 mm Aperture: f/2.8 - f/11 Focusing range: 1 m to infinity (with automatic focusing) Lens Video: 100-6400 (automatic) Picture: 100-12800 (automatic) ISO range Zoom 1-16 times (max. 3 times lossless zoom) Picture taking mode Photographic resolution Single shot Continuous shot: 3/5 frames Auto exposure bracketing: 3/5 bracketing frame (under 0.
Precise temperature measuring distance 2-20 m Zoom 1-16 times Picture taking mode Single shot; Continuous shot; 3, 5, 3 by default; Timing: 2s/5s/7s/10s/20s/30s/60s, 5S by default. Photographic resolution Infrared mode: 640*512 Picture-in-picture: 1920*1080, 1280*720 Picture format TIFF+JPG (with irg file) Video format MP4 / MOV (support H.264/H.
Long exposure: max. 8s HDR imaging: (in 4K JPEG format) Photographic resolution 8000*6000 (4:3) 7680*4320 (16:9) 4000*3000 (4:3) 3840*2160 (16:9) Video format MP4 / MOV (MPEG-4 AVC/H.264, HEVC/H.265) Video resolution 8K 7680*4320 p25/p24 6K 5760*3240 p30/p25/p24 4K 3840*2160 p60/p50/p48/p30/p25/p24 2.7K 2720*1528 p120/p60/p50/p48/p30/p25/p24 1080P 1920*1080 p120/p60/p50/p48/p30/p25/p24 Max. video bitrate 120Mbps Remote controller Max.
Size 303*190× 87mm (folded antenna) 303*273× 87mm (unfolded antenna) Weight 1150G (excluding protective cover) 1250G (including protective cover) Satellite positioning module GPS+GLONASS+Galileo Battery Battery capacity(mAh) 7100mAh Voltage (V) 11.55 Transmission power (2.4G) 13.2 Battery type LiPo 3S Battery energy 82Wh Net weight (g) 365 Charging temperature range (℃) 5- 45℃ Storage temperature & humidity -10-30℃, 65±20%RH Recommended storage temperature 22-28℃ Max.
Rated power 66W Memory SC card memory Standard: 32G Support max. 256G Built-in memory 8G Note: * The working frequency band varies in different countries and regions.