Quick Guide With XI-5A Gimbal
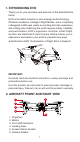
1. INTRODUCING EVO Thank you for your purchase and welcome to the Autel Robotics family. EVO is the latest evolution in drone design and technology. Obstacle avoidance, Intelligent Flight Modes, and a completely redesigned mobile app create an exciting and safe experience like nothing else. Exploring the world requires safety, reliability, and performance. EVO’s ergonomic controller, Smart Flight System and stabilized 3-Axis Camera Gimbal allows you to experience and capture your world in powerful new ways.
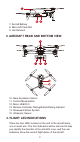
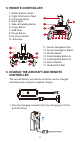
7 7. Aircraft Battery 8. Micro-SD Card Slot 9. Fan Exhaust 8 9 3. AIRCRAFT REAR AND BOTTOM VIEW 10 11 12 13 10. Rear Avoidance Sensor 11. Control Mode Switch 12. Micro-USB Port 13. Remote Controller Pairing Button/Pairing Indicator 14. Downward Vision System 15. Ultrasonic Sensor 4. FLIGHT LED INDICATIONS There are four LEDs located on the end of the aircraft arms, one on each arm.
R — Red Color G — Green Color Y — Yellow Color Solid Light Slow flashing: Flashes once per second Interval flashing: Flashes once every two seconds Fast flashing: Flashes 3 times per second Double flashing: Flashes two times then pauses and repeats Alternate flashing: Alternate among different colors Example: “R-●” Solid Red light Normal Status RGY-●◎ System Self-test is activated YG-●◎ The aircraft is warming up G-◎ The aircraft is in GPS mode G-◎◎ The Forward Vision System and StarpointTM Positioni
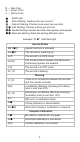
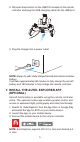
. REMOTE CONTROLLER 1. Mobile Device Holder 2. Flight Information Panel 3. Command Sticks 4. Hand Grips 5. Take-off/Landing Button 6. Power Button 7. USB Ports 8. Pause Button 9. Go Home Button 10. Antennas 1 3 4 5 6 7 8 9 11. Screen Navigation Dial 12. Screen Navigation Button 13. Shutter Button 14. Customizable Button A 15. Customizable Button B 16. Record Button 17. Gimbal Pitch Dial 11 12 17 13 16 14 10 2 15 6.
2. Flip open the protector on the USB Port located on the remote controller and plug the USB charging cable into the USB port. 3. Plug the charger into a power outlet. NOTE: Always fly with a fully charged aircraft and remote controller battery. It will take approximately 80 minutes to fully charge the aircraft battery and 180 minutes to fully charge the remote controller. 7. INSTALL THE AUTEL EXPLORER APP (OPTIONAL) Aircraft functionality is available using the remote controller alone.
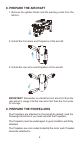
8. PREPARE THE AIRCRAFT 1. Remove the gimbal holder and the warning cards from the Motors. 2. Unfold the front arms and Propellers of the aircraft. 3. Unfold the rear arms and Propellers of the aircraft. IMPORTANT: Remember to unfold the front arms first then the rear arms for usage, fold the rear arms first then the front arms for storage. 9. PREPARE THE PROPELLERS The Propellers are attached on the aircraft by default, read the following instructions if you need reinstall the Propellers.
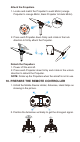
Attach the Propellers 1. Locate and match the Propeller to each Motor (orange Propeller to orange Motor, black Propeller to black Motor). 2. Press each Propeller down firmly and rotate in the lock direction to firmly attach the Propeller. Detach the Propellers 1. Power off the aircraft. 2. Press each Propeller down firmly and rotate in the unlock direction to detach the Propeller. NOTE: Folder up the Propellers when the aircraft is not in use. 10. PREPARE THE REMOTE CONTROLLER 1.
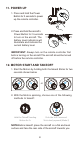
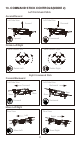
11. POWER UP 1. Press and hold the Power Button for 2 seconds to power up the remote controller. 2. Press and hold the aircraft´s Power Button for 3 seconds to turn on the aircraft. The battery level indicators will illuminate and indicate the current battery level. IMPORTANT: Always turn on the remote controller first before turning on the aircraft.The aircraft should be turned off before the remote controller. 12. MOTOR START AND TAKEOFF 1.
13.
14. LANDING AND MOTOR SHUT-DOWN (MODE 2) 1. Choose one of the following methods to land the aircraft: Hold the Takeoff/Landing Button for 2s Push the Left Command Stick slowly downwards 2. When the aircraft reaches the ground, choose one of the following methods to shut down the Motors: Push the Left Command Stick to the bottom and hold for 2s Hold both Command Sticks toe-in for 2s IMPORTANT:Make sure to land the aircraft on a flat and level surface in an open area.
Aircraft Battery Specifications Battery Type Lithium-Polymer Capacity 4300mAh Battery Voltage 11.4V Charging Environment Temperature 10°C~45°C (50°F~113°F) Discharging Environment Temperature -20°C~60°C (-4°F~140°F) Storage Temperature & Humidity Temp: -10°C~40°C (14°F~104°F) Humidity: 65±20%RH 30 mins Flight Time Camera Gimbal Specifications Operating Current 150mA@12V (Non-video Mode) Input Voltage 12V Operating Temperature -10°C~50°C (14°F~122°F) Weight 67.5g (Camera incl.
Lense Diameter 25mm Camera Bit Rate 100M Storage capacity 4GB-128GB File Formats FAT32/exFAT Photo: JPG/DNG Video: MOV/MP4 Aircraft Specifications Hover Precision GPS+ Ultrasonic+ IMU: Horizontal: ±1.5m, Vertical: ±0.2m; Vision+ IMU: Horizontal: ±0.1m, Vertical: ±0.1m Max. Yaw Rate 200dps Max. Inclination Angle 35deg Max. Ascent/Descent Speed Ascent: 5m/s; Descent: 3m/s Max. Horizontal Speed 20m/s Diagonal Wheelbase Propeller Size 338mm 8.3inches Video Link Frequency 2.4GHz~2.
RF Receiver Operating Frequency Video Link Frequency Operating Temperature Storage Temperature 2.4GHz~2.4835GHz 902MHz~928MHz 2.4GHz~2.4835GHz 902MHz~928MHz 0°C~40°C (32°F~104°F) 1 year: -20~25°C(-4°F~77°F) 3 months: -20~45°C (-4°F~113°F) Max Control and Video Transmission Distance 7km Transmission Power (EIRP) FCC: <=26 dBm CE: <=20 dBm Operating Current/Voltage 2A @ 3.6V Battery 6700mAH Power Consumption 7.
2017-2018 Autel Robotics Co., Ltd.