
EVO Nano Series User Manual
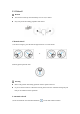
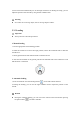


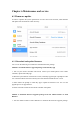


Table Of Contents
- User Manual
- EVO Nano Series
- Terms for Usage
- Trademark Information
- Copyright
- Disclaimer
- Data Storage and Use
- Table of contents
- Chapter 1 Read Instructions
- Chapter 2 Aircraft
- ① Propeller
- ④ Forward visual system
- ② Motor
- ⑤ Antenna
- ③ PTZ camera
- ⑥ Rear vision system
- ⑨ USB-C port
- ⑦ Power button
- ⑩ Rear LED indicator
- ⑧ Aircraft battery
- ⑪ SD card slot
- ⑫ Air outlet
- ⑬ Ultrasonic sensor
- ⑮ Air inlet
- ⑭ Downward vision system
- There is an LED indicator on the tail of the aircr
- Status Definition of Flight LED Indicator
- Back LED Indicator
- Meaning
- Normal status
- Green light flashes slowly (1 flash every 2 second
- Aircraft in GPS mode
- Yellow light flashes slowly (1 flash per second)
- Aircraft in ATTI mode
- Pairing
- Green light flashes quickly
- Aircraft and remote controller are pairing
- Green light stays on for 5 seconds
- Pairing successful
- Red light stays on for 5 seconds
- Pairing failed
- Compass calibration
- Yellow light is on
- Starting compass calibration
- Yellow light is on
- Calibration failed
- Green light is on
- Calibration successful
- Warning
- Yellow light flashes slowly (1 flash per second)
- Low battery warning
- Red light flashes slowly (1 flash per second)
- Critical low battery alert
- Updating
- Green light flashes quickly
- Aircraft is updating
- Green light is is on
- Update successful
- Yellow light flashes slowly (1 flash per second)
- Update failed
- The battery for EVO Nano is 2250mAh and has the ra
- The battery indicator is divided into LED 1, LED 2
- Chapter 3 Remote controller
- Chapter 4 Autel Sky App
- Chapter 5 Flight
- 1) As shown in figure, press the left and right st
- 2) Slowly push up the left stick.
- 1) Press and slide the one-click takeoff button (
- 2) The aircraft will automatically rise to the hei
- Class I: main airport & low-altitude area for mann
- Class II: Sensitive area or organization & militar
- Chapter 6 Maintenance and service
- Method 1: download firmware upgrade package from A
- Method 2: download firmware upgrade package from t
- Chapter 7 Technical Specification
use any strong cleanser, detergent or chemical.
Keep the battery charger clear of other conducting materials.
Avoid the aircraft and its accessories falling, especially falling on a hard surface.
Carefully check all components after each collision or impact. Please contact the
customer support of Autel Robotics for any damage.
Only use the accessories authorized by Autel Robotics, such as charger. We will provide
no warranty for any accident due to the use of unapproved accessories.
6.3 Warranty
Autel Robotics Co., Ltd (hereinafter referred to as “the Company”) promises to the original
retail buyer of the product that: under the normal use condition, if the product or its any part is
certified to have defect in material or technology, causing equipment fault, then you can,
within the warranty period (calculated from the date of delivery), carry your proof of purchase
for free repair or replacement service by the Company.
Scope of service:
Within the warranty period, the product has the non-human performance fault during
normal use;
The product is not disassembled without approval or modified or added as instructed by
non-official manual, or has other non-human faults;
The equipment serial number, factory label and other marks are not torn away or altered;
The effective proof of purchase, document and document number are provided;
The implementation of the specific rules of this service is subject to the local policies,
laws and regulations of different countries and regions.
This warranty clause will not be applied:
When the product is out of the warranty period;
When the battery has been charged for more than 200 times;
When the product doesn't use the official latest firmware;
When the fault is caused when product is used for unlawful activities;
When the product flight log has been changed or deleted without approval;