
EVO Nano Series User Manual
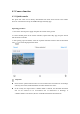
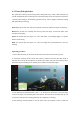
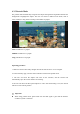

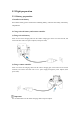
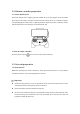
Table Of Contents
- User Manual
- EVO Nano Series
- Terms for Usage
- Trademark Information
- Copyright
- Disclaimer
- Data Storage and Use
- Table of contents
- Chapter 1 Read Instructions
- Chapter 2 Aircraft
- ① Propeller
- ④ Forward visual system
- ② Motor
- ⑤ Antenna
- ③ PTZ camera
- ⑥ Rear vision system
- ⑨ USB-C port
- ⑦ Power button
- ⑩ Rear LED indicator
- ⑧ Aircraft battery
- ⑪ SD card slot
- ⑫ Air outlet
- ⑬ Ultrasonic sensor
- ⑮ Air inlet
- ⑭ Downward vision system
- There is an LED indicator on the tail of the aircr
- Status Definition of Flight LED Indicator
- Back LED Indicator
- Meaning
- Normal status
- Green light flashes slowly (1 flash every 2 second
- Aircraft in GPS mode
- Yellow light flashes slowly (1 flash per second)
- Aircraft in ATTI mode
- Pairing
- Green light flashes quickly
- Aircraft and remote controller are pairing
- Green light stays on for 5 seconds
- Pairing successful
- Red light stays on for 5 seconds
- Pairing failed
- Compass calibration
- Yellow light is on
- Starting compass calibration
- Yellow light is on
- Calibration failed
- Green light is on
- Calibration successful
- Warning
- Yellow light flashes slowly (1 flash per second)
- Low battery warning
- Red light flashes slowly (1 flash per second)
- Critical low battery alert
- Updating
- Green light flashes quickly
- Aircraft is updating
- Green light is is on
- Update successful
- Yellow light flashes slowly (1 flash per second)
- Update failed
- The battery for EVO Nano is 2250mAh and has the ra
- The battery indicator is divided into LED 1, LED 2
- Chapter 3 Remote controller
- Chapter 4 Autel Sky App
- Chapter 5 Flight
- 1) As shown in figure, press the left and right st
- 2) Slowly push up the left stick.
- 1) Press and slide the one-click takeoff button (
- 2) The aircraft will automatically rise to the hei
- Class I: main airport & low-altitude area for mann
- Class II: Sensitive area or organization & militar
- Chapter 6 Maintenance and service
- Method 1: download firmware upgrade package from A
- Method 2: download firmware upgrade package from t
- Chapter 7 Technical Specification

5.2.2 Remote controller preparation
1. Connect mobile device
Extend the mobile device support, place the mobile device on the support, insert the mobile
phone port of the remote controller connector into the mobile device (it is allowed to replace
corresponding Micro USB, USB-C, Lightning interface adapter for remote controller). Ensure
that the mobile device has firmly been inserted into the slot.
2. Turn on remote controller
Press the power button ( ) for 2s to turn on the remote controller.
5.2.3 Aircraft preparation
1. Extend aircraft
Before the aircraft power switch is turned on, slowly pull out the protective cover for gimbal,
extend the front arm, rear arm and propeller successively.
Important
Ensure that the protective cover for gimbal has been removed and the arms have been
extended before the aircraft power switch is turned on.
Please extend the front arm and then the rear arm.
Be sure to turn off the aircraft power switch before turning off the remote controller. Turn
off the aircraft power switch before the arms are folded. First extend the rear arm and
propeller and then the front arm.