
EVO Nano Series User Manual
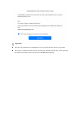
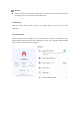
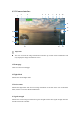

Table Of Contents
- User Manual
- EVO Nano Series
- Terms for Usage
- Trademark Information
- Copyright
- Disclaimer
- Data Storage and Use
- Table of contents
- Chapter 1 Read Instructions
- Chapter 2 Aircraft
- ① Propeller
- ④ Forward visual system
- ② Motor
- ⑤ Antenna
- ③ PTZ camera
- ⑥ Rear vision system
- ⑨ USB-C port
- ⑦ Power button
- ⑩ Rear LED indicator
- ⑧ Aircraft battery
- ⑪ SD card slot
- ⑫ Air outlet
- ⑬ Ultrasonic sensor
- ⑮ Air inlet
- ⑭ Downward vision system
- There is an LED indicator on the tail of the aircr
- Status Definition of Flight LED Indicator
- Back LED Indicator
- Meaning
- Normal status
- Green light flashes slowly (1 flash every 2 second
- Aircraft in GPS mode
- Yellow light flashes slowly (1 flash per second)
- Aircraft in ATTI mode
- Pairing
- Green light flashes quickly
- Aircraft and remote controller are pairing
- Green light stays on for 5 seconds
- Pairing successful
- Red light stays on for 5 seconds
- Pairing failed
- Compass calibration
- Yellow light is on
- Starting compass calibration
- Yellow light is on
- Calibration failed
- Green light is on
- Calibration successful
- Warning
- Yellow light flashes slowly (1 flash per second)
- Low battery warning
- Red light flashes slowly (1 flash per second)
- Critical low battery alert
- Updating
- Green light flashes quickly
- Aircraft is updating
- Green light is is on
- Update successful
- Yellow light flashes slowly (1 flash per second)
- Update failed
- The battery for EVO Nano is 2250mAh and has the ra
- The battery indicator is divided into LED 1, LED 2
- Chapter 3 Remote controller
- Chapter 4 Autel Sky App
- Chapter 5 Flight
- 1) As shown in figure, press the left and right st
- 2) Slowly push up the left stick.
- 1) Press and slide the one-click takeoff button (
- 2) The aircraft will automatically rise to the hei
- Class I: main airport & low-altitude area for mann
- Class II: Sensitive area or organization & militar
- Chapter 6 Maintenance and service
- Method 1: download firmware upgrade package from A
- Method 2: download firmware upgrade package from t
- Chapter 7 Technical Specification
11. Shooting setting
Set the shooting parameters.
12. Zoom
Switch the zoom factor.
13. Shooting button
Click the button to trigger the camera or start/stop recording video.
14. Album
Click to enter the album page.
15. Shooting mode
Photo: set shooting mode between (single/burst/AEB/timer), resolution, white balance, HDR,
etc.
Video: set shooting while recording, video frame rate, resolution, HDR, etc.
Quick shot: select from four cinematic modes: fade away, rocket, orbit and flick.
Portrait: it is available for taking photo or recording video, setting photo/video resolution
and filter, and automatically adjusting the shooting distance of aircraft, etc.
Pano: landscape, portrait, wide-angle, spherical. Based on the selected panorama type, the
aircraft will automatically take several photos and composite them.
Hyperlapse: provide two time-lapse shooting modes: manual and orbit. Set shooting time,
shooting quantity, duration of the composited video, maximum flight speed of aircraft, save
original images, etc.
Pro: Set one of four shooting modes: automatic, manual, and shutter priority mode.