
EVO Nano Series User Manual
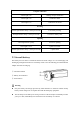
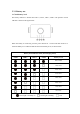
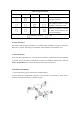
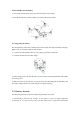
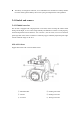
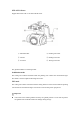
Table Of Contents
- User Manual
- EVO Nano Series
- Terms for Usage
- Trademark Information
- Copyright
- Disclaimer
- Data Storage and Use
- Table of contents
- Chapter 1 Read Instructions
- Chapter 2 Aircraft
- ① Propeller
- ④ Forward visual system
- ② Motor
- ⑤ Antenna
- ③ PTZ camera
- ⑥ Rear vision system
- ⑨ USB-C port
- ⑦ Power button
- ⑩ Rear LED indicator
- ⑧ Aircraft battery
- ⑪ SD card slot
- ⑫ Air outlet
- ⑬ Ultrasonic sensor
- ⑮ Air inlet
- ⑭ Downward vision system
- There is an LED indicator on the tail of the aircr
- Status Definition of Flight LED Indicator
- Back LED Indicator
- Meaning
- Normal status
- Green light flashes slowly (1 flash every 2 second
- Aircraft in GPS mode
- Yellow light flashes slowly (1 flash per second)
- Aircraft in ATTI mode
- Pairing
- Green light flashes quickly
- Aircraft and remote controller are pairing
- Green light stays on for 5 seconds
- Pairing successful
- Red light stays on for 5 seconds
- Pairing failed
- Compass calibration
- Yellow light is on
- Starting compass calibration
- Yellow light is on
- Calibration failed
- Green light is on
- Calibration successful
- Warning
- Yellow light flashes slowly (1 flash per second)
- Low battery warning
- Red light flashes slowly (1 flash per second)
- Critical low battery alert
- Updating
- Green light flashes quickly
- Aircraft is updating
- Green light is is on
- Update successful
- Yellow light flashes slowly (1 flash per second)
- Update failed
- The battery for EVO Nano is 2250mAh and has the ra
- The battery indicator is divided into LED 1, LED 2
- Chapter 3 Remote controller
- Chapter 4 Autel Sky App
- Chapter 5 Flight
- 1) As shown in figure, press the left and right st
- 2) Slowly push up the left stick.
- 1) Press and slide the one-click takeoff button (
- 2) The aircraft will automatically rise to the hei
- Class I: main airport & low-altitude area for mann
- Class II: Sensitive area or organization & militar
- Chapter 6 Maintenance and service
- Method 1: download firmware upgrade package from A
- Method 2: download firmware upgrade package from t
- Chapter 7 Technical Specification
Be sure to charge the battery fully before each flight. If the aircraft enters the low battery
alarm mode, it is necessary to land the aircraft, stop flying, replace or charge battery as
soon as possible.
Never decompose, scratch, extrude, bend, pierce, cut, distort or damage the battery in
other forms. Otherwise the fire, explosion, leakage or other dangers may be caused.
Once the battery is found with bulge, smoke, leakage or any damage, it is necessary to
stop use or charging immediately and soak the battery into a vessel containing saline
water.
Please use the battery at the suitable temperature (-10°C~40°C). The use at high or low
temperature will affect the battery life. Too high temperature may cause fire or
spontaneous combustion; too low temperature may cause the permanent damage of
battery.
When the battery is at low temperature lower than 10°C, it can be inserted into the
aircraft for warming; the flight is allowed after the battery is fully warmed up. It is
optimal to warm up to 20℃ above.
Due to the battery output power limitation under the low temperature environment, the
wind resistance of aircraft will reduce and its flight performance will degrade. Please
operate with care.
When the battery is used in low temperature environment (0~5°C), the battery shall be
full. The discharge capacity of battery will reduce when it operates in low temperature
environment, so first turn on the aircraft to warm up the battery.
Never use the battery in strong static or electromagnetic environment.
Never expose the battery to open fire, explosion or other danger.
Never place the battery in microwave oven or pressure cooker.
If the aircraft falls into water, the battery shall be taken out immediately after it is
recovered. Place the battery in an open space and keep a safe distance till that the battery
is fully dried. Stop the use of the battery, and contact the customer service center for
replacement.
2. Charging
At most 90 minutes are required to fully charge the aircraft battery, but the charging time
is related to the remaining battery level.
Never use the damaged battery charger.
When the charger is not used, disconnect it from the aircraft battery and power supply.