
EVO Lite Series User Manual
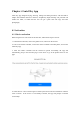
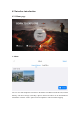
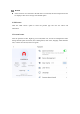


Table Of Contents
- User Manual
- EVO Lite Series
- Terms for Usage
- Trademark Information
- Copyright
- Disclaimer
- Data Storage and Use
- Table of contents
- Chapter 1 Read Instructions
- Chapter 2 Aircraft
- ① Propeller
- ④ Gimbal camera
- ② Undercarriage
- ⑤ Front LED indicator
- ③ Forward visual system
- ⑥ Motor
- ⑦ Power button
- ⑨ Rear LED indicator
- ⑧ Rear vision system
- ⑩ Air outlet
- ⑪ SD card slot
- ⑫ Aircraft battery
- ⑬ USB-C port
- ⑭ Ultrasonic sensor
- ⑯ Downward vision system
- ⑮ Downward LED
- The aircraft has one LED indicator at the end of e
- Designated symbol of color:
- R - Red
- Y - Yellow
- G - Green
- B - Blue
- Front LED Indicator
- Back LED Indicator
- Meaning
- B - Normally on
- G - Slow flash(2 secs/1 time)
- Aircraft in GPS mode
- B - Normally on
- Y - Slow flash(1 sec/1 time)
- Aircraft in ATTI mode
- B - Normally on
- Y - Slow flash(1 sec/1 time)
- Low battery warning
- B - Normally on
- R - Slow flash(1 sec/1 time)
- Serious low battery warning
- B - Normally on
- Y - Normally on
- Aircraft under calibration
- B - Normally on
- G - Normally on
- Calibration successful
- B - Normally on
- Y - Normally on
- Calibration failed
- B - Rapid flash
- G - Rapid flash
- Aircraft under pairing
- B - Rapid flash
- G - Normally on 5S
- Pairing successful
- B - Rapid flash
- R - Normally on 5S
- Pairing failed
- B - Rapid flash
- G - Rapid flash
- Aircraft under upgrading
- B - Normally on
- G - Normally on
- Upgrading successful
- B - Normally on
- Y - Slow flash(1 sec/1 time)
- Upgrading failed
- The battery for EVO Lite is 6175mAh and has the ra
- The battery indicator is divided into LED 1, LED
- Chapter 3 Remote controller
- Chapter 4 Autel Sky App
- When shooting night scene videos, users can choose
- Standard: The shooting effect is the same as the n
- Night: it will automatically adjust the ISO value,
- Super Night: it will automatically adjust the ISO
- Chapter 5 Flight
- 1) As shown in figure, press the left and right st
- 2) Slowly push up the left stick.
- 1) Press and slide the one-click takeoff button (
- 2) The aircraft will automatically rise to the hei
- Class I: main airport & low-altitude area for mann
- Class II: Sensitive area or organization & militar
- Chapter 6 Maintenance and service
- Method 1: download firmware upgrade package from A
- Method 2: download firmware upgrade package from t
- Chapter 7 Technical Specification
2) Control
- Unit: Set default units to metric (km/h or m/h) or imperial (mph/h)
- Command stick mode: set the command stick mode as mode 1, mode 2, or mode 3.
- Flight mode: set the control speed of the aircraft and gimbal. Options include smooth mode,
standard mode, and sport mode.
- RC customizable button: click or double-click the customizable button on the left to set a
custom function.
- RC calibration: follow the prompt steps to calibrate the remote controller. Calibration is
required when the flight attitude is inconsistent with the direction of the remote controller
stick.
- Gimbal setting: set the working mode (stabilized / FPV) and gimbal angle
(center/downward); activate gimbal calibration and gimbal manual adjustment, and enable
gimbal pitch adjustment upwards by 30°.
3) Shooting
- General setting: photo format (JPG/DNG/JPG+DNG), video format (MP4/MOV), video
encoding (H.265/H.264), storage location (Internal Memory/SD card), formatting. Select
settings such as audio recording during video recording, caching during video recording, and
camera reset.
- Shooting assist function: histogram, overexpose warning, grid, download aerial material,
defog, anti-flicker, and other settings.
4) Image transmission
- Image transmission mode: HD, smooth, 2.7K.
5) About
- View device serial number, firmware version, App version, and other information.
10. Prompt information
Click to view the meaning of each option in the image transmission interface.