
User's Manual

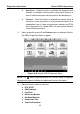
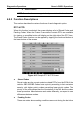
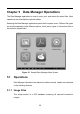
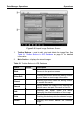
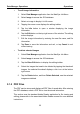
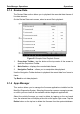
Table Of Contents
- Trademarks
- Copyright Information
- Disclaimer of Warranties and Limitation of Liabilities
- For Services and Support:
- Safety Information
- Contents
- Chapter 1 Using This Manual
- Chapter 2 General Introduction
- Chapter 3 Getting Started
- Chapter 4 Diagnostics Operations
- Chapter 5 Data Manager Operations
- Chapter 6 MaxiFix Operations
- 6.1 Navigation
- The Header
- Select Vehicle Button
- The “Select Vehicle” button on the Header allows you to specify the vehicle which you want to reference on MaxiFix, by selecting each of the vehicle attribute from a sequence of option lists. This feature helps to filter out the searches that allow on...
- 6.1.1 Terminology
- 6.2 Operations
- 6.1 Navigation
- Chapter 7 Settings Operations
- Chapter 8 Shop Manager Operations
- Chapter 9 Update Operations
- Chapter 10 Remote Desk Operations
- Chapter 11 Support Operations
- Chapter 12 Training Operations
- Chapter 13 Quick Link Operations
- Chapter 14 Maintenance and Service
- Chapter 15 Compliance Information
- Chapter 16 Warranty

Data Manager Operations Operations
51
Figure 5-2 Sample Image Database Screen
1. Toolbar Buttons – used to edit, print and delete the image files. See
Table 5-1 Toolbar Buttons in JPG Database on page 51 for detailed
information.
2. Main Section – displays the stored images.
Table 5-1 Toolbar Buttons in JPG Database
Name Button Description
Back
Returns to the previous screen.
Enter Edit
Touching this button shows the editing toolbar
to print, delete or view image information.
Cancel
Touching this button close the editing toolbar
or cancels file search.
Search
Quickly locates the image file by entering the
vehicle name, test path, file name or file info.
Info
Touching this button opens a w indow
displaying the detail information of the image.
Print
Touching this button prints the selected image.
Delete
Touching this button deletes the selected
image.