
User's Manual

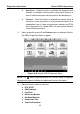
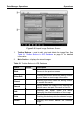
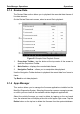
Table Of Contents
- Trademarks
- Copyright Information
- Disclaimer of Warranties and Limitation of Liabilities
- For Services and Support:
- Safety Information
- Contents
- Chapter 1 Using This Manual
- Chapter 2 General Introduction
- Chapter 3 Getting Started
- Chapter 4 Diagnostics Operations
- Chapter 5 Data Manager Operations
- Chapter 6 MaxiFix Operations
- 6.1 Navigation
- The Header
- Select Vehicle Button
- The “Select Vehicle” button on the Header allows you to specify the vehicle which you want to reference on MaxiFix, by selecting each of the vehicle attribute from a sequence of option lists. This feature helps to filter out the searches that allow on...
- 6.1.1 Terminology
- 6.2 Operations
- 6.1 Navigation
- Chapter 7 Settings Operations
- Chapter 8 Shop Manager Operations
- Chapter 9 Update Operations
- Chapter 10 Remote Desk Operations
- Chapter 11 Support Operations
- Chapter 12 Training Operations
- Chapter 13 Quick Link Operations
- Chapter 14 Maintenance and Service
- Chapter 15 Compliance Information
- Chapter 16 Warranty

Diagnostics Operations Generic OBD II Operations
45
Auto Scan – When this option is selected the diagnostic tool
attempts to establish communication using each protocol in
order to determine which one the vehicle is broadcasting on.
Protocol – When this option is selected the screen opens a
submenu of various protocols. A communication protocol is a
standardized way of data communication between an E CM
and a diagnostic tool. Global OBD may use several different
communication protocols.
3. Select a specific protocol if the Protocol option is selected. Wait for
the OBD II Diagnostic Menu to appear.
Figure 4-14 Sample OBD II Diagnostic Menu
NOTE: The
○
i button displayed beside the function name is tappable,
tapping which opens a bubble with additional function information.
4. Select a function option to continue.
DTC & FFD
I/M Readiness
Live Data
O2 Sensor Monitor
On-Board Monitor
Component Test
Vehicle Information