
User's Manual
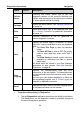
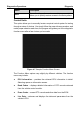
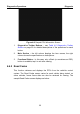
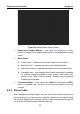
Table Of Contents
- Trademarks
- Copyright Information
- Disclaimer of Warranties and Limitation of Liabilities
- For Services and Support:
- Safety Information
- Contents
- Chapter 1 Using This Manual
- Chapter 2 General Introduction
- Chapter 3 Getting Started
- Chapter 4 Diagnostics Operations
- Chapter 5 Data Manager Operations
- Chapter 6 MaxiFix Operations
- 6.1 Navigation
- The Header
- Select Vehicle Button
- The “Select Vehicle” button on the Header allows you to specify the vehicle which you want to reference on MaxiFix, by selecting each of the vehicle attribute from a sequence of option lists. This feature helps to filter out the searches that allow on...
- 6.1.1 Terminology
- 6.2 Operations
- 6.1 Navigation
- Chapter 7 Settings Operations
- Chapter 8 Shop Manager Operations
- Chapter 9 Update Operations
- Chapter 10 Remote Desk Operations
- Chapter 11 Support Operations
- Chapter 12 Training Operations
- Chapter 13 Quick Link Operations
- Chapter 14 Maintenance and Service
- Chapter 15 Compliance Information
- Chapter 16 Warranty

Diagnostics Operations Diagnosis
32
Figure 4-8 Sample ECU Information Screen
1. Diagnostics Toolbar Buttons – see Table 4-2 Diagnostics Toolbar
Buttons on page 23 for detailed descriptions of the operations for each
button.
2. Main Section – the left column displays the item names; the right
column shows the specifications or descriptions.
3. Functional Button – In this case, only a Back (or sometimes an ESC)
button is available; tap it to exit after viewing.
4.6.2 Read Codes
This function retrieves and displays the DTCs from the vehicle’s control
system. The Read Codes screen varies for each vehicle being tested, on
some vehicles, freeze frame data can also be retrieved for viewing. The
sample Read Codes screen displays as below: