
User's Manual
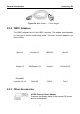
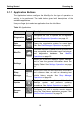
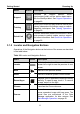
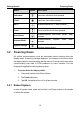
Table Of Contents
- Trademarks
- Copyright Information
- Disclaimer of Warranties and Limitation of Liabilities
- For Services and Support:
- Safety Information
- Contents
- Chapter 1 Using This Manual
- Chapter 2 General Introduction
- Chapter 3 Getting Started
- Chapter 4 Diagnostics Operations
- Chapter 5 Data Manager Operations
- Chapter 6 MaxiFix Operations
- 6.1 Navigation
- The Header
- Select Vehicle Button
- The “Select Vehicle” button on the Header allows you to specify the vehicle which you want to reference on MaxiFix, by selecting each of the vehicle attribute from a sequence of option lists. This feature helps to filter out the searches that allow on...
- 6.1.1 Terminology
- 6.2 Operations
- 6.1 Navigation
- Chapter 7 Settings Operations
- Chapter 8 Shop Manager Operations
- Chapter 9 Update Operations
- Chapter 10 Remote Desk Operations
- Chapter 11 Support Operations
- Chapter 12 Training Operations
- Chapter 13 Quick Link Operations
- Chapter 14 Maintenance and Service
- Chapter 15 Compliance Information
- Chapter 16 Warranty

General Introduction MaxiSys Display Tablet
4
A. Charging (above 90%) – indicated by steady green light
B. Charging (below 90%) – indicated by steady yellow light
C. Low Battery (below 15%) – indicated by steady red light
D. System Failure – indicated by steady blue light
Figure 2-2 MaxiSys Tablet Back View
1. Camera Lens
2. Camera Flash
Figure 2-3 MaxiSys Tablet Top View
1. M
ini
SD Card Slot - holds the mini SD Card
2. DC Power Supply Input Port - Connects the 12 volt power adapter to
charge
3. DB15-Pin Port - connects the vehicle DLC cable
4. USB-B Port
5. Lock/Power Button – turns the device on & off with long press, or locks
the screen with short press