
User's Manual
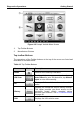
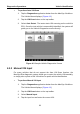
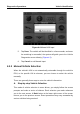

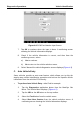
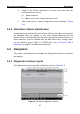
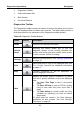
Table Of Contents
- Trademarks
- Copyright Information
- Disclaimer of Warranties and Limitation of Liabilities
- For Services and Support:
- Safety Information
- Contents
- Chapter 1 Using This Manual
- Chapter 2 General Introduction
- Chapter 3 Getting Started
- Chapter 4 Diagnostics Operations
- Chapter 5 Data Manager Operations
- Chapter 6 MaxiFix Operations
- Chapter 7 Settings Operations
- Chapter 8 Shop Manager Operations
- Chapter 9 Update Operations
- Chapter 10 VCI Manager Operations
- Chapter 11 Remote Desk Operations
- Chapter 12 Support Operations
- Chapter 13 Training Operations
- Chapter 14 Quick Link Operations
- Chapter 15 Digital Inspection Operations
- Chapter 16 Maintenance and Service
- Chapter 17 Compliance Information
- Chapter 18 Warranty

Diagnostics Operations Navigation
5. Check if the vehicle information is correct, and then from the
confirming screen, select:
a) Yes to continue.
b) No to return to the vehicle selection menu.
6. Select Yes and the Vehicle Diagnostics screen displays. (Figure
4-3)
4.3.4 Alternative Vehicle Identification
Occasionally, you may identify a test vehicle that the tester does not recognize;
the database does not support, or has some unique characteristics that
prevent it from communicating with the tester through the normal channels. In
these instances, you are provided with the OBD direct entry, through which
you can perform generic OBD II or EOBD tests. See 4.9 Generic OBD II
Operations on page 57 for additional information.
4.4 Navigation
This section describes how to navigate the Diagnostics interface and select
test options.
4.4.1 Diagnostics Screen Layout
The Diagnostics screens typically include four sections. (Figure 4-7)
Figure 4-7 Sample Diagnostics Screen
32