
User's Manual
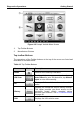
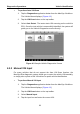

Table Of Contents
- Trademarks
- Copyright Information
- Disclaimer of Warranties and Limitation of Liabilities
- For Services and Support:
- Safety Information
- Contents
- Chapter 1 Using This Manual
- Chapter 2 General Introduction
- Chapter 3 Getting Started
- Chapter 4 Diagnostics Operations
- Chapter 5 Data Manager Operations
- Chapter 6 MaxiFix Operations
- Chapter 7 Settings Operations
- Chapter 8 Shop Manager Operations
- Chapter 9 Update Operations
- Chapter 10 VCI Manager Operations
- Chapter 11 Remote Desk Operations
- Chapter 12 Support Operations
- Chapter 13 Training Operations
- Chapter 14 Quick Link Operations
- Chapter 15 Digital Inspection Operations
- Chapter 16 Maintenance and Service
- Chapter 17 Compliance Information
- Chapter 18 Warranty

Diagnostics Operations Vehicle Identification
Figure 4-6 PCM Part Number Input Screen
7. Tap OK to continue when the input is done. A confirming screen
showing the Vehicle Information displays.
8. Check if the vehicle information is correct, and then from the
confirming screen, select:
a) Yes to continue.
b) No to return to the vehicle selection menu.
9. Select Yes and the vehicle diagnostics screen displays.(Figure 4-3)
C. Auto Vehicle Entry
Some vehicles provide an auto scan feature, which allows you to skip the
step-by-step vehicle identification procedure and retrieve the specific vehicle
information from the vehicle’s ECU directly.
To perform Auto Vehicle Entry - take Ford for example
1. Tap the Diagnostics application button from the MaxiSys Job
Menu. The Vehicle Menu displays. (Figure 4-2)
2. Tap the USA or the All button on the top toolbar.
3. Select the Ford button from the vehicle menu.
4. Select Start New Session from the vehicle selection menu. A
confirming screen showing the Vehicle Information displays.
31