
User's Manual
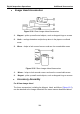
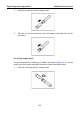
Table Of Contents
- Trademarks
- Copyright Information
- Disclaimer of Warranties and Limitation of Liabilities
- For Services and Support:
- Safety Information
- Contents
- Chapter 1 Using This Manual
- Chapter 2 General Introduction
- Chapter 3 Getting Started
- Chapter 4 Diagnostics Operations
- Chapter 5 Data Manager Operations
- Chapter 6 MaxiFix Operations
- Chapter 7 Settings Operations
- Chapter 8 Shop Manager Operations
- Chapter 9 Update Operations
- Chapter 10 VCI Manager Operations
- Chapter 11 Remote Desk Operations
- Chapter 12 Support Operations
- Chapter 13 Training Operations
- Chapter 14 Quick Link Operations
- Chapter 15 Digital Inspection Operations
- Chapter 16 Maintenance and Service
- Chapter 17 Compliance Information
- Chapter 18 Warranty

Digital Inspection Operations Operations
4. Select the video icon at the lower right corner to record a video.
5. Properly locate the imager head cable to focus the inspection scene
for recording.
6. Tap the red ring on the operating screen to start recording.
7. Tap the red circle again to stop recording. The recorded video is
automatically saved to the system Gallery.
8. Tap the thumbnail image on the top right corner to review the
recorded video.
9. Tap the Play button to play the video.
10. Tap on the selected video and the edit toolbar instantly displays.
11. Tap the appropriate button to share, delete, or edit the video.
12. Tap the Back or Home button on the Navigation bar at the bottom of
the screen to exit the Digital Inspection application.
To configure various settings for the work mode of the imager head
1. Tap button at the bottom edge of the circle.
2. Select each item to make appropriate adjustments.
For more tips and detailed information about the camera application, please
refer to associated Android documentations.
118