
User's Manual


3
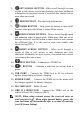
5) LEFT SCROLL BUTTON –When scroll through a screen
of data or text, moves to previous character and views additional
information on previous screens if recorded data content covers
more than one screen.
6) HELP BUTTON – Provides help information.
7) POWER BUTTON – Long press the button to turn on/off
the tool; short press the button to return Home screen.
8) DOWN SCROOL BUTTON – Moves down through menu
and submenu items in menu mode. When more than one set of
data are retrieved, use this button to move down to next screens
for additional data. It is also used to view next trouble code
when viewing DTCs.
9) RIGHT SCROLL BUTTON – When scroll through a
screen of data or text, moves to next character and view
additional information on next screens if recorded data content
covers more than one screen.
10) TEST BUTTON – Commences a TPMS Test.
11) Y BUTTON – Confirms a selection (or action) from a
menu.
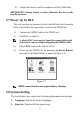
12) USB PORT – Connects the TPMS tool to PC for software
update, data printing or battery charging.
13) POWER PORT – Connects the TPMS tool to the mains with
the charger supplied for battery charging.
14) SD CARD SLOT – Holds SD card.
15) OBD II CONNECTOR – Connects the TPMS tool to the
vehicle‟s Data Link Connector (DLC).
NOTE: When using external power, the scan tool stays on
until you turn it off. When using internal battery power, the
scan tool turns off automatically after a set time of inactivity
(see 2.8 System Setting).