
User's Manual

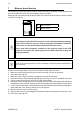


6.3 Inversion of movement direction of the joystick's axis
1. Start up the radio remote control.
2. Press the TEACH pushbutton in the receiving unit and do not release it until the SETUP
LED illuminates.
3. Enable and release the TEACH + command of the corresponding switch on the transmitting
unit and press and release the START pushbutton within one second.
4. Repeat actions described in the previous point until the SETUP LED on the receiving
unit starts blinking four times.
5. Set the desired values as follows:
- Move the joystick out of the rest position of the axis to be calibrated. Maintain this
position and activate once the TEACH + command related to the corresponding switch
on the transmitting unit.
- After calibrating one joystick, press the STOP pushbutton to save calibrations. All
calibrations are saved in the memory board.
6. To invert other directions, unlock the STOP pushbutton, press the START pushbutton
and repeat actions described in the previous point.
7. To leave the procedure, press the TEACH pushbutton on the receiving unit and do not
release it until the SETUP LED switches o.
6.4 Restoring factory settings
This procedure is used to restore factory settings for the proportional outputs.
1. Ensure that the transmitting unit is switched o.
2. Power on the receiving unit.
3. Press the TEACH pushbutton in the receiving unit and do not release it until the SETUP
LED illuminates.
4. Press the TEACH pushbutton three times and do not release it at last pressure; the SETUP
LED blinks fast: this indicates that factory settings are being restored.
5. Release the TEACH pushbutton when the SETUP LED is steadily illuminated again. If
the TEACH pushbutton is released before the SETUP LED is steadily illuminated, factory
settings of proportional outputs will not be restored.
6. To leave the procedure, press the TEACH pushbutton on the receiving unit and do not
release it until the SETUP LED switches o.
AUTEC - Dynamic Series
Values of proportional outputs 11
LIADDE00-00