Aussie Blasters Service Fundamentals July 2011
Aussie Pumps Bertolini Pumps Service–Guidelines Aussie Pumps Bertolini Pumps Service Guidelines July 2011 – July 2008
INTRODUCTION This manual was developed as a basic guide to understanding the operation and requirements, installation and servicing of Aussie Pumps >Big Berty= Bertolini positive displacement pumps. High pressure cleaning equipment is a potentially hazardous undertaking and can cause injury and property damage. It must be installed and repaired in accordance with the manufacturer=s instructions. Recommended OH&S safety practices must be observed at all times.
TYPICAL OPERATION AND REQUIREMENTS and the development of dangerously high Pressure pressure. The pressure produced in a pressure washer system is the result of forcing a known volume Note: Failure to install correct unloader valve or of water through a known orifice size (spray tip). regulator device could result in serious injury and This pressure is measured in bar or pounds per property damage. square inch (psi).
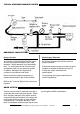
TYPICAL PRESSURE WASHER SYSTEM DESIGNING YOUR SYSTEM Pump selection The heart of any pressure washer system is your Aussie Pumps >Big Berty= Bertolini pump. Choose the pump that=s right for your work demands. Higher pressure is not necessarily best. To much pressure and flow will cause unnecessary wear on your pressure system. In addition, damage to the objects and surfaces to be cleaned could result.
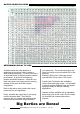
NOZZLE SELECTION GUIDE DETERMINING SPRAY TIP SIZE As stated earlier the outlet pressure is determined by ejecting a known volume of water through a spray tip. The size of this tip is an important factor of efficient pressure cleaner performance. A tip that is too large may produce insufficient pressure. A tip that is too small may cause over high pressures causing damage to the pump and other system components. Refer to the above chart to select the correct nozzle size for your application.
SELECTING REMAINING COMPONENT Inlet side components Inlet filter - It is important to install a water filter on the intake line to remove and impurities or solids in the water. This will increase the operating life of your system and reduce problems. A 60-120 mesh screen filter is recommended to stop foreign matter clogging valves and orifices, scratching internals, abrading packing and wearing the components.
Downstream injector - This component introduces a detergent downstream of the pump. The size of the injector must be selected taking into account the pump pressure. Refer to the injector manufacturer for technical data. If the injector is too small a large pressure drop will result causing a high concentration of detergent. If the injector is too large it will be unable to create sufficient suction to pick up any detergent. Downstream injectors require low pressure to activate the chemical flow.
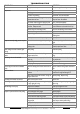
PROBLEM TROUBLESHOOTING CAUSE REMEDY Pulsation Faulty pulsation damper Check precharge, if low recharge or replace Low pressure Worn nozzle Replace nozzle Belt slippage Tighten or replace Air leak in inlet plumbing Disassemble, reseal and reassemble Relief valve stuck, partially plugged or improperly adjusted valve seat worn Clean, adjust relief valve, check for worn and dirty valve seats. Kit available Inlet suction strainer clogged or improperly sized Clean.
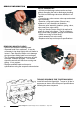
SERVICE INFORMATION VALVE ASSEMBLIES • All inlet and discharge valves can be serviced without disrupting the inlet or discharge plumbing. The inlet and discharge valves are identical in all models. • To service any valve remove valve cap and extract valve assembly. • Examine o-rings and replace if there is any evidence of cuts, abrasions or distortion. • Remove valve assembly (retainer, spring, valve, valve seat) from valve cavity.
SERVICE INFORMATION REPLACING PLUNGERS •Remove stainless steel piston nut and copper washer from piston rod • If slinger washer comes off with plunger ensure this is replaced before the new plunger is installed. • Separate piston from plunger • Install new o-ring and teflon backup ring on plunger. • A thin film of grease on the outside of the o-rings will ensure a better seal.
SERVICE INFORMATION REPLACING V-PACKINGS • Remove manifold from crankcase • Insert proper extractor collet through main seal retainer. Tighten collet and extract retainers, v-packings and head rings. • Place correct insertion tool in cylinder and install front head ring, v-packing and long life ring and press firmly into cylinder until they will go no further. • Insert intermediate seal retainer pressing it firmly into cylinder until it will go no further using proper insertion tool.
AUSSIE WATER BLASTERS RECOMMENDED PUMP OILS It is recommended that the following oils be used: APPLICATION AUSSIE BLASTER RECOMMENDED OIL Renolin 100B non-foaming oil Axial style wobble-plate pumps H101 H110 H120 H130 F140 F150 F180 Panther Cougar Tiger MkII Monsoon Series AB Series BB Series Super Indy Series Top Pro (TK) Series Admiral Terminator Predator SAE 75W/90 gear oil Slow speed machines SAE 75W/90 gear oil Triplex style crankshaft/piston pumps Pressure cleaner gear boxes AUSSIE PRESSURE C
AUSSIE BLASTER PRESSURE SETTING INSTRUCTIONS Engine drive blasters NOTE: These instructions are intended for the use of Authorised Aussie Eco-Clean service centres only 1. Connect machine to mains pressure water supply, ensuring that water is passing freely through the pump at the correct flow rate for specified pump by holding the gun trigger open. 2. Check gun nozzle size with gauge to ensure correct nozzle size (see chart). Replace nozzle if worn. 3.
AUSSIE BLASTER PRESSURE SETTING INSTRUCTIONS Electric drive blasters NOTE: These instructions are intended for the use of Authorised Aussie Eco-Clean service centres only 1. Connect machine to mains pressure water supply, ensuring that water is passing freely through the pump at the correct flow rate for specified pump by holding the gun trigger open. 2. Check gun nozzle size with gauge to ensure correct nozzle size (see chart). Replace nozzle if worn. 3.
PREVENTATIVE MAINTENANCE )Prevent pump failure )Avoid costly repairs )Minimise downtime Simple steps in preventative maintenance will allow you to get the best out of your machinery: DAILY CHECK LIST 1. 2. 3. 4. 5. 6. Check pump and gearbox oil level Check engine oil level Check nozzle wear Check all high pressure components for leaks: a) gun/lance b) high pressure hose c) all fittings. Check water filter and clean if necessary Check unloader, safety valve and thermal dump for leaks.