
Install guide


ARMY TM 5-6675-308-34
MARINE CORPS TM 08837A-34/2
Table 4-19. PS Testing and Troubleshooting – Continued
Malfunction
Test procedure
Normal indication
indication/corrective action
2b.
2c.
2d.
2e.
2f.
2g.
2h.
2i.
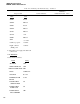
Switch Setting
POWER SUPPLY
OFF
FLAG
COMP PS
OFF
Set CB1 and CB2 circuit breakers to off
Turn on external +28V power source
and adjust to +28V ( l)V
Turn on external O to +40V power source
and adjust to +0.5 ( 0 .25)V. Adjust the
current limit for 5 to 7 amps
Set switches in order as follows:
Switch Setting
INPUT POWER PSTS ON
POWER SUPPLY
ON
TEST SET
MODE NO LOAD
INPUT POWER UUT ON
Set PS battery and vehicle CB1 and CB2 to
ON. Check that fan is disconnected from J6
Connect DVM test leads to POWER
SUPPLY PWR IN and PWR RTN test jacks
Slowly increase O to +40V external power
source to +5V or 5 amp current limit.
If no current limit occurs, continue
increasing voltage to +24 (~0 .5)V at
POWER SUPPLY PWR IN and PWR RTN
test jacks
Press POWER SUPPLY ON switch
Current drawn from O to +40V If current is greater than 1 amp indica-
extemal power source is less
ting a short, perform subroutine 1,
than 1 amp
then repeat steps 2a thru 2h. If cur-
rent is still greater than 1 amp, perform
subroutine 2 and recheck step 2h
PS ON indicator lights. Cur-
Use oscillsocope to determine which
rent drawn from O to +40V
particular output is missing when the
external power source is
switch is recycled. Look for outputs
1 to 6 amps
in order of +14V (+14V is on +INV
DR jack), +28V, -28V, +17V, 400-Hz
sinewave, 400-Hz square wave by
selecting proper FUNCTION switch
positions
4-111