
Black Medium Anti Flap Kit (AFK), 2200-2300mm

ANTI-FLAP KIT INSTALLATION
GUIDE
BRISBANE SHOWROOM
11-15 Oasis Court, Clontarf Queensland 4019
Phone: 1300 663 868
Email: enquiries@aussietraveller.com.au
MELBOURNE SHOWROOM
235 Barry Road, Campbellfield Victoria 3061
Phone: 1300 663 868
Email: enquiries@aussietraveller.com.au
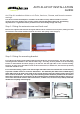
Step 3: Fitting the AFK spigot end
How the spigot end fits depends greatly on the type of cassette awning that you have.
Some cassette awnings are designed to allow for very carefully drilling a 10mm hole directly through the
outrigger (fascia panel) 20mm in from the edge of the vinyl and 20mm down (in line with the mounting
bracket on the cassette housing) on each end of the Outrigger (fascia panel).
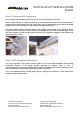
For cassette awnings where the above drilling of the outrigger (fascia panel) is not possible, it will be
required to mount a small box-section bracket to the outrigger that has a hole for the AFK spigot to slot
into (if this method is chosen, the AFK spigot ends need to be repositioned slightly to cope with the new
angle). (Ref Image 6 and 7)
Step 4: AFK Operating Instructions
For correct operation of the Aussie Traveller AFK set, refer to the AFK Installation and Operating
instructions included in all Aussie Traveller Anti-Flap Kit package boxes or refer to
www.aussietraveller.com.au. Operating the AFK for both roll out awnings and cassette awnings the same
steps and adherance to positioning, fitment and operation of the AFK.
NOTE: It is important that the Cassette awning legs are engaged and secured on a level surface when
installing and operating the AFK.
Image 6: Box Section Bracket Positions
Image 7: Box Section Bracket Positions