OWNER'S MANUAL
10 Ventilation Slots and openings in the cabinet arc provided Ior ventilation and Io ensure reliable operation (fl the producl and Io protecl il horn ovefl_eadng, and Ihese openhlgs must not be blocked or covered The openings shoukl never be blocked by placing II_ep_oduc[ on a bed. sol,l, rug. or otl_er similar surlace This product should not be placed in a built-in installation such as a bookcase or rack unless proper venlilalion is provided or Ihe manulaclurel's instructions have been adhered to.
dl II die product does nol operate normall} b) followhlg 24 Ou(door tbc operabng instructions Adjust only dlosc controls tb31 are covered bv Ihe operaling hlslrtlctions as an improper adjustment of other con(rols may result in damage and will (/llel/ le(ltlile qualified lechniclan exlensive to restore wolk the producl bv a Io h_ normal If die product wav f) has been dropped When IIle product exbibils Replacement Parts a disdnct 21 Salary electrodes, in perfof When replacemenl
1 2 Tu assure tl/_" finest perl_)rnlance, carefully¸ Keep Inslall Ibis souncl system place away please i{ in a sal_ place dusL moisture, and/or sunlighL cool, heal sources, cold¸ Allow 30 cm on the lop, 20 cm on the left and right, Ihe back of Ibis unil 3 Locale or 4 this unil a'_ay Iltli]gJ()[ii]_l S Io hul]]i_lin_ humidity lie. condensalion a room inside shock, fire, damage Avoid installing this unit, which coi_polleIff_, as discoloration they (i.
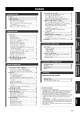
Features ................................................................... Getting started ........................................................ Quick start guide .................................................... Preparation: Check the items ..................................... Step ]: Set up your speakers ...................................... Step 2: Compeer your DVD player and other componellls ............................................................
Built-in 5-channel power Radio tuners amplifier Minimunl RMS ot_tput po_'r t_ FM/AM [USA and Cana k_modelsl ( 1 kHz, ()0<_ THD, 8 -Q) 105 With !_ XM Sat_'llite and Home ti. [Other models] (1 kHz, 09% THD, 6 f2) 105WA'h SCENE select !_ function Yam_dla sulrotllld !_ technology Compressed Mush' Enh_m_er Dolh} Digital decod_'r N_'tHal Surrou_d (U.
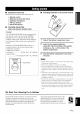
• • Supplied accessories Check that you received all of tile t_)llowing parts. J Installing batteries in the remote control 3 Remote control J Batteries (2) (AAA, R03, UM-4) {3 Optimizer microphone AM loop antenna Indoor FM antenna • VOLTAGE SELECTOR (Asia and General models only) Caution The VOLTAGE SELECTOR on the rear panel of this unit nmst be set tkar your local voltage BEFORE plugging hnproper the power cable into the AC wall outlet. setting of the VOLTAGE SELECTOR may cause damage hazard.
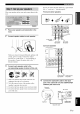
The tk)llowing steps describe the easiest way lo enjoy DVD movie playback in your home theater. Prepare Video monitor Front right speaker Front left speaker Subwoofer Surround right speaker Center speaker the l_)llowing items. Speakers Front speaker ..................................... x 2 _1 Center speaker ................................... x 1 Surround speaker .............................. x 2 Select magneticall) shielded speaker. The minimum required speakers are two lront speakers.
qr/_,'tFsl ,'rNIJrr_t; Be sure to connect the left channel (R), "+" (red) and "-" (black) Place your speakers unit. in the room and connect (L), right channel properly. Front and center speakers them to this / 1 Place your speakers and subwoofer in the room. 2 Connect speaker cables to each speaker, To%%r/= ,aar 1' =\ TO the front right speaker TO the front left speaker Surround speakers \ Cables are colored or shaped differently, perhaps wilh a stripe, groove or ridge.
3 Connect the video cable to the video input jack of your video monitor and the VIDEO MONITOR OUT jack of this unit. AV Video monitor Make sulv that this unit and the DVD player are unplugged outlets. fi'om the AC wall ] Video input jack DVD player • • DVD DIGITAL INPUT COAXIAL jack MONITOR jack OUT For further connections Using the other kind of speaker combinations , P. 11 • Connecting a video components _ P. 15 • Connecting a DVD player , P.
you unit Check the type of the connected speakers. If the speakers are 6 ohm speakers, set "SP IIVlP." to "6_._MIN" before using this unit (see page 21). 1 Turn on the video monitor and then set the input source selector of the video monitor to this unit. 2 Press @SCENE This unit is turned on. "DVD Viewing" appears in fl_e front panel display, and this unit automatically optimize own status R_rthe DVD playback.
• After using this unit... Press @STANDBY/ON on the front panel to set this unit to the standby mode. • Customizing the SCENE templates • Using various SCENE templates • Creating your original SCENE templates _ P. 28 P. 31 • \ This unit is set to the standby this unit consumes mode. a small amount In the standby mode, of power in order to receive infrared signals from tile remote control. T_) turn on this unit from the standby mode, press @STANDBY/ ON (or @POWER).
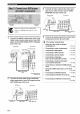
i) <@@@@@@@ I (U.S.A. model) @ HDMIjacks 14 @ DIGITALINPUT @ COMPONENT @ XM jack @ SIRIUS jack (U.S.A. and Canada jacks VIDEO (U.S.A.
The speaker layout below shows channel audio sources. Front left and right the speaker speakers setting we recommend. You can use it to enjoy CINEMA DSP and multi- (FL and FR) Tile l]'ont speakers are used for tile m_dn source sound plus effect sounds. Place these speakers at an equal distance ideal listening posilion.
Be state to connect this unit cannot the left channel reproduce (L), right channel the input sources (R), '+" (red) and _-" (black) properly. [f the connections me l_mlty_ accurately. Caution Belkwe connecting the speakers, Do not let the bare speaker this unit and/or panel display the speakers. If the speaker fl:om the AC wall outlet. any metal part of this unit. This could damage wires me short-circuited, "CHECK SP WIRES" appears in the front shielded speakers.
• Before connecting terminal to the SPEAKERS A speaker cord is actuall3, a pair of insulated cables running side by side. Cables are coh)red or shaped dilt)mntly, perhaps with a stripe, groove or ridges. Connect the striped (grooved. etc.) cable to the "+" (red) terminals of this unit and your speaker. Connect the plain cable to lhe "" (black) terminals.
Connect one of the type of the audio jack(s) lind/or vide() jack(s) that your input components Audio jacks and cable plugs AUDIO DIGITAL AUDIO © ® /'vVhile) (P.ed) COA_AL @@@ are equipped Video jacks and cable plugs VIDEO COMPONENT VIDEO PR PB Y @ @@@ DIGITAL AUDIO OPTICAL D (Yellow} (Orange} t 1` t with. (P.
[l,2,1111f.g_t_f#le_ • HDMI compatibility with this unit Audio signal Audio types signal 2oh. 32-192 u" Bitstream t kHz, CD, bit DVD-Audio, etc DVD-Audio, etc DVD-Video, etc 6oh. 32-192 kHz, 16/2(}/24 bit Dolby HDMI components 16/20/24 Mtflti-ch Line PCM Digital, DTS • HDMI Version 1.2a (High-Definition Multimedia lntertace Specificalion Version 1.2a) licensed by HDMI Licensing, LLC.
,,I*,]llll'4_f_le Connect your TV (or projector) the COMPONENT VIDEO VIDEO MONITOR to the HDMI MONITOR OUT jack, OUT jacks, or tile OUT jack of this unit. • Some video monilors connection connected fail to recognizc Io this ilnit vi_l a DVI the HDMI audio/video signals Make sure that this unit and other components arc unplugged AC wall outlets.
rl.i*,]alal.g_l_l¢t. Make sure that this unit and other components are unplugged flom the AC wall outlets. • Be sule 1o make Ihe same lype ol v]dc'o CO[lilecljol)s made Ior y
• Connecting a DVD recorder, PVR or VCR DVD recorder, PVR or VCR Connecting a set-top box Satellite receiver receiver, cable TV or HDTV decoder HDMI ou_ = indicates recommended connections indicates alternative connections (One for the video connection, and one for the audio connection) 17 En |
Connect file audio components as tPllows. • Connecting a CD player and a CD recorder/MD recorder • When you connect connection, yotlr CD player priority selecl connection component assigned _he corl_sponding to a component to each setting that this unit and other fl'om 1 J the and digital other DIGITAL in "INPUT sure input a_ the DIGITAL -- INPUT jack¸ • To make a digi[al del_ult via analog is given to the signal Make components are unplugged AC wall outlets.
Use the VIDEO game console AUX jacks on the ti'ont panel to connect or a video camera a to this unit. Caution I_ J colnpoilenls are unplugged [hOlll the AC wall outlets. Make sure that this unil and other This unit is equipped with the DOCK panel that allows you to connect dock (such as YDS-10, terminal a Yamaha sold separately) adapter (such as YBA-10, Yamaha iPod universal dock or Bluetooth componenls before the volmne making of this unil and other connections.
rlD2.1111l_g_f_llt, Connecting the wire of the AM loop antenna Open the lever Both FM unit. Connect and tenninals. AM indoor each In general, sufficient signal antennas antenna these are supplied with correctly to the designated antennas should Insert Close the lever this provide strength. 4" See right lot conne_:tion an[ennm hfl _rmalion of tile supplied AM loop Tile wire of the AM loop and you can connecl lerminal.
• Caution [f you are to use 6 ohm spe_kers, set "SP IMP." to "6___MIN" as follows BEFORE using INs unit. Turning on this unit Press @STANDBY/ON on this unit. (or @POWER) to turn F, 1 Press @STANDBY/ON on the front panel to set this unit to the standby mode. Refer to the right colmnn for details.
rlD2=qafa{.g_llt. The XM and SIRIUS SIRIUS indicalor indica(o_ ligh(s is only up only when applicable 'XM" to Ihe U.S.A. or 'SIRIUS" k. DVR- and Canada is selecled models and the cursor on Ihe leli of the XM indicalor o] as (he input source DTV/CBL IpDVD DOCK_NHARCER_- I_MD/CD-R I_CD NER YPAO L. YPAO OR¥ , VIRTUA_I AUTOTUNED $TERE0,_ IMUTE LJLIdB _LD__ E..........
,'I*,]afal_i_ftle @ CINEMA Lights DSP indicator up when you select field program VIRTUAL Lights a CINEMA DSP sound (see page 39). • Using the remote control The remote control trnnsmits u directional infl'mxxlray. Be sure to aim the remote control directly al the remote control sensor on this unit during operation. indicator up when Virtual CINEMA DSP is active (see page 39).
This unit elnploys troublesome the YPAO ('_.unaha listening-based optimizer microphone environment. speaker collects Parametric setup Room Acoustic and achieves mid this unit analyzes highly the sound during that it is normal the "AUTO • To achieve the best results, possible while die "AUTO (here is (oo mtlch I_)r loud test tones SETUP" _ll]lblellt technology sound your speakers 2 • Be advised Optimizer) accurate which lets you avoid adjustments produce automatically.
Make sure that "SETUP" and the pointer is set to "AUTO" is pointing at "START". 4£ You um also s{'le{'l [he folha_ h3g setup med3ods. In [his case. press @_ to select "SETUP", press @<:1 / 1> to selecl d_e one o[ {he Ik)llo'Mng choices and {hen selecl 'START" Choices: AUTO, RELOAD, • Selecl "AUTO" UNDO, to automatically settings settings. • Select "UNDO" and override the previous to start the setup procedure. This unil starts the auto setup procedure.
The display changes as tollows. 7 %EFJ _:2!JR........................................................ Press @L_ and setup results @ENTER to display the in detail. g4UTO SETUP....... ÷ START 8 Aut c,h_tic Rioters n9 o_ al item Press @ repeatedly the setup [ENTERJ: Stare .
qTlltTr/_dtaT![tLla4_,z_._YJg_l/ril_ 10 Press @V and then press @<:1 / L> to select "SET" or "CANCEL". Choices: SET, CANCEL • Select 'SET" to confirm tile 'AUTO SETUP" results. • Select "CANCEL" to cancel the "AUTO SETUP" results. The top "SET MENU" display appearsin the OSD. t[|q,.- = • If"WARNING" appears When this unit detects potential problems during the "AUTO SETUP" procedure. "WARNING' appears in the result display. Check tile warning messages to correct your speaker settings.
This unit is equipped with 17 preset SCENE templates lor various situations of using this unit.
Which SCENE template would you like to select? Which source do you like to play back? Video Which component do you like for playback? DVD sources SCENE Default SCENE buttons templates DVD Viewing (DVD video, Recorded video) DVD Movie Viewing DVD Live Viewing Music discs (CD, SACD or DVD-Audio) DVR DVR Viewing DVD Disc Hi-fi Listening Music Disc Listening Disc Listening CD CD Hi-fi Listening CD Listening CD Music Radio Listening Listening Radio programs XM TUNER SIRIUS iPod or Blu
• Preset SCENE templates descriptions The illustrations of the SCENE template DVD SCENE button Input in the source Playback indicate the assigned SCENE mode buttons in the default DVD MOVIE Movie Dramatic Live Viewing DVD MUSIC Pop/Rock Select Ibis SCENE tempb.
t=dt'_ill_i, 3 Press @AMP llii'v'_r_l_l._lg:aTri_t ._ and then @/\ / V to select the desired parameter of the SCENE template and then @<_ / _> to select the desired value You can create your original SCENE You can refer to the preset button. templates to create SCENE the original templates SCENE tot each of the selected parameter. You can adjust the Ik_llowiIIg parameters t_r a SCENE template: 17 SCENE templates.
• Controlling the input source components in the SCENE mode Youcan opel'ale both this unit mid the input source component by using the remote control. You]nust set the appropriate remote control code 12)reach input source in advance (see page 75). 1 2 Press the desired @SCENE remote control, button on the to control the input source component of the selected SCENE template.
Caution 5 Extreme caution shouM be exercised when you play back CDs encoded in DTS. If you play back a CD desired output level. encoded in DTS on a DTSqncompatible CD player, you will only hear some unwanted noise that may damage your speakers. supports CDs encoded Check whether your CD player in DTS. Also, check the sound output level of your CD player CD encoded in DTS.
r_'frptrm;- This unit tleature crones (audio with input jacks when more same input source. a variety jack than of input select) one jacks.
_r_mP.g# You can display the operating infommtion of this trait on a video monitor. 1 Connect a pair of headphones with a stereo analog audio cable plug to the PHONES jack on the front panel. Turn on the video monitor connected to this unit, 2 Press _ DISPLAY. The current status screen appears in the OSD.
r_,,q, Fm;1̧ You can combine a video image from a video source with sound from an audio source. For example, you can enjoy listening to classical music while viewing beautiful scenery from the video source on the video monitor.
Use this fealure standby mode to automalically after a certain set this unit to the amount of time. Press @AMP and then press _SLEEP repeatedly to set the amount of time. Each time you D_ss _SLEEP, the thont panel display changes as shown below. The SLEEP indicator flashes while you are switching the amount of time fi)r the sleep timer. Once the sleep timer is set, the SLEEP indicator lights up in the lhont panel display, and the display returns to the selected sound field program.
This trail is equipped with a variety of precise digital decoders thai allow you to enjoy multi-channel playback ti'onl ahnost any stereo or multi-channel sound source. • When you select the lasl sound an inpul soma:e, field program this unh used automatically selecls with _he corresponding input SOUICe Press @ PROGRAM then press .
• Enjoying standard 2-channel decoders sources using the • Signals input from 2-cfiannel sources can also be played back on multi-channels. Press @AMP repeatedly and then to select press @SUR. You can select fi'om the I_)llowing decoders the type of source DECODE a decoder, you are playing on depending and your personal preference. F'V'O k.O_i+Z [)olb_ Pro L(!gic processing lor in5 sources Dolby F'Li i Ho_-_.:-:.
L.'*_llYJ_l[dtD_.'_l*J,#iI/_.a_ljit • Editing sound fields parameters You can enjoy good quality sound with tfie tuctory detS.lult paranleters. Although you do not have to change the inilJal settings, you can change some of the parmneters to better suit the input source or your listenfi_g room. hlitial sellings aw indicaled While listening to a source, press @AMP and then press _PARAMETER. Press @A / _7to select the desired parameter you want to change.
Use the DIRECT mode to enjoy the high quality sounds of the selected source. When llle DIRECT mode is activated, You can adjusl the output this unit plays back the selected playing source with the least listening to a music sources level of each speaker source. This is also possible while when input at the MULTI CH INPUT.jacks. circuitry. Press @DIRECT (or press @AMP _DIRECT) to select "DIRECT".
The night listening listenability modes are designed at lower volumes to improve or at night. Press @AMP and then _NIGHT to select "NIGHT:CINEMA" or "NIGHT:M USIC", Choices: NIGHT:CINEMA, NIGHT:MUSIC, • Select "NIGHT:CINEMA" reduce the dynamic make dialog easier • Select • Select to preserve "OFF" OFF when watching range films to of flhn soundlracks and to hear at lower volumes. "NIGHT:MUSIC" sources repeatedly when listening ease-ofqistening to music IZ)r all sounds.
There are 2 tuning methods: there is no interference. the automatic aulomafic If the signal and manual preset and manual. Automatic fi'om the station lulling fealllres 2 3 Press @INPUT <_/c> repeatedly so that "TUNER" is displayed in the front panel display, Press @BAND (FM or AM). to select the reception band Press @TUNING AUTO/MAN'L is effective when station signals are strong and You can also use R) store tip to 40 stal]ons.
You can use lhe automatic preset tuning feature 1o store FM stations with strong signals up to 40 (AI to E8:8 preset station numbers in each of the 5 preset station groups) of those stations in order. You can then recall any preset station easily by selecting the preset station number. You can also store up to 40 stations (AI to E8:8 presel station nnnlbers in each of the 5 preset station groups) manually. 1 Tune into a station automatically or manually, See page 43 t_r bming instructions.
! _/fl'.Ti_/b_lHIla You call tune into any desired the preset stored. station group station and number simply under by selecting You Call exchange which it was the assignlllelitS with each other. The example procedure to exchange of two preset below describes preset station "El" stations tile with "A5".
XM Radio ofl)rs an extraordinary variety of commercial=flee music, plus the best in premier sports, news, talk radio, stand-up comedy, children's and entertainment programming. XM is broadcast in superior digital audio quality fl'om coast to coast. From rock to reggae_ from classical to hip hop, XM has something R)r every music tim. XM Satellite Radio online information For U.S. customers: http://www.xmradio.com/ For Canadian customers: ht*p://www.xmradio.
h_lR_-iF'dlltt_l_T;llTlllmm Once you have installed tile XM Mini-Tuner Dock, inserted the XM Mini-Tuner, connected the XM Mini-Tnner Dock to your XM Ready _ home audio system, and installed the antenna, you are ready to subscribe and begin receiving XM programming. There are three places m lind your eight character XM Radio ID: on the XM Mini-Tnner, on the XM Mini-Tuner package, and on XM Channel 0. Record the Radio [D in the Mlowing eight squares lbr ret_rence.
Belore illpUI perlomling/>peradons, pless (_XM Io elect "XM" as die 3 SO[II'CL" • All Channel 1 Press _SEARCH MODE (or _SRCH MODE) repeatedly to select "ALL CR SEARCH". Y,mcan also select the pres_'l channel numberdirecdy by pr_'sshlgthe numeric buttons (l to 81on file rcinolc coml'ol.
3 Press @CATEGORY You can use lhis l_:ature to store up to 40 XM Satel[ite Radio d_annels (AI to ES: 8 preset channel numbers in each of the 5 preset channel groups). You can then recall any preset channel easily by selecting the preset channel group and number as described in "Preset Search mode" on page 48. [ _-"..... f:_A ":!' Selected See "Basic XM Satellite Radio operations" on page 47 lot details.
• The h'onl panel char icters Salellile You can display the XM Satellite Radio information (such as channel number, channel name, category, artist name, or song title) lk)rthe currently selected ch_mnel in the fiont panel display or in the OSD. Radio continuous using display al once.
SIRIUS Satellile SIRIUS has more than 65 original authentic country commercial-l)'ee. SIRIUS Radio provides over 130 channels music and real bluegrass also has more than 55 channels you get up to 16 NFL games are broadcast during great their respecti'_e with great sports intk_rmation, entertainment hits to R&B, of world-class sports, and 100% commercial-free oldies and classical music. masterpieces. Only From rock and many more. Best of all, it's all 100% news and entertainment.
kq/.*tl#_."_,*_h":21tlflFlL*h'qqlfl]_llt_tJtte_ BeRate using the SIRIUS activate your SIRIUS activate file subscription, uniquely assigned Satel[ite Satellite l)ature, you need to Radio subscription. you need the Sirius ID to the SiriusConnect To 1 which is tune_: Sirius ID is 12-digit munber and it appears on tbe package of the SiriusConnect tuner, on the label of the SiriusConnect tuner and when you lune into the SIRIUS Channel "0" (see below).
• Bel_3re perlk)rming _SIRIUS Ihe following operations, • All Channel Search mode 1 Press @SEARCH pless MODE (or _SRCH 1 MODE) repeatedly to select "ALL CH SEARCH". 2 ioi a channel @PRESET/TUNING/OH 1o_ @PRESET/CH (plickly by pressing and holding 2 3 <_ / t_ Press @SEARCH or ll_'xt c re'gory Press@CATEGORY(or@A.E/CAT. <31r:>) Press@PRESET/TUNING/CH <_/_> (or @PRESET/CH A / V) repeatedly to change 0_r @A-E/CAT.
_*'I/.'tl#/."_*_F'atlftTZ.'h'Ta/t'it.g_ll_ljltml Before perforllllrl_ Ihe I:ollowirl_ opel'atiOllS, press 4 _SIRIUS Press @PRESETITUNINGICH <_ / _> (or @PRESETICH k IV) repeatedly to select a preset channel number (1 to 8) while the MEMORY indicator is flashing. The preset channel nunlber appears in the thontpanel display. You can use this leature to store up to 40 SIRIUS Satellite Radio channels (AI to E8:8 preset channel numbers in each of the 5 preset channel groups).
3 Press @V repeatedly to select "OPTION MENU" and then press @ENTER, In Ihe SIRIUS oulpuls 4 is locked Press @A / V repeatedly to select "G)SIRIUS SET" and then press @ENTER. The tbllowing menu screen appears. OPT!ON name 10 HENU G>SIRIUS + PRRENTRL Satellile the sound Only Radio channel el Ihe selected the lirst eighl are displayed Press @ENTER channel.
_'ql;tl#t.."t_*_iggltlilFll;h'7_l.qI_,lll_lJllml Before perfornllrl_ @SIRIUS Ihe I:oJIowirl_ opel'a[iOllS, press • The h'onl panel display clmr _cters al once. Saleliile Radio can indicale up Io 14 alphanumeric You can se_ whefl_er Io displa 3 the SIRIUS iniomlafion in the Iront panel conIil_UOtl>, m inl]er Or by 14 aJph mumeric using the 'FL SCROLL" page 7()1 • IJ ti_e SIRIUS You can display (such as channel name, composer selected channel the SIRIUS Satellite Radio int_.
Once you have stationed your iPod in a Yamaha iPod universal dock (such as YDS=I0, sold separately) connected to the DOCK terminal of this unit (see page 19), you can enjoy playback of your iPod using the supplied remote controh You can also use the Compressed Music Enhancer mode oi tills unit to improve the sound quality of the compression mtifacts (such as the MP3 formal} stored on your iPod (see page 19).
• Controlling mode iPod in the menu Shuffle browse You can ped_)rm the advanced operations of your iPod using the supplied remote control when you connect this unit and a monitor using the VIDEO connection. You can browse the songs stored on your iPod in the OSD. Furlher_ you can dlange o1"adjust settings tbr your iPod to suit your personal preferences.
You clm connect a Yamaha enjoy the music contents Bluetooth this unit and the Bluetooth Bluetooth component adapter (such as YBA-10, stored in your Bluetooth component.
Recording adjustmenls instructions lot those • When Ihis unil is set to the standby • TONE CONTROL not aflkzcl _corded • The source • The SIRIUS • I)igital source • A given • Once Radio component audio • Check lilws Do I test signals is nol oulput slgnals recording fl'om tbe recording laws beli_re cannot bet_een speaker components.
You can use the following parameters in "SET MENU" to adjust a variety of system settings and cuskm]ize the way this unit operates. Change the initial settings (indicated in bold under each paran]eter) to reflect the needs of your listening environmenl. • Auto setup i:iij[L-i SETUP Use this t_alure to automatically adjust speaker and system parameters {see page 24). • Manual setup M..qHUi?LSETLiP Use this feature to manually adjust speaker and system parameters. Sound menu ;;.
Option menu ]_ L-IF'TiL-IHHEHU ,-,. r'. r ,"r-,_ ,",;, :'r"'r" i-i : L=£ Z=i-L.i-_Y Z=i2i Adiusls fl3e bl'ighlness ol fl3e fi'ont panel displa_ illl iHl)alioiI i_ ilispla} cd. i!:) HEH0i? '_ (!iUi:ii?.[) LockssoundfieldDogiamparamulersaiidolher"SlTMENLt"seUiiigs '.:-;[!Z.i!%:T C)iYiU[:@3 [:_) F'i)i?.i)H= r-.r-,= :.r--r. Pail file connected Yamaha Blueloolh BltKIOOfll CompOIl_ Ill (S_e plge 59) F )_:==[=iiZ_H[)_ () Displays '_:iE T (!i) !!;i [?.
_/J Use this menu to manually compensate LCD acljust any speaker lk_r video signal processing monitors setlings or delays when using _laL5 Woot)r section of a speaker is 16 cm (6.5 in) or larger: large Woot)r section of a speaker is smaller than 16 cm (6.5 in): small or projectors.
Surround left/right speakers Choices: NONE, SML LRG Crossover L-;UR° L.."R 5;P Use this t)ature to select tile crossoxer l?equency of all tile speakers set to "SML" (or "SMALL") in "SPEAKER SET" (see page 63). All frequencies below the selected frequency will be sent to the subwoot)r or fi'ont speakers depending on the setting of "LFE/BASS OUT" in "SPEAKER SET" (see page 63). Choices: 40Hz, 60Hz, 80Hz, 90Hz. 100Hz, 110Hz, 120Hz, 160Hz.
_/J • Speaker Use this feature level EOSF:' LL:?..iEi to manually adjust Speaker • the output level of each speaker. range: -10 Control step: 1 dB Initial setting: to +10 dB Ideally, each speaker must be applied B>SPLEUEL should position. most home situations. SOUND r_EHU [ _2 SOUND HEHU B>SP LEUEL - ......... ÷SUR_L_I 5UR.
• Center speaker equalizer [:)CEHTC:Rriu:! to acliusttile builtqn 5-fi'equency band Use this t_ature (1 (lOHz, 300Hz, equalizer I kHz. 3kHz and IOkHz) graphic [i)r the center channel the center speaker matches can make adjustments selected so that the tonal Dynamic quality of You range headphones. decoding This setting Dolby Digital I SOUND HENU [_ ] "[_] ! Up "[)o14n [41 '[i_1! AdSust OdB OdB OdB _dB OdB Speaker '_-; P Ei::.:'{( ER Adjusts lhe speaker compression.
_/J Maximum volume !_;_;:-:;UOLo • Use this t_ature to set the muxinmm feature volume level. This is usefld to avoid the unexpected the volume nmge becomes H)H[:,H.."_5_;7 Use this feature to select the component to play back HDMI audio signals. loud sound by mistake. For example, the original volume to -80 dB. However. when "MAX VOL." HDMI set range is +16 dB is set to -5 dB, -5 dB 1o -80 dB.
For HDMI Use this menu to reassign decoder mode or rename the input jacks, select jacks 1 and 2 the the input source.
_/J 4 Repeat steps 1 through 3 to rename each input source. 5 Press @ENTER RENAME". • Volume trim toexit from "INPUT C)IjOLLJHE !-Ri_ Use this fealure to a_ust the output v_ume of each source. This is useful if you want to balance the level of ead_ input source to avoid sudden changes in volmne when switching between input sources. Choices: CD, MD/CD-R, TUNER_ DVD, DTV/CBL V-AUX, DVR, DOCK, MULTI CH. XM, SIR[US Control range: -6.0 to +6.0 dB Control step: 1.0 dB Initial setting: 0.
Source feature OSD display time O::5[)-2;OURI2:...E: Use this menu lo adjust llle optional -NAHUAL SETUP 30PTIOH • system paramelers. -NAHUAL SETUP HEHLI i 2 3 OPT!OH HEHLI ÷ R>b!SF'LA',_ SET B>HEHOR_? GLI_qRb C)RU[!I 0 SELECT [:'>PRR_qM,!H! E>BLUETOOTHSET ÷ F>}]H R;qb!O SET _z _IRIU_ _ _ >ET _ [ ENTER]_Enter ¸ [ ENTER]_Enter ¸ Display settings 3 OPTION 2,2 i:i:_[::,.."_-!!;F'[...."-:i'-,' SET HENU F4)D[ SPLR _' SET ÷ D!HMER ......... @ FL SCROLL- - - EOHT OSD SHIFT ......
• Audio select Use this featnre select setting C;,_tC-i0 to designate Bluetooth setting E )BLUErOOTH SET SEL.ECT the default tbr the input sources audio input jack when you turn on the 3 OPT!ONMENU power of this unit. Choices: AUTO, LAST E>BLUETOOTH SET STRRT PRIRING 3 OPTION MENU C>#JDI0 >AUTO SELECT [ ENTER ] ! Enter UqST Use this feature Bluetooth [4]=[hi:Select t() start pairing adapter your Bluelooth component.
XM Radio setting F>_.::H i_:_L_'u_:_:i (U.S.A. and Canada models only) 3 OPTION F)XH HENU R£[:'_O SET :@1RNTENNR,-,95_ [ENTER_Retu_'r_ XM Radio antenna :-::Hi:iNFEHN_ Use this feature to check the cun_nt reception level of the XM Satellite Radio signals. For the best reception, orient XM Mini-Tuner so that a value of 60% or more is displayed here. Display status: NONE, 0 to 100% 'NONE" is displayed iiXM tllis unit.
[11addition to controlling and other malmfacmrers. for each input source this unil, the relnote To control control can also operate your TV or other components, components made by Yamaha remote control code (see page 75). • Controlling this unit Press @AMP to control this unit. AMP -- other audiovisual you must set up the appropriate • Controlling a TV Press@DTV/CBL to control yourTV. To control your TV,you must set the appropriate remote control code fi}r DTV/CBL (see page 75).
• Controlling other components Press one of the input selector buttons (@) or A to C buttons to control other coml×ments. You must set the appropriate remote control code l_)reach input source in advance (see page 75). The ff_llowing table shows tile function of each conlrol button used to control other [2_ H71 _ .... components assigned to each input selector button. Be advised that some buttolls may not correctly operate the [4F [5> 000_ selected component.
You can control other components by setting While pressing and holding one of the input selector buttons (@) on the remote control to the select the input area you want to set up, press @AV POWER for more than 3 seconds. appropriate ]'emote control codes. For a complete list of available remote control codes, ret)r to "List of remote conlrol codes" at the end of this manual. [_ Remote control code default settings xM _lRlUS ©© MD/C_.
This unil has additiona] menus that are displayed in the front panel display. The advanced setup nlenu offers additional operations to adjust and customize the way this unit operates. Change the initial settings (indicated in bold under each parameter) to reflect the needs of your listening environment. • Speaker impedance !!;P i_F:'= (U.S.A. and Canada models only) Use this feature to set lhe speaker impedance of this unit so that it matches that of your speakers.
• Tuner frequency step TLi (Asia and General models only) Use this t_atureto set the tuner l_equency step according to the frequencyspacing in your area. Choices: AM 10/FM100, AMg/FMS0 Select "AM 1(!/FM1(!0" for North, Cen{raland South America. Select "AM9/FM50" lk)rall other areas. • Initializing iHiT= Use this t_a{llre to reset all the lmrameters of this unit to the initial lactory settings (see page 87). Choices: OANOEL RESET Select "CANCEL" unit.
Rellzr to the table below when this unit does 11o1fimction properly. If the problem you are experiencing is not listed below or if the instruction below does not help, turn off this unit, disconnect the power cable, and contact the nearest authorized Yamaha dealer or service center. • General This unit fails to turn on or enters the standby mode soon after the power is turned on.
rligri,'TFJtqigil';l_la The sound goes off.
Dolby Digital or DTS sources cannot be Tile cOllllCC Icd COlllpollen played. (Dolby Digital or DTS indicator in signals the front panel display does not light Audio inpu[ j_ck sdecl - kNALOG" oulpul Dolby Digital [ is IlO[ _e[ [o oi DTS digilal is sel Io Make all approprial_ iiisil ucliol_s setting Ik>llox_ ing Ihe Ol',el ati ng i'tl£ youi ¸ compol]_ill ScI Audio mpu[ i_ck sdecl Io "AU-IO" _4 up.) A humming heard, sound is In_onect able _onneclion_.
ri_ri,'IFJ_iTi'/;jm • Tuner FM stereo noisy.
I'lri'i'_ ;'i_iTilTJ • i t mi XM Satellite Radio If an operation takes longer than usual or an error occurs, one of the following messages may appear in the front panel display. In this case, read the cause and R)llow lhe correslxmding remedies. {..i{-{>._.._}:_. ?:_q i U['i[:.}_'.
!!;U[!; [.*-P[?i:_TE[? _Ihe subscriplk/ll .."Hi..i:q L [[[3 The HOt. 1"he opel _.._ _. ].._:2:_][ e selecled Ilion hll_umation channel )ou is cuJlenfl) nlad_ is updated.
IIff'_rl_t=J'_lillll'Jtllt E-4 ; HOi'!!;'r' Tunl off noisy condilio[lels optimizer _ leclric Ol ¸ i]lo,ve equipmenl [ht3m away like []om air [he micl opholle _[--_, ="H{) _ _ _._: The optimizer miclophone was unplugged during [he "AUTO SETUP" procedule Connect Ihe supplied oplimizei micJophone to OPTIMIZER MIC ¸jack _ll the front panel 24 c---' The optm_izer Check the microphone 24 ; i'[0 '-:ii t_'_{_24{..
rZi/_,'It:'J_igigiJ_la ReadBisl the sl>eak_'r installalion so Ihat all speakers al_ sel in Iocalions with similar ColldiliOllS Check (he speaker conncclions Use _peakcrs • II the "ERROR" • If a warning ol "WARN[NG" message • If all el'rOl" illeSsa_e • screens "'W_ 1", %V-2".
\ The Bluel/!_qh _lclapler and file Bluel//ofl_ c//nlpi_nenlisinthenliddleoieg_ll)li_hing _]]_ cOIIlleC[j_HL L_IOFF:"I i_=_.i_u2i The I)aring i', compleled _...:_'"_-"_,....-:.'-" Li.-:.=._'-'"j The I)_l'i=lg i_ c_nceled _!;_- (i.C_-ii.'i_G_._?_:._ The conIleclion \ \ \ belween file Y_lmaha Bluet/_/!lh _ld_lp[_r (s_Icll _s YBA ](I, _old sep_lralely) and file Bluel/!oth c//nlPonen[ i_ e_,[_lblished [_ :._ G OFii-i:_=C._.
TQ, Si'llill_ Ll>,ill_ g\k_ll • i_ [h_ ]ell]ole Coll_lOl c_)ll'cclly Set. there (ILl 110{ i espol]d _o al'c [he Some i'elllOIC codc alIOI]lCI" "Lisl Ill code lenl_lle [OJ IhC c//ll{rol Same codes" 75 I]]alILI[_ICILIICI al {he end _11_ {his is l]lt)_lcIs thai COnll'OI Resetting the system Use lhis feature to reset all the parameters ot this unit to the 1 initial factory settings.
• CINEMA DSP Since the Dolby originally • Surround designed and DTS systems for use in movie were theaters, their effect is best felt in a theater ha_ing many speakers designed acoustic ett_ct_. Since home conditions, sudl as room size, wall materiah differ so widely, the sound of speakers, it is inevitable CINEMA tield technology to combine experience of a movie own hon/e.
• HDMI • HDMI (Higll-Definifion Mukimedia Interface) is the first induslry-supported, uncompressed, all-digital audio/video interface. Providing an interface between any source (such as a set-top box or AV receiver) and an audio/video monitor/such as a digital television), HDMI supports standard, enhanced or high-definilion video as well as mulfi-channel digital audio using a single cable.
AUDIO SECTION • Signal I,evcl Composilc Component * Minimum RMS Output Powel lk)= hont, CenwJ, Smround [USA anti Canada modelsl I kHz, 0 9_ THD, 8 f-_ ................................................... IOIher models I I kHz, 0 90 THI), 6 _ ................................................... • Maximum Powel for FronL Cenlcr. St.round (JEITA) I kHz, 10%THD. 0 f! ....................................................... * Dynamic IUSA ([HK [Olher (IHF, * Fivquency (D. ell Response Io Fionl IdR ]HD .......
• Symbols XM tunhlg SOlll_d poelltl .......... 65 • C)VOLUME TRIM, IJlpuI menu CALL SIRIUS. SIRIUS Satellite ......... 69 Radio D)CENTER C)SP - - -. slaltlS message ............... 82 DISTANCE, slalus • Numerics I SOUND Canceled, MENU. 2 INPUT message Manual MENU, setup Muntml ........ 61 setup .......... 61 CAT .................................. Troubleshoo_i SEARCH, Category ng .................. 86 XM tuning .................
l_ ENHANCER indicator ....................... 22 Exchange. Preset station. FM/AM tuning ................................. 45 External decoder conneclion ................ 18 • J • Jazz, Sound field program ....................38 • L LFE/BASS OUT. Speaker setlings ... 64 LFE/Bass ore. Speaker seldngs ............ 64 LOADING. F F)DYNAMIC RANGE. Som]d menu ..................................... • 66 F)XM RADIO SET .............................. 72 FYWUPDATING, SIRIUS Satellite Radio status message .
'i[q-?,ll • S SCENE ................................................... 7 SCENE template selection ................... 28 Searching .... Bluelooth status message ................. 86 Selection, Audio input jacks ................ 34 Selection, MULTI CH INPUT componen( Selection, Preset station. . 34 FM/AM liming ................................. 45 Selection, SCENE template ................. 28 SET MENU .......................................... 61 Setting rein/ire control codes ................
• Front panel
• Remote control ® ii
List of remote control codes MBO 2078 Blu-ray player Medkm 2072 Samsung Mi 2072 Yokd 2078 2073 Zeni01 2038, 2137 Micromedi CD player Yanl lha romaxx 5000, 5013 _ _Sunaha 2000, 2(X) l, 2003, Microsoft 2030, 2101 Mind Mierosta_ 2072 MJ{snbish] 2035 DVD Recorder MJTuda 2075 Apex 2024 CD Recorder Muslek 2(178 JVC 2070 Yamaha Naiko 2077 LG 2071 Onkyo O Jall 2073, 2075 Panasonic 2020, P&B 2075 Pacilic 2074 Panasonic 2030.
Akai Akiba Akura Alaron Alba ALBIRAL AllstaJ Amplitision Amsiiad Amu'on Anam Anam Nltional Anglo Anilecl_ Ansonic AOC Apex Air enCiel Arcam Arcanl Deltt Arislona ASA AsbeT_ Astra Asuka A0antic Atod Audio_mic 0059, 0065.0127. 0129.0130,0200, 0204. 0208, 0209, 0213,0217,0218, 0255 0209, 0218 0206, 0209. 0218 0200 0200. 0207, 0208, 0209, 0217, 0218 0212 0213 0207 0204, 0206, 0208, 0209, 0218 0062 (1208 0062 0208 0206, 0208 0203, 0208 0060, 0B61 0118, 0122.
Lenco 0208 Lenoir 0207. NEC Lesl 0214 Leyco 0206, 0213, 0217 LG 0016, 0038, 0039, 0127, 0128, 0158, 0163, 0166, 0188, 0200, 0208 Neckeml 0205,0207,0210, (1()20, 0021, 0022. 0(_,9, 0060, 0064. 0217, 0250 0127, 0128, 0200, Planu'on 0206, 0213 0203, 0207, 0215 Pohlloid 0075 SBR 0209, 0213. Nesco 0214 NET-TV 0082,0101 Poppy Portland 02(18 (X)60. 0061 SCHAUB 0164. 0189. New Tcch 0208,0213 PrandonPPrince 0204.
Tandy 0127,0207.0200. weltblick 0213.0217 Alba 0211. 0218 Weslon 0215 American Tashik{> 0200, 0207. Tamng 0127,02-{)4,0207, 0210 0237 White Weslinghouse Yamall 1 High H}44. 1050 GoldHand 1050 1(1{)4 Goldst 1000. 1(142 0200,0207,0217 Anitec!l 1050 00{g1, 0001,0002-, ASA 1045, 1046 0t_)3.00(14, Asha 100_. 1014 Asuka I(142. 1045. 0217, TCM 0206, 0208 Teac 0127 Tec 0207,0208.0214.
Memorex 1001, 1002, 1003, Pathe 1004, 1005, 1008, Penney Mai_oni 1043 1010, ]014 Samsung 1013, 1(114. 1042. Pentax 1010, 1049 1045, 1047 Pe_lio 1042 Memphis 1(_0 Phiico 1004, 105] Metz 1048 Philips 1004, 1025, I033, MGA ]014 1046. 1056, 1(_7, 1059.
OYAMAHA The circled ges hombres • numbers RX-V463 and alphabets correspond el lettJes dans un cercle Front panel/Face ® to those con'espondenl Manual. avant ® ® in tile Owner's h ceux du mode d'emploi.
• Remote control/Boitier de t_lecommande ® @ YAMAHA CORPORATION Pdntedin China c WN26190