
User manual

Skybox Installation & User Manual
24
7.4.1 Procedure for Connecting
Skybox to Switched/Accessory
Power
WARNING:
The following procedure MUST
be completed ONLY
with a Digital Multi-Meter (DMM). Failure
to do so could result in serious injury, dam-
age or death due to airbag deployment.
1. Make sure that the vehicle is turned off.
2. Remove power plug from the receiver.
3. Carefully remove the lower covering of
the steering column. Be careful, removal
may involve a metal protection plate that
may be sharp.
4. Locate the main wiring harness. In most
cases it will contain 16g to 14g wires; this
will be the ‘main harness.’ Note! Some
vehicles (like the Ford Escape) may have
a thinner gauged main harness. The major-
ity of vehicles will have the heavier gauge
setup.
5. Turn the meter on. Find a suitable ground
(Recommend in the kick panel - usually
indicated by a bolt going through the metal
with wires secured by it, behind the kick
panel covering.) and insert the black probe
there. Set the dial on the DMM to ‘20v’ on
the DC side. Applying the red probe to this
point should result in a reading of ’0.00’.
This is your ground; connect the black
wire from the power plug to this point.
NOTE
RG-6 provides good picture
quality, but is the least desirable
for connection. For DVD or VCR connec-
tion, please refer to your satellite provider’s
User Guide.
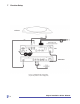
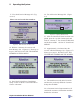
7.3.3 RF Coaxial Connection
1. Connect one end of an RG6 RF
cable to the RF Output of the
satellite receiver.
2. Connect the other end of the
RF cable to the RF or VHF/UHF
Input of the vehicle’s entertainment
system.
WARNING
Only a trained and experienced
technician in automotive electrical
systems familiar with the type of vehicle
should attempt power cable connection.
7.4 Power Cable Connection
Once all of the system cables have been
connected, the following steps will inform
you of power connectivity.