
User manual

Skybox Installation & User Manual
19
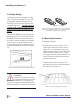
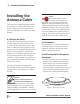
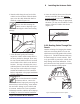
Figure 6-4 Routing cable between two panels.
6 Installing the Antenna Cable
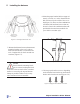
Figure 6-2 Open hatch routing method.
3. Close the hatch gently and carefully
inspect the cable to make certain that it is
not bent, pinched or damaged. There may
be extra coaxial cable left once it has been
routed inside of the vehicle to the desired
location. You may coil and tie the excess
cable and place it near the IDU and receiver.
You may also cut the cable to the length
needed and install a new TNC connector.
Refer to Appendix A for proper installation
of TNC connectors.
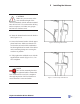
4. Once the cable has been routed from the
antenna to the IDU, the cable must be
properly secured to the roof rack crossbars
with the supplied tie-wraps. In appropriate
situations, you may use self-adhesive cable
straps to secure the cable to the vehicle
(Figure 6-3).
2. Run the cable along the roof rack of the
vehicle, back to the hatch. With the hatch
open, route the cable behind the hatch to
inside the vehicle (Figure 6-2 ).
NOTE:
Only a trained automotive installer
should run cable or remove the
vehicle’s headliner. Improperly removing this
material may result in tearing, water inltra-
tion and other damage to your vehicle and
its contents. Audiovox® is not responsible
for damage caused to vehicles due to improp-
er drilling or removal of interior headliners.
Figure 6-3 Tie wrap cable to roof rack.
6.2.2 Routing Cables Through Two
Panels
Another technique for bringing the antenna
cable into an existing POE is to route the
cable between two body panels of the vehicle
(Figure 6-4). The RG58 antenna cable may
be small enough for certain vehicles. Take
every precaution to protect the vehicle from
body damage and water inltration. If the
space between two body panels is too small,
look for an alternate routing option.
NOTE:
Prior to the cable entering the
vehicle, create a drip loop to pre-
vent water entering the vehicle and causing
damage.