
User manual

Skybox Installation & User Manual
15
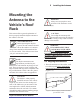
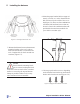
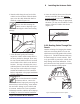
Figure 5-5 A 1-inch gap allows mounting space for antenna between the
crossbars and roof rack.
3. Perform a thorough inspection to make sure
the roof rack is not damaged and can support
the 55 lb. weight of the antenna.
4. Check to see if sun/moon roof or other
vent system will work properly without
interfering with the antenna or mounting
brackets.
5. If the distance between the base of the an-
tenna and the vehicle’s roof is greater than
1 inch (Figure 5-5), use the supplied Allen
wrench to remove the 2 head screws that
secure each mounting bracket. Replace the
1 inch spacer with a 1/2 inch spacer. If the
antenna-to-roof distance is already 1 inch,
continue to the next step.
CAUTION
Failing to leave at least a 1 inch
space between the Skybox anten-
na and the vehicle’s roof may result in dam-
age to the roof and to the antenna due to the
bouncing or movement of the antenna while
the vehicle is in motion.
5 Installing the Antenna
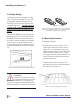
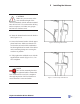
6. Orient the antenna so that the antenna’s
cable connection is located toward the rear
of the vehicle (Figure 5-6). If the distance
between the antenna’s base and the vehicle’s
roof is less than 1 inch, even with the largest
spacer used, attach a large section of rubber
or foam to the bottom of the antenna to
protect the vehicle’s roof.
Figure 5-6 Position TNC connector toward rear of vehicle.
NOTE
Use a towel or moving cloth to
protect the roof of the vehicle
while installing the antenna.