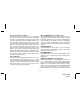
Shuttle User Guide SIR-PNP3 s.seek 001 p.tune C hannel N am e A rtist S ong C ategory 12:00P A -1 JUMP 128-7193A 1 of 32 Released: 8-6-04 Revision A: 8-10-04 Removed maximum FM frequency reference; default display mode PDT to 2 lines and font type to A.
Congratulations You are one step closer to experiencing the latest innovation in Sirius Satellite Radio. Sirius will revolutionize your in-home or vehicle entertainment with: • Over 120 channels of original programming, including – 65 channels of 100% commercial-free music – guaranteed, Over 50 channels of world-class sports, news, talk and information.
Contents Edit Code .......................................................... 21 Audio Level Options ......................................... 21 Antenna Aiming (Home Installation) ................ 21 Memory Options ............................................... 22 Time Based Features ...................................... 22 Clock ................................................................. 22 Format ........................................................... 22 Time Zone ............................
Cautions and Warnings 1. Do not install the Shuttle in a position that hinders your view through the windshield, or obstructs viewing of the dashboard indicators and displays. 2. Do not install the unit where it may obstruct the operation or deployment of safety devices, such as airbags, etc. 3. Do not allow operation of the unit to detract from safe driving practices; remember that you are responsible as the vehicle operator to adhere to all safe driving and traffic regulations. 4.
NOTE: The SIRIUS® signal can be received and processed virtually anywhere as long as there are no obvious satellite signal obstructions such as nearby buildings, high terrain, parking garages or tunnels. The Shuttle is typically installed in an accessible location of the vehicle (dash area), consistent with line-of-sight operation of the remote control, and/or within easy reach of the driver. For home use, situate the Shuttle close to your stereo receiving equipment.
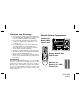
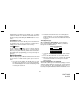
(b) Call Sirius at 1-888-539-SIRIUS (7474). One of our friendly Customer Care representatives will takethe necessary information and walk you through the activation process. MEMORY (s-seek) BUTTON BAND (p.tune) BUTTON POWER BUTTON Sirius® Shuttle Controls The Audiovox Sirius® Shuttle Unit provides eight control buttons, an Encoder knob and 10 number keys. Power Button: This button applies power to and removes power from the Sirius® Shuttle as follows: 1.
Encoder Knob and Select Button: The Encoder knob is the primary control for navigating through the various lists and option menus available on the unit. In the default mode, the Encoder knob provides sequential tuning through the available program channels. Clockwise (CW) rotation tunes up one channelper-detent, while Counterclockwise (CCW) rotation tunes down one channel-per-detent.
and band preset number on the display. Pre- set tuning continues until the user decides to terminate this function by pressing and holding the BAND Button for 2 seconds. Keypad Buttons 0-9: These buttons are used to directly enter a desired channel number. They are also used when entering and recalling preset channel numbers into memory.
is displayed on the LCD, pressing and holding the DISP Button will display all the available channel numbers and channel names. The second press of the DISP button will display all currently available artists. The third press of the DISP button will display song titles. While in the Category List menu, pressing the DISP button changes Channel List to Artist List. The available content listing now displays information by the Artist Name.
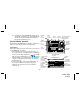
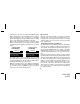
001 A -1 A -2 A -3 A -4 A -5 C hann el N am e A rtist P reset T une M o de S ong C atego ry 12:00P A - 1 001 C hannel N am e A rtist S ong C ategory 12:00P A -1 Press and Hold Preset Button Press and Hold Preset Button 001 C hannel N am e A rtist S ong C ategory 12:00P A -1 Preset List Mode To search by list for a preset, press and hold the BAND button to enter Preset Tune mode.
the DISP button will display program information by Artist Name, Song Title or channel name. Pressing and holding the DISP button will exit the Channel List mode and return to the previously selected tuning/display mode.
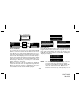
M em ory R ecall D elete S -S eek Delete S -S eek Yes No ON O FF Turning the Encoder knob highlights the options and pushing the knob selects the option. The delete option allows the user to delete the currently featured artist/ song title selection from S-Seek memory. The default setting is NO. If the YES option is chosen, the currently featured Artist/ Song Title is deleted from S-Seek memory. The SSeek option allows the user to turn the S-Seek function on or off. The default setting is S-Seek on.
No stored match alert is provided for the currently selected channel. To ensure that no duplicate entries are stored in memory, the receiver will check the stored input data to ensure the information about to be stored is not already in memory. a. If one or more matches are found, a display list appears, and allows you to scroll through the list of songs using the Encoder knob.
Menu Display Operations To enter the Menu Options page, press the MENU Button. The Menu Options list will appear on the LCD display. Using the Encoder knob, highlight the option you wish to adjust and then press the Encoder knob.
Traffic Option When the Traffic option is highlighted on the “Choose Jump Setting” screen, the 3-letter abbreviation of the currently selected city is also shown; however, if no city has been selected, NONE appears. To select a desired city, press the Encoder knob when the Traffic option is highlighted, and the “Choose Traffic Market” screen appears with a listing of abbreviated city names in alphabetical order.
Options. Then follow the previous steps describing city selection. display appears for 2 seconds, as shown previously, providing directions to set the JumpSet channel, before returning to the “Choose Jump Setting” screen. 2 sec. Once the Jump button is set to function as JumpSet, the Traffic line displays “NONE” to signify that the button can no longer be set to traffic alert.
If a city ID has been set, the receiver will immediately start scanning all channels for a matching City ID. While searching for the city ID, a pop-up appears for 2 seconds, with “XXX Pending”, where XXX is the 3-letter abbreviation of the city name, specifying that the receiver is indeed search ing and waiting for the desired traffic/weather report. The band indicator (preset bank) on the dis play changes to the Jump button icon to signify that the receiver is in searching mode.
of the Jump button saves the current channel as the JumpSet channel. When a channel is saved as a JumpSet, the band indicator will change to to indicate that the current channel is associated with the Jump button. tuned to after a power cycle, there will be an audible beep and the receiver remains tuned to the current channel. Replace The traffic city ID can only be replaced by changing it in the Menu Option - Jump Setting - Choose Traffic Market.
Dimming control offers two choices; Manual and Automatic. In both cases, a 10-segment horizontal bar graph is displayed with a “-” sign to the left, and a “+” sign to the right. The current setting is indicated on the bar graph by a reverse image segment. The Font Type allows the user to select the appearance of text on the Shuttle display.
Add or Skip Upon entering this mode, a channel list is displayed with the current channel in play highlighted. Rotate the Encoder knob to navigate the list and highlight the channel to be adjusted. Once a channel has been highlighted, pressing the Select Button displays the text “Skip” next to the channel, and prevents the channel from being accessible during any of the tuning modes.
1. Press the MENU button to access the User Menu. 2. Rotate the Encoder knob to select the “Lock Options”. 3. Press the Encoder knob. 4. Rotate the Encoder knob to highlight “Edit Code”. 5. Press the Encoder knob. 6. Enter the default code “0000”. 7. The “New Code” prompt will appear. Enter your newfour digit code using the 0-9 number buttons. You will then be prompted to confirm the new code by entering your code again. 8. The lock code is now changed.
Memory Options In this mode, the user can turn the Memory Search Function (S-Seek) ON or OFF. In addition, all 24 Memory Locations can be cleared. On the display, the top line displays the text,M e m o r y Options. The following adjustment options are possible: 1. Automatic Memory Search function - On or Off. Use the Encoder knob to select between the 2 options by highlighting the desired selection. Then press the Encoder knob to enter the option. 2. Clear all Memory Locations.
Time Zone: The Time Zone option provides: (GMT-9:00) Alaska (GMT-8:00) Pacific (GMT-7:00) Mountain (GMT-6:00) Central (GMT-5:00) Eastern (GMT-4:00) Atlantic (GMT-3:30) Newfoundland (Abbreviated as GMT-3:30 Newfndlnd) Use the Encoder knob to highlight the desired time zone and press the Select Button. Daylight Savings Time (DST) Observance: Activate this function if your area is subject to DST; rotate the Encoder knob to toggle between DST Observed (default) or DST Not Observed.
Alarm Time When this menu option is highlighted and selected the current alarm setting is displayed. The factory default is 12:00PM. By pressing the category buttons the hours can be increased or decreasedin one hour increments. AM or PM will switch automatically when the AM or PM threshold has been exceeded. By rotating the Encoder knob the minutes can be increased or decreasedin one minute increments.
increase (CW) or decrease (CCW) to se lect the desired day from the default value (Monday). NOTE: This function is especially useful when the shuttle is being powered by battery (Car etc.). Channel: Rotate the Encoder knob to scroll through a listing of all the Sirius streams in a circular motion. The listing should encompass all 5 available lines. When the desired channel is highlighted,press the Encoder knob.
Sleep Off is the factory default setting. Rotate the Encoder knob to toggle through the desired sleep times. When the desired time is highlighted, press the Encoder knob. The unit will now turn off after the selected time has expired Factory Default The Factory Default screen displays the text Restore Default Settings with the following adjustments: Yes/No Upon entering this mode, rotating the Encoder knob toggles between the “Yes” or “No” function/display selection.
to the preceding sections in this manual. For optimal operation of the remote control, always aim it toward the Remote Sensor on the front panel of the main unit. Remote Control Unit 1 14 2 13 12 3 11 4 10 5 9 6 7 8 1. MUTE- Allows the user to silence the audio signal. 2. BAND- Used to switch between the 3 preset bands (A, B, C) and to activate preset tuning. 3. Jump- Favorite memory preset for tuning to traffic/weather information in selected city of interest (or channel). 4.
Troubleshooting Specifications PROB AB L E C AU SE REMEDY Shuttle does not turn on Blown fuse, power cable not properly connected Check fuse check power cable Check antenna display message Satellite antenna not connected Check satellite connection to Shuttle Antenna or cable is faulty Contact system installer or vendor FM modulator frequency contains static switch to another FM frequency Vehicle antenna not connected to radio Check vehicle antenna cable.
City Names APPENDIX A Atlanta Baltimore Boston Chicago Washington DC Detroit Dallas/Ft. Worth Houston Los Angeles Miami New York City Orlando Philadelphia Phoenix San Diego Seattle San Francisco St. Louis Tampa/St. Petersburg Appendix City Names & 3-letter Abbreviations NOTE: For city abbreviations that only contain two letters, a space is added before broadcasting to maintain consistency. These cities are highlighted with an asterisk.
THIS PAGE LEFT BLANK INTENTIONALLY -30- 128-7193A 30 of 32
12 MONTH LIMITED WARRANTY AUDIOVOX CORPORATION (the Company) warrants to the original retail purchaser of this product that should this product or any part thereof, under normal use and conditions, be proven defective in material or workmanship within 12 months from the date of original purchase, such defect(s) will be repaired or replaced with new or reconditioned product (at the Company's option) without charge for parts and repair labor.
© 2004 Audiovox Electronics Corporation 128-7193A -32- 128-7193A 32 of 32