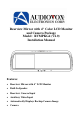
Rearview Mirror with 4" Color LCD Monitor and Camera Package Model: RVMPKG4 (V2.
Warnings The product is intended to assist in safe driving and to allow the driver to have a broader rearview while in reverse. You as the driver, are solely responsible for the safe operation of your vehicle and the safety of your passengers according to the country and their local traffic regulations. Do not use any features of this system to the extent it distracts you from safe driving. Your first priority while driving should always be the safe operation of your vehicle. Audiovox Electronics Corp.
TABLE OF CONTENTS Warnings 1 Product description 3 Packing list 3 Installation Instructions 4 1. Signal Input 5 2. Control and Indicator 6 3.
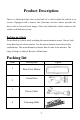
Product Description There is a blind spot that exists at the back of a vehicle while the vehicle is in reverse. Equipped with a camera, this electronic rearview mirror provides the driver with a clear and wide image of the area behind the vehicle whenever the vehicle is shifted into reverse. Backing up vehicle Do not back up vehicle while watching the mirror/monitor screen. Always look in the direction of vehicle motion. Use the mirror/monitor as an aid in safety confirmation.
6 Rear View CMOS1 Camera Parts list included with camera installation manual Camera Cable 1. Installation Instructions (1) Mount the mirror/monitor a). Take the two belts and slide them into the slots on the top rear of the mirror with the grooved side of the belt facing down. Figure 1 b). Take the buckles and slide them into the lower slots on the rear of the mirror with the buckle facing down toward the strap.
d). Trim off excess length of the straps. e). Place (hide) the monitor cable behind the windshield trim piece down under the dash area. (2) Wiring the Monitor a) RED FUSED WIRE: 12VDC ACCESSORY SOURCE Connect this wire to a source that has 12 volts when the Ignition key switch is turned on, and 0 volts when the Ignition key switch is turned off. b) BLACK WIRE: CHASSIS GROUND Connect this wire to a solid, metal part of the vehicle’s chassis.
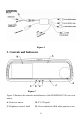
Figure 4 3. Controls and Indicators Figure 5 Figure 5 illustrates the controls and indicators of the RVMPKG4(V2.
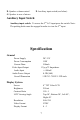
E: Speaker volume control F: Auxiliary input switch (see below) G: Speaker in rear of mirror Auxiliary Input Switch: Auxiliary input switch: To access the 2nd A/V input press the switch. Note: The parking brake must be engaged in order to view the 2nd input. Specification General Power Supply Power Consumption Current Draw Video Input/Output Audio Input Audio Power Output Overall Dimension DC 12V 10W 500mA 1Vp-p/75 Impedance <=500mV 0.5W(16Ω) 11W X 3.75H X 1.
Maintenance Though your Rearview mirror requires little care, you can still maintain its condition and performance following the procedures below. • Keep your system away from excessive moisture, extreme heat or cold and magnetic fields. • Keep liquids away from the display mirror. • To avoid damage, do not place auxiliary devices or other objects on the top of the mirror. • Occasionally clean the surface of the mirror with soft cloth moistened with water or window cleaner.
Troubleshooting Symptoms Solutions The ON/OFF signal light is not on after the car is started? 1. Check the installation-wiring diagram. 2. Ensure that the parallel red and black line from the control box is connected properly. No video signal appears while reversing the car? 1. Check the LCD Contrast (Brightness) control knob whether the contrast knob is set too low 2. Check the rearview Camera lens. 3. Check the rearview Camera wiring and connection. 4.
Illustration of Connections Refer to CMOS1 camera installation manual Parts list included with camera 10
© 2007 Audiovox Electronics Corp., 150 Marcus Blvd., Hauppauge, N.Y.