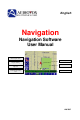
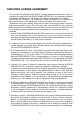
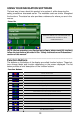
English Navigation Navigation Software User Manual GPS reception status Vehicle symbol Compass heading Park Map scale * Hide Function buttons Icon Current location 128-7837
Explanation of symbols The following symbols are used in this user manual: ! This symbol denotes safety and warning notes. They contain important information about the safe use of your device. Failure to observe this information may result in damage or injury. There-fore, please observe this information with particular care. Denotes an action to be taken there, you receive useful tips and information about the use of thesystem.
PREFACE Navigation software provides turn-by-turn route guidance while traveling to your destination. Before operating, take a few minutes to review the safety and operating instructions in this manual so you can quickly and safely become familiar with your Navigation software’s many features.
SAFETY INFORMATION AND PRECAUTIONS WARNING! Please read and follow the following safety precautions. Failure to follow the instructions below may increase your risk of collision and personal injury. The Please Drive Safely screen is displayed each time the Navigation software is turned ON as a reminder to make use of the system’s navigational aids in a safe manner. Before using the Navigation software, read this entire manual.
END-USER LICENSE AGREEMENT This End-User License Agreement (EULA) is a legal agreement between you (either an individual or a single entity) and HORIZON NAVIGATION, INC. for the operating software and updates thereof that run the digital map database and associated hardware (collectively the “Software”). By installing or using the Software, you agree to be bound by the terms of this agreement.
END-USER LICENSE AGREEMENT(Continued) 7. Warnings. A. Copies of the digital map database reflect conditions, as they existed at various points in time before your receipt of such copies. Accordingly, copies of the digital database map may contain inaccurate or incomplete data or information due to inaccurate or incomplete source materials, the passage of time, road construction, changing conditions, and otherwise. B.
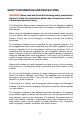
INTRODUCTION TO YOUR NAVIGATION SOFTWARE Navigation software provides turn-by-turn visual and voice assistance to direct you to your selected destination. The software quickly calculates step-by-step directions to any destination available on the included navigation map. The Navigation software uses Global Positioning System (GPS) satellites, and a digital roadway map database to calculate and display travel directions.
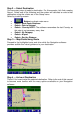
NAVIGATION SOFTWARE OPERATION Quick Start Follow these four easy steps and you are on your way. _____________________________________________________________________________ NOTE: Before operating your Navigation software, please carefully read and follow the instructions provided in the “Safety Information and Precautions” section of this manual.
Step 2 — Select Destination You have many ways to select a destination. For this example, let’s find a nearby Airport. Select one of the following and the system will calculate a route to that destination using the criteria set in the Setup menu. Select by touching screen: • • • • • • • Button to activate main menu. Select > Start Route Guidance Select > Point of Interest Select > Country NOTE: The software remembers the last Country, so this step is not necessary every time.
USING YOUR NAVIGATION SOFTWARE The best way to learn about this product is to explore it, while observing the safety precautions discussed earlier. The methods used are similar throughout the functions. The status bar also provides a reference for where you are in the menus.
Navigation Menus The table below briefly describes the Main Menu options. Main Menu Options At-A-Glance Main Menu Option Start Route Guidance Edit Address Book Trail Book Setup Select this Option to... Pick a destination for routing. Add or modify destinations in address book. For Trail Blazing. Set preferences for routing and navigation display. List Mode, Spell Mode, and Most Recently Used There are five ways to select a destination.
Spell Mode Buttons Button Mode Press This Button to... Spell Select currently input characters and show list of matches. Spell Delete last entered character. Spell Switch keyboard from QWERTY layout to special character layout. Spell Switch keyboard from special character layout to QWERTY layout. Spell Quit Spell Mode and return to List Mode. Map Screen The table below explains the button functions available on the Map Screen. Map Buttons Button Press This Button to... Show smaller map area.
DESTINATION SELECTION To select a destination, you must select Start Route Guidance from the Main Menu. The table below explains the button functions available on the Destination Selection Menu. Destination Selection Buttons Button Press This Button to... Exit menu mode and return to map mode Page up in displayed list. Return to main menu. Page down in displayed list. Go back one step.
You may select either the Postcode or City Name or the Street Name first. • Postcode – If you know the postcode, select this option to quickly find the city. NOTE: The postcode search is limited to the currently selected country. Postcode searching may not be available in all areas. • City Name - If you know the city and street, select this option. You could use the “Street Name” option instead, but it is quicker and easier to use the “City Name” option when you know both parts of the address.
Select Country/City/Street List Mode Buttons Button Press This Button to... Exit menu mode and return to map mode Page up in displayed list. Return to main menu. Page down in displayed list. Switch to Spell Mode. Go back one step. Point of Interest (POI) The Point of Interest option is useful when you are going to a public place or are looking for some type of facility such as a gasoline station. After selecting the Point of Interest option, you must select the Country where the destination is located.
POI Category POI Name Speller Some POI categories may not be available in some areas and not all possible POI’s may be listed for all categories. For example, although the “Restaurant” category is very extensive, it is only as current as the map database information. Several categories restrict the search radius as well to minimize the search time. Since businesses change over time, so will the accuracy of the points of interest in your navigation map.
Address Book Entries Button Press This Button to... Exit menu mode and return to map mode Page up in displayed list. Return back one menu level. Page down in displayed list. Go back one step. Edit Address Book The “Edit Address Book” option allows adding and editing address book entries. Previous Destination Previous destinations entered into your Navigation software are automatically saved into the memory of the Navigation software.
Previous Destination Selection Previous Destination Selection Buttons Button Press This Button to... Exit menu mode and return to map mode Page up in displayed list. Return back one menu level. Page down in displayed list. Go back one step. Select Destination by latitude and longitude You may select the destination by input latitude and longitude. Select By Latitude/Longitude.
Select Destination from Map Panning crosshairs Select Destination from Map Buttons B u tto n P re s s T h is B u tt o n t o ... S h o w a s m a lle r m a p a r e a . S h o w a la r g e r m a p a r e a . C e n t e r m a p o n c u r r e n t v e h ic le lo c a t io n a n d c a n c e l p a n n in g . C h a n g e ty p e o f m a p v ie w . S e le c t c u r r e n t p a n n e d lo c a t io n a n d s h o w lo c a t io n in f o r m a t io n .
Route Guidance Once on the highlighted route, guidance information is provided on the screen. Glance at the screen only when necessary and safe to do so. As you continue on the route, the guidance information is continually updated to correspond with your progress to the destination.
Trail Book Trail Book is used to track an OFF-ROAD trail not listed on the map. Select Add function and choose a name for this trail. After confirming the name then start driving. Press Menu icon when you complete the trail Add Trail Press Pushpin to add a waypoint.
Press menu icon and select Stop Trail when complete the trail:. After select the saved trail use the keyboard to rename the trail.
Delete Trail Select Delete Trail function then choose the trail name to remove it from the system. Follow Trail The next time you go off-road, you can follow the same trail you just created by selecting “Start Route Guidance” then select ‘Trail Book” and finally select an existing trail. You will see the following screen upon selecting a trail: You can select to go to any points in this route as a starting point. Upon your selection, the system will point you with a red line to that starting location.
Or Press Menu button to cancel route 24
MAP DISPLAY The Map Display shows roads, road names, and cartographic features like lakes and rivers. You can adjust the map scale, the map orientation, map view, status information display, and the distance units to your own preferences (See Setup section of this manual). Map display GPS reception status Vehicle symbol Compass heading Park Map scale * Hide Function buttons Icon Current location The GPS symbol will change colors indicating the strength of the signal.
Arrival Screen The destination is shown on the Map Display screen with a circle. A voice message announces that you are approaching your destination. Arrival Screen Off-Route and Route Interruptions If you leave the current route, the Navigation software will automatically recalculate the route. This feature may be disabled if you prefer by turning “Auto Recalc Off” in the Setup menu.
Detour Detour Distance Avoid Specific Road Cancel Route Select this function to cancel the current route.
SET-UP MENU You may customize the Navigation software to your own preferences. Select Setup option to adjust navigation preferences, display options, and units (km or mi) settings. You may also reset the vehicle position and do some basic system diagnostics through the Setup Menu.
Display Options Display options allow you to set the map orientation and some of the information items displayed. • • • • • • • • North Up/Heading Up – Determines if the map is always displayed with North direction at the top of the screen or if map is always adjusted so that vehicle symbol points toward the top of the screen. GPS Icon Display On/Off – Turn the display of the GPS reception symbol on or off. Status Bar Display On/Off – Turn the display of the Status Bar on or off.
Point of Interest This feature will allow you to select POI that will be displayed in different scales. Set Distance Units The units used when displaying and announcing the distance to turns may be set to Miles (decimal miles, e.g. zero point three miles), Kilometers/meters, or Miles/ yards based on personal preference. Distance Units Selection Language You can choose one of the following languages/voices: NOTE: Languages available is dependent upon memory size and unit features.
Set Vehicle Position You may reset the location of the vehicle symbol using the Set Vehicle Position option. System Diagnostics Menu The System Diagnostics menu allows you to diagnose the GPS reception status, adjust the current vehicle symbol position, and it also provides information on the current software and map version numbers. Diagnostic Menu The GPS diagnostic displays the number of GPS satellites currently in view and how many are currently being used.
To reset the vehicle symbol based on the GPS determined longitude and latitude, select GPS VP reset. GPS VP Reset The version numbers for the system software and mapping can be found under System Information. System Information Software version Map version NOTE: Please record the system information displayed on the screen in the event you should require technical support.
NOTES: 33