
Owner's Manual


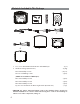


Table Of Contents
- Installation Guide
- Table of Contents
- Supplied Accessories
- Installation
- Tools Required / Preparation
- Installing the Snap-On Shroud
- Installing the Snap-On Screen Cover
- Installing the Trim Ring
- General Vehicle Installation Approach
- Vehicle Preparation
- Connecting the Dome Lights
- Installing the Mounting Bracket
- Wiring Diagram
- Mounting the Unit
- Removing the Screen Back Cover
- Removing the Trim Ring and Shroud
- Installing the Optional Thick Trim Ring
- Installing the Optional SmartStream Module (WM1)
- Troubleshooting
- Owners Manual
- Warranty

6
1. 10.1” / 13.3” TFT LCD Overhead Monitor with DVD Player - (1 pc)
2. Hardware Package (P/N 540-017) - (1 pkg)
M3 x 5mm Phillips Screws - (12 pcs)
#8 x 3/8” Self Drilling Screws - (4 pcs)
(*NOTE: For Installation of WM1x4pcs)
M5 x 10mm Phillips Screws - (4 pcs)
M5 x 20mm Phillips Screws - (4 pcs)
M5 x 40mm Phillips Screws - (4 pcs)
Pry Tool and Slide Knob for Dome Light Switch (P/N 540-018) - (1 pc)
CAUTION: The 10mm, 20mm and 40mm screws in the hardware kit are provided to
facilitate installation. Use extreme caution when using these screws to avoid damage to
vehicle roof or other components, wiring, etc.
Materials Included In This Package
1
2
3
4
67
8
5
9
10
11
1
1
24
2
5
9
0
11
2
4
26
00