
Owner's Manual


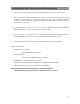


Table Of Contents
- Installation Guide
- Table of Contents
- Supplied Accessories
- Installation
- Tools Required / Preparation
- Installing the Snap-On Shroud
- Installing the Snap-On Screen Cover
- Installing the Trim Ring
- General Vehicle Installation Approach
- Vehicle Preparation
- Connecting the Dome Lights
- Installing the Mounting Bracket
- Wiring Diagram
- Mounting the Unit
- Removing the Screen Back Cover
- Removing the Trim Ring and Shroud
- Installing the Optional Thick Trim Ring
- Installing the Optional SmartStream Module (WM1)
- Troubleshooting
- Owners Manual
- Warranty

15
Connecting the Dome Lights
To 3 pin
connector
on Monitor
To
constant
+12 VDC
To
constant
+12 VDC
Factory Door Ajar
Switch or Body
Control Computer
Red/Black-Lamp ON
Black/Red-Lamp Common
Purple/Brown-Lamp Auto
Positive Switched Dome Lighting
Fused
Factory Dome Light Circuit
To 3 pin
connector
To
constant
Factory Door Ajar
Switch or Body
Control Computer
Red/Black-Lamp on
Black/Red-Lamp common
Purple/Brown-Lamp Auto
To
constant
+12 VDC
+12 VDC
Negative Switched Dome Lighting
Fused