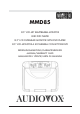
MMD85 8.5” LCD MIT KLAPPBAREM MONITOR UND DVD PLAYER 8.5” LCD OVERHEAD MONITOR WITH DVD PLAYER 8.
3 31 58
INDEX - Wichtige Warn- und Sicherheitshinweise S. 4 - Technische Merkmale S. 6 - Bedienelemente und Anzeigen S. 7 - Beschreibung der Hauptfunktionen S. 8 - Fernbedienung S. 9 - Grundeinstellungen und Anpassungen S. 16 - Wiedergabe von DVDs S. 21 - Wiedergabe von Audio-CDs S. 21 - Wiedergabe von MP3-Discs S. 22 - Ein- und Ausschalten des MMD85 S. 24 - Deckenleuchten S. 25 - Fernbedienungssensor S. 25 - Optionales Zubehör S. 26 - Quellen Merkmale S. 26 - DVD-Grundlagen S.
Achtung Ein LCD-Display bzw. Videomonitor, der im Sichtfeld des Fahrers im Fahrzeuginnern angebracht wird, dient vorrangig zum Anzeigen von Fahrzeugdaten, zur Systemsteuerung, zur Beobachtung des seitlichen und rückwärtigen Verkehrs als auch zur Navigation. Soll zudem der Empfang von Fernsehprogrammen oder das Abspielen von Videofilmen oder DVDs ermöglicht werden, so muss das Display bzw.
Sicherheitsmaßnahmen Aus Sicherheitsgründen sollten die Discs oder CDs nicht während des Fahrens gewechselt werden. Darüber hinaus sollten Kinder ihre Sicherheitsgurte nicht lösen, um die Discs oder CDs zu wechseln oder sonstige Einstellungen oder Anpassungen am System vorzunehmen. Systemeinstellungen oder -anpassungen können mit der Fernbedienung vorgenommen werden, ohne dass die Sicherheitsgurte gelöst werden müssen.
Technische Merkmale • 8.5” Zoll Active Matrix TFT/LCD-Monitor • Bildschirmmenü (OSD) für die Steuerung der Bildqualität und Funktionen • IR-Sender für optionale IR-Köpfhörer • Drei Audio/Video-Signaleingänge (inkl.
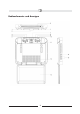
Bedienelemente und Anzeigen 7
Beschreibung der Hauptfunktionen 1. Deckenleuchten – Bietet eine zusätzliche Innenbeleuchtung. 2. IR-Sender/Empfänger – Sendet Audio-Signale an kabellose Kopfhörer. Ermöglicht ebenfalls, das MMD85-System mit der Fernbedienung zu betreiben und anderes Zubehör im System zu steuern. 3. SOURCE-Taste - Wählt eine der drei Quellen DVD, AV1, AUX aus. 4. Screen Mode (Bildschirmmodus) Taste - Ändert das Anzeigeformat (Seitenverhältnis, 4:3 oder 16:9) 5.
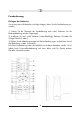
Fernbedienung Einlegen der Batterien Sie müssen zuerst die Batterien wie folgt einlegen, bevor Sie die Fernbedienung verwenden: 1) Drehen Sie die Oberseite der Fernbedienung nach unten. Entfernen Sie die Batterieabdeckung mit dem Fingernagel. 2) Installieren Sie zwei „AAA”-Batterien (siehe Abbildung). Beachten Sie dabei die richtige Polarität (+ oder -). 3) Richten Sie die Abdeckungszungen auf die Fernbedienung aus und drücken Sie auf die Abdeckung, so dass sie einrastet.
Bedienung mit der Fernbedienung *Die Funktionen können auf dem Gerät und über die Fernbedienung gesteuert werden. 1. POWER-Taste* Drücken Sie auf diese Taste, um den MMD85 einzuschalten. Drücken Sie erneut auf diese Taste, um den MMD85 auszuschalten. 2. DISPLAY Zeigt die aktuellen Informationen zur DVD Disc an. Drücken Sie diese Tasten ( ) um auszuwählen von: TITEL (TITLE) KAPITEL (CHAPTER) BILDWINKEL (ANGLE) AUDIO UNTERTITEL (SUBTITLE) Um den Titel und das Kapitel anzuzeigen, wählen Sie die Titel bzw.
Hinweis: Je nach verwendeter Disk schwankt die Anzahl möglicher Sprachen für die Untertitel. 5. AUDIO Drücken Sie während der Wiedergabe auf AUDIO, um die gewünschte* Sprache auszuwählen. Wenn Sie eine andere Sprache auswählen möchten, drücken Sie erneut auf AUDIO. Hinweis: Die Sprachen und Kanäle für Audio sind von Disc zu Disc unterschiedlich. 6. Zoom Drücken Sie diese Taste um das Bild auf der DVD-Disc zu vergrößern oder zu verkleinern.
10. A-B Wiederholt die Wiedergabe einer DVD oder CD von Punkt A zu Punkt B. 11. VOL-Taste (-) Drücken Sie auf diese Taste, um die Lautstärke der Kopfhörer leiser zu stellen. Diese Taste wird auch verwendet, um das Bild im Bildauswahlmodus einzustellen. 12. VOL-Taste (+) Drücken Sie auf diese Taste, um die Lautstärke der Kopfhörer lauter zu stellen. Diese Taste wird auch verwendet, um das Bild im Bildauswahlmodus einzustellen.
. SLOW Wiedergabe einer DVD in Zeitlupe Drücken der SLOW Taste DVD-Player Anzeige Einmal Vorwärtswiedergabe einer Disk in Zeitlupe mit einer Abspielgeschwindigkeit, die im Vergleich zur normalen Laufgeschwindigkeit um 1/2 reduziert wurde. Zweimal Vorwärtswiedergabe einer Disk in Zeitlupe mit einer Abspielgeschwindigkeit, die im Vergleich zur normalen Laufgeschwindigkeit um 1/4 reduziert wurde.
. Taste PIX (Bildauswahl) Bei jedem Drücken dieser Taste werden auf dem Bildschirm „Einstellungsbalken” für die Helligkeit, den Kontrast oder die Farbe angezeigt. Wenn der gewünschte Einstellungsbalken angezeigt wird, drücken Sie auf die VOLUME UP/DOWN-Tasten, um die Einstellung vorzunehmen. Wenn innerhalb von 6 Sekunden keine Einstellung erfolgt oder keine andere Taste gedrückt wird, wird die Anzeige automatisch ausgeblendet. 15. Taste PAUSE (II) Unterbricht die Wiedergabe. 16.
22. SETUP Wählt die Optionen des DVD-Players aus (Anzeige, Bildschirmmenüsprache (OSD), Jugendschutz etc.) Beziehen Sie sich auf die Grundeinstellungen und Anpassungen für mehr Informationen. 23. REPEAT Wiederholt verschiedene Positionen einer DVD, CD oder MP3. 24. Taste ( ) Geht zum nächsten Kapitel oder Track. 25. Taste ( ) Kehrt zum vorherigen Kapitel oder Track zurück. 26. Taste ( ) Sucht vorwärts, 2-, 4-, 8-, 20-Mal schneller als die normale Geschwindigkeit. 27.
Grundeinstellungen und Anpassungen In diesem Kapitel wird erklärt, wie Grundeinstellungen und Anpassungen mit dem SETUP-Menü vorgenommen werden. Verwenden des Setup-Menüs Im SETUP-Menü können Sie das Gerät konfigurieren, die Bildqualität anpassen und die verschiedenen Ausgänge einstellen. Darüber hinaus können Sie die Sprache der Bildschirmmenüs (OSD) und des SETUPMenüs einstellen und die Wiedergabe für Kinder bzw. Jugendliche einschränken.
Menü OSD SPRACHE Über das Menü OSD SPRACHE können Sie die Sprache für das Bildschirmmenü auswählen. Drücken Sie auf und anschließend auf die Tasten ( ), um die gewünschte Sprache auszuwählen. Als OSD-Sprache können Sie folgende Sprache auswählen: Englisch, Französisch, Spanisch, Deutsch oder Italienisch. Bildschirmeinstellungen Drücken Sie auf die Taste SETUP und wählen Sie anschließend VIDEO aus. Über TVMONITOR können Sie die Bildschirmeinstellungen (Seitenverhältnis) anpassen.
Hinweis: Diese Einstellung kann nur erfolgen, wenn keine CD/DVD eingelegt ist oder wenn die CD Abdeckung geöffnet ist! TV-MODELL Wählen Sie mit Hilfe der UP-oder Down-Taste TV-MODELL aus und drücken Sie anschließend auf die RIGHT-Taste um ins Untermenü zu gelangen. Wählen Sie das TVMODELL auf dem Bildschirm aus mit den Tasten UP/DOWN aus und drücken Sie auf ENTER um die Einstellung zu bestätigen. Drücken Sie auf die LEFT-Taste um zurückzukehren.
LESE: Kennworteinstellungen (Kennwort für die Jugendschutzkontrolle) Drücken Sie auf die Taste SETUP und wählen Sie KENNWORT aus. Über KENNWORT können Sie das KENNWORT für die Jugendschutzkontrolle ändern. Drücken Sie auf und anschließend auf ENTER. Das werkseitige Passwort/Kennwort ist 3308. Nachdem Sie das Kennwort eingegeben haben, haben Sie die Möglichkeit die Zugriffsrechte unter ”LESE” (Erwachsener) nach Bedarf einzustellen.
Einstellungen für den Jugendschutz (Jugendschutzkontrolle) Über die Option LESE des Menüs SETUP können Sie die Wiedergabe des Filminhalts von G bis ERWACHSENER kontrollieren. Mit der Jugendschutzkontrolle können Sie die Wiedergabe nach Ihren Wünschen einschränken 1. Verwenden Sie die Tasten ( ), um Ihre Wahl zu treffen: G (Kinder) PG PG 13 R NC-17 ERWACHSENER Hinweis: Je niedriger der Wert, desto höher die Einschränkung. Drücken Sie zum Bestätigen der Auswahl die Taste ENTER.
Wiedergabe von DVD´s Drücken Sie auf der Fernbedienung die Taste DISPLAY, um die Statuszeile anzuzeigen. Durch mehrmaliges Drücken der Taste DISPLAY werden nacheinander die folgenden Optionen aufgerufen: Auswählen eines Kapitels Sie können zu einem bestimmten Kapitel springen, indem Sie die entsprechenden Zahlentasten drücken. Wenn Sie beispielsweise zu Kapitel 2 springen möchten, drücken Sie ‘02’. Verwenden der Funktion REPEAT Der Standardmodus der REPEAT-Funktion ist OFF.
Verwenden der Funktion REPEAT Der Standardmodus der REPEAT-Funktion ist OFF. Wenn Sie mehrmals hintereinander auf REPEAT drücken, ändern sich die Optionen dieser Funktion: - SINGLE - wiederholt den derzeit wiedergegebenen Track. - ALL- wiederholt die derzeit wiedergegebene Disc. Beim Durchblättern der Optionen ändert sich die Funktionsweise entsprechend. Die Tracks werden beispielsweise wiederholt, sobald diese Tracks bis zum Ende wiedergegeben sind.
2. Drücken Sie auf die Aufwärts- oder Abwärts-Pfeiltaste, um durch die Songliste zu blättern, und markieren Sie den gewünschten Song. Drücken Sie auf ENTER um die Wiedergabe des markierten Songs zu starten. Überspringen von Songs Drücken Sie auf der Fernbedienung die Taste NEXT ( ) , um zum nächsten Song zu wechseln. Drücken Sie auf die Taste PREVIOUS ( ), um zum Anfang des derzeit wiedergegebenen Songs zurückzukehren. Drücken Sie zweimal auf die Taste , um zum vorherigen Song zu wechseln.
Ein- und Ausschalten des MMD85 1. Wenn Sie die Bildschirmverriegelung nach vorne schieben, wird der LCD-Bildschirm entriegelt und klappt aus. Klappen Sie den Bildschirm so weit nach unten, bis ein komfortabler Sichtwinkel eingestellt ist. Durch die Reibarretierung wird die Bildschirmposition während der Benutzung gehalten. 2. Wenn die Ein/Aus-Taste auf dem Gerät oder der Fernbedienung gedrückt wird, wird das System ein bzw. ausgeschaltet.
Deckenleuchten Die im MMD85 integrierten Leuchten werden über einem Lichtschalter mit drei Positionen gesteuert. Wenn der Schalter auf die Position Ein (ON) gestellt wird, werden die Leuchten eingeschaltet. Die Schalterposition Aus (OFF) bewirkt, dass die Deckenleuchten unabhängig von der Fahrzeug-Innenbeleuchtung ausgeschaltet bleiben, wogegen die Schalterposition Auto dafür sorgt, dass die Leuchten zeitgleich mit der Innenbeleuchtung ein- bzw. ausgeschaltet werden.
Optionales Zubehör Drahtlose Kopfhörer Im MMD85 ist ein IR-Sender für die Benutzung kabelloser Audiovox-Kopfhörer (Teilenummer MMIRHS) eingebaut. Die Lautstärke kann über die Lautstärkeregler an jedem Kopfhörer eingestellt werden. Da sich Infrarotsignale, genauso wie das sichtbare Licht, nur geradlinig ausbreiten, können die kabellosen Kopfhörer nur bei freiem Sichtfeld auf den IR-Sender eingesetzt werden.
DVD - Grundlagen Lesen Sie diesen Abschnitt vollständig durch, um die DVD-Funktion optimal nutzen zu können. Regionaler Code Sowohl DVD-Player als auch die DVD-Discs sind nach Regionen codiert. Diese regionalen Codes müssen für die fehlerfreie Wiedergabe übereinstimmen. Andernfalls kann eine Disc nicht abgespielt werden. Der Code für dieses Geräts lautet „Region 2“. Andere regionale Codes können mit diesem Gerät nicht wiedergegeben werden. In dem Fall zeigt das Gerät “WRONG REGION” an.
Fehlerbeseitigung PROBLEM LÖSUNG IR-Sensor funktioniert nicht • Überprüfen Sie, ob die Batterien der Fernbedienung neu sind. • Stellen Sie sicher, dass der Fernbedienungssensor nicht verschmutzt ist. Die Disc lässt sich nicht abspielen • Legen Sie die Disc mit der beschrifteten Seite nach oben ein. • Überprüfen Sie den Disc-Typ. Der DVD-Player gibt nur DVDs, Audio-CDs und MP3s wieder. • Sowohl der DVD-Player als auch die Disc sind nach Regionen codiert.
PROBLEM LÖSUNG Kein Schnellvorlauf des Films möglich • Sie können den Vorspann oder die Warnungen am Anfang des Films nicht schneller durchlaufen lassen bzw. überspringen, weil die Disc so programmiert ist, dass dieser Vorgang nicht möglich ist. Auf dem Bildschirm erscheint das Handzeichen-Symbol • Die Funktion oder Aktion kann an dieser Stelle aus folgenden Gründen nicht ausgeführt werden: 1. Die Funktion bzw. Aktion wird durch die Software der Disc eingeschränkt. 2. Die Funktion (z. B.
Technische Daten LCD Hintergrundbeleuchtung: Edge Light Röhre Auflösung: 480 x 600 Pixel: 864.000 Betriebstemperatur: 0 - 60° C (32 - 140° F) Lagertemperatur: -20 - 80° C (-4 -176° F) Lebensdauer: 10.000 Stunden Video-Norm: NTSC/PAL Kopfhörerausgang: 0.03W an 32 ohms Video Ausgangssignal: 1.
CONTENT - Important Warnings and Safety Precaution p. 32 - Features p. 34 - Controls and Indicators Diagram p. 35 - Main Function Descriptions p. 36 - Remote Control Operation p. 37 - Settings and Adjustments p. 43 - Playing DVDs p. 48 - Playing Audio CDs p. 48 - Playing MP3 Discs p. 49 - Turning the MMD85 on or off p. 51 - Overhead dome lights p. 52 - Remote Sensor p. 52 - Optional Accesories p. 53 - Source Features p. 53 - DVD basics p. 54 - Troubleshooting p.
Notice An LCD panel and/or video monitor may be installed in a motor vehicle and visible to the driver if the LCD panel or video monitor is used for vehicle information, system control, rear or side observation or navigation. If the LCD panel or video monitor is used for television reception, video or DVD play, the LCD panel or video monitor must be installed so that these features will only function when the vehicle is in “park” or when the vehicle’s parking brake is applied.
Safety Precaution For safety reasons, when changing video media it is recommended that the vehicle is not in motion, and that you do not allow children to unfasten seatbelts to change media or make any adjustments to the system. System adjustments can be accomplished using the remote control unit, while seatbelts remain fastened. Enjoy your Movies 2 Go entertainment system but remember safety of all passengers remains the number one priority.
FEATURES • 8.
CONTROLS AND INDICATORS DIAGRAM 35
MAIN FUNCTION DESCRIPTIONS 1. Dome Lights – Provide additional interior illumination. 2. Infrared Transmitter and Sensor – Used to transmit audio to wireless headphones. Also allows the remote control to operate the MMD85 and to control other accessories in the system. 3. Source Button – Source select DVD,AV1, AUX. 4. Screen Mode Button – Allows the user to change screen format (Aspect Ratio 4:3 or 16:9 ). 5. Power ON/OFF Button – Turn the MMD85 ON and OFF. 6. DVD disc insertion slot 7.
REMOTE CONTROL OPERATION Battery Installation Before attempting to operate your Remote Control, install the batteries as described below. 1) Turn the Remote Control face down. Using a fingernail, lift the battery cover off. 2) Install two “AAA” batteries as shown. Make sure that proper polarity (+ or -) is observed. 3) Align the cover tabs with the remote control and press down until the cover clicks. The remote control will operate the MMD85 and most Audiovox VCP’s.
Operation with Remote Control * Function control is available on the unit and the Remote Control. 1. *POWER Press this button to turn “ON” and “OFF” the MMD85 unit. 2. DISPLAY Press to display current disc information while the disc is playing. Press cursor ( ) buttons to select from: Title Chapter Angle Audio Subtitle For Title/Chapter, press numeric buttons to do Title/Chapter selection. For Angle, Audio & Subtitle, press Enter key repeatedly to change the options.
6. ZOOM Press this button to zoom or reduce the picture on DVD disc. Press ZOOM button DVD player perform Once Enlarge the picture 2 times of the original size Twice Enlarge the picture 3 times of the original size 3 times Enlarge the picture 4 times of the original size 4 times Picture is returned to original size 7. CURSOR ( ) Use these buttons to access menu selections on the screen. 8. MENU Allow the user to access the disc menu. 9. RETURN Press to return to the main menu for VCD 2.0 10.
12. VOLUME UP (+) Press to increase the volume level of the headphone jacks. It is also used to make picture adjustments in the picture select mode. Note: The volume buttons will not affect the volume of wireless headphones. When using these devices, the volume must be adjusted with the wireless headphone volume control or with your radio’s volume control.
13.
16. *STOP ( ) Press to stop the playback 17. Eject ( ) Button* This button is used to eject the disc. 18. NUMBERS Allow the user to enter the numbers 0-9 for selection of the tracks, titles, chapters or password setting. 19. *SOURCE Video signals from video equipment connected to the audio / video input can be displayed on the monitor by pressing this button. Each time the button is pressed, the audio/video source will toggle between DVD, AV1 and AUX. 20. MUTE Press to mute the audio.
26. SCAN FORWARD ( ) Press to search in a forward direction. Press repeatedly to change the search speedfrom 2, 4, 8, 20 times the normal speed. 27. SCAN BACKWARD ( ) Press to search in a backward direction. Press repeatedly to change the search speed from 2, 4, 8, 20 times the normal speed. 28. *PLAY Press to activate the play mode while a disc is loaded in the disc compartment. * Function is available on the remote and the front panel.
2. In order to Go to the desired page, move the highlight using the cursor button or to the icon indicated. 3. After entering the desired page, highlight the desired item using the cursor button or . 4. Press to move the highlight to the different options for the selected item. Press or to select the desired options, and then press ENTER to confirm the selection. 5. Repeat steps 3~4 to continue setting the items in the same Setup Page. 6.
VIDEO SETUP TV DISPLAY The TV DISPLAY setup allows you to adjust screen setting (aspect ratio). 4:3 PS This displays the wide picture on the screen with a portion of the left & right side removed. 4:3 LB This displays the wide picture with black bands on the upper and lower portions of the screen. 16:9 This displays a wide picture with black bands on the upper and lower portion of the screen. The bandwidth will vary, depending on the aspect ratio of the disc.
TV TYPE The TV TYPE setup allows you to select the system to fit to the color system of the TV to be connected. NTSC - Select this type for NTSC TV PAL - Select this type for PAL TV MULTI - Select this type for multi-system TV RATING SETUP PASSWORD After you selected the password, just use the numeric buttons to key in the default password (3308), then press Enter. Only key in the default password then you can change the rating. *To close the password locked just key in the default password.
RATING This item allows you to limit the content of movie playback from G to Adult. The lower the value, the more strict the control. G PG PG – 3 R NC – 17 Adult The Rating just can be open by key in the user password or default password. To apply the changes just press the Enter button and lock the password by key in the password again. LOAD FACTORY The Load Factory — Reset allows you to reset all options to factory settings. * This function will not affect the Rating control settings.
Playing DVDs 1. Press the DISPLAY Button on the remote control to display the status banner. 2. Selecting a chapter. You can skip to a specific chapter by using the numbers keys. For example, if you want to skip to chapter 2, press “02”. 3. Using the Repeat Feature The default mode for the Repeat feature is OFF. Pressing REPEAT consecutively changes the repeat options: • REPEAT CHAPTER - Repeat the chapter that is playing. • REPEAT TITLE - Repeat the title that is playing.
Playing MP3 Discs MP3 is a format for storing digital audio. An audio CD-quality song can be compressed into the MP3 format with very little loss of quality, while taking up much less space. CD-R discs that have been encoded in MP3 format can be played on your DVD player. The DVD player plays the songs in the order they were burned on to the disc. Press DISPLAY button on the remote to display the time counter display elapsed only.
Skipping Songs Use the Next ( ) button on the remote control to move to the next song. Use the Previous ( ) button to move to the previous song. Selecting a Play Mode You can choose what order the songs will play on a disc temporarily. The default play mode is FOLDER. Press REPEAT consecutively to choose the desired play mode. The play mode options are: • FOLDER • SHUFFLE • • • • RANDOM SINGLE REPEAT ONE REPEAT FOLDER Plays the songs in a folder in the order they were recorded.
TURNING THE MMD85 ON OR OFF 1. Sliding the screen release lock forward will unlock the LCD screen and it will drop down slightly. Pivot the screen downward until a comfortable viewing angle is reached. The hinge friction will hold the screen in position while the system is in use. 2. Pressing the power button on the unit or the remote control will turn the system on or off alternately. When in use the internal backlighting will illuminate the controls. 3.
OVERHEAD DOME LIGHTS The Dome Lights integrated into the MMD85 are controlled by a three position slide switch. Sliding the switch to the ON position will turn the lights ON. The OFF position will prevent the lights from turning ON with the vehicle’s interior lighting, and the auto position will allow the lights to turn ON and OFF with the vehicle’s interior lighting. Refer to the installation Guide for wire connections.
OPTIONAL ACCESSORIES Wireless Headphones The MMD85 includes a built in infrared transmitter for use with Movies 2 Go wireless headphones (PN MMIRHS). Turning the Wireless Headphone switch ON will activate the internal IR receiver and the volume can then be adjusted separately with the controls on each headset. Any number of wireless headphones can be used, but all must be within direct line of sight from the transmitter.
DVD Basics To get the optimum use out of the DVD section, make sure you read this section completely. Regional Coding Both the DVD player and disc are coded by region. These regional codes must match in order for the disc to play. If the codes don’t match, the disc won’t play. This unit’s code is region 2. Other regional codes cannot be played in this unit. The unit will display “WRONG REGION”. Types of Discs your DVD will play • DVD disc - DVD discs which contain video.
Troubleshooting PROBLEM SOLUTION IR sensor inoperative • Verify that the batteries in the remote are fresh. • Verify that the remote sensor eye is not obstructed. Disc won´t play • Insert a disc with the label side facing up. • Check the type of disc you put into disc tray. This DVD only plays DVDs, audio CDs and MP3s. • Both the unit and the disc are coded by region. If the regional codes don’t match, the disc can’t be played. This DVD player is set to Region Number 2.
PROBLEM SOLUTION Can´t advance through a movie • You can’t advance through the opening credits and warning information that appears at the beginning of movies because the disc is programmed to prohibit that action. The icon ( screen ) appears on The feature or action cannot be completed at this time because: 1. The disc’s software restricts it. 2. The disc’s software doesn’t support the feature (e.g., angles) 3. The feature is not available at the moment. 4.
Specifications LCD Backlighting Edge Light Tube Resolution 480 x 600 Pixels 864,000 Operation Temperature 32-140°F (0-60°C) Storage Temperature -4-176°F (-20-80°C) Backlight life 10,000 Hours Video Display System NTSC/PAL Headphone Audio Output 0.03W at 32 ohms Video Output 1.
INDICE - Avviso importante, Avvertenze, Ricezione televisiva p. 59 - Caratteristiche p. 61 - Schema dei comandi e degli indicatori p. 62 - Descrizioni delle funzioni principali p. 63 - Funzionamento del telecomando p. 65 - Impostazioni e regolazioni p. 72 - Riproduzione di DVDs p. 76 - Riproduzione di CD Audio p. 77 - Riproduzione dei dischi con formato MP3 p. 78 - Accensione o spegnimento del MMD85 p. 80 - Plafoniere p. 81 - Sensore remoto p. 81 - Accessori optional p.
Avviso Un pannello LCD e/o un monitor video può essere installato su un veicolo a motore ed essere visibile dal guidatore se tale pannello o video monitor vengono utilizzati per mostrare informazioni relative al veicolo, al sistema di controllo, per l’osservazione laterale o posteriore o per la navigazione satellitare.
Ricezione televisiva Questo impianto di intrattenimento è stato progettato essenzialmente per vedere filmati preregistrati o riprodurre videogiochi. La ricezione televisiva in un veicolo in movimento è limitata; in alcune aree non è possibile a causa di un segnale debole e variabile. La visione della televisione è migliore a veicolo fermo, ma anche in questo caso potrebbe essere condizionata dalla potenza del segnale. La qualità dell’immagine non è paragonabile a quella della ricezione domestica.
Caratteristiche • Monitor LCD (a cristalli liquidi) da 8.
Schema dei comandi e degli indicatori 62
Descrizioni delle funzioni principali 1. Plafoniere: forniscono un’illuminazione interna supplementare. 2. Trasmettitore e sensore a infrarossi: utilizzato per trasmettere il segnale audio alle cuffie auricolari senza fili. Consente anche di utilizzare il telecomando per far funzionare il MMD85 e per controllare altri accessori dell’impianto. 3. Selezione SOURCE (FONTE): utilizzata per selezionare una delle quattro fonti (DVD, AV1, AUX). 4.
12. Aperture di aerazione del MMD85 13. Pannello LCD - Mostra la sorgente video sull'OSD (On Screen Display). 14. Ingresso video/audio ausiliario - Audio e Video Source (fonte) ingresso. 15. Jack per cuffie auricolari: consente di utilizzare cuffie auricolari con fili dotate di spinotto da 1/8” per ascoltare l’audio del programma video.
Funzionamento del telecomando Installazione della batteria Prima di cercare di utilizzare il telecomando, installare le batterie come descritto di seguito. 1) Ribaltare il telecomando. Con l’unghia, sollevare il coperchio della batteria. 2) Installare due batterie “AAA” come da figura. Accertarsi di rispettare la corretta polarità (+ o -). 3) Allineare le linguette del coperchio con il telecomando e premere verso il basso fino a farle scattare.
Funzionamento con telecomando *I comandi delle funzioni sono disponibili sia sull’unità che sul telecomando. 1. Pulsante POWER (ACCENSIONE)* Premere il pulsante POWER per accendere il MMD85. Premere nuovamente il pulsante per spegnere il MMD85. 2. Pulsante DISPLAY Premere questo pulsante per visualizzare le informazioni attuali relative al disco DVD.
5. AUDIO Durante la riproduzione premere ‘AUDIO’ per selezionare la lingua di riproduzione desiderata. Premere di nuovo AUDIO per scegliere un’altra lingua. Nota: Le lingue e i canali audio variano da disco a disco. 6. ZOOM Durante la riproduzione premere ‘ZOOM’ per ingrandire l’immagine. Premere pulsante ZOOM Funziona come lettore DVD 1 volta Allarga l'immagine di 2 volte rispetto alle dimensioni originali. 2 volte Allarga l'immagine di 3 volte rispetto alle dimensioni originali.
11. Pulsante Volume Giù (-) Utilizzare questo pulsante per ridurre il livello del volume dei jack per cuffie auricolari. Il pulsante consente anche di effettuare regolazioni all'immagine in modalità di selezione dell'immagine. 12. Pulsante Volume Su (+)* Premere il pulsante per aumentare il volume dei jack per cuffie auricolari. Il pulsante serve anche per effettuare regolazioni all’immagine in modalità di selezione dell’immagine.
13. SLOW Riproduce un DVD al rallentatore.
14. Pulsante PIX (SELEZIONE DELL’IMMAGINE) Ogni volta che si preme questo pulsante, sullo schermo vengono visualizzate le regolazioni per l’immagine; le barre di regolazione disponibili sono BRIGHTNESS (LUMINOSITÀ), CONTRAST (CONTRASTO) e COLOR (COLOR). Dopo aver visualizzato la barra appropriata, modificare l’impostazione mediante i pulsanti di regolazione del volume. Se non vengono effettuate regolazioni o non si rilasciano altri pulsanti entro 6 secondi, lo schermo si spegne automaticamente. 15.
22. Pulsante SETUP (CONFIGURA) Consente all’utente di selezionare le opzioni del lettore DVD (visualizzazione, lingua OSD, impostazioni predefinite, controllo dei contenuti non autorizzati, password, uscita configurazione). 23. Pulsante REPEAT (RIPETI) Consente all’utente di ripetere la riproduzione di diversi punti di un DVD, CD o MP3. 24. Pulsante NEXT ( SUCCESSIVO) Consente all’utente di passare al capitolo o alla traccia successivo. 25.
Impostazioni e regolazioni Nel presente capitolo viene descritto come utilizzare il menu SETUP (CONFIGURA) per effettuare impostazioni e regolazioni. Utilizzo del menu di configurazione La visualizzazione della configurazione consente di effettuare la configurazione iniziale, di regolare la qualità dell’immagine e di impostare diverse uscite. È anche possibile impostare la lingua e la configurazione del display e limitare l’uso da parte dei minori.
Menu della lingua OSD Il menu della lingua OSD consente all’utente di selezionare la lingua della visualizzazione sullo schermo. Premere i pulsanti e quindi utilizzare i pulsanti ( ) per selezionare la lingua desiderata. Le lingue disponibili sono inglese, francese, tedesco spagnolo o italiano. Impostazioni del display Premere il pulsante SETUP (CONFIGURA) e selezionare Display. La configurazione del display consente di regolare le impostazioni dello schermo (aspetto).
TIPO TV Selezionare ‘TIPO TV’ usando pulsanti SU/GIU e premere DESTRA/INVIO per aprire il sottomenu. Selezionare la modalitá TV sullo usando i pulsanti SU/GUIU e premere INVIO per confermare a selezione. Premere SINISTRA per ritomare. PAL - Selezionare questo formato per le trasmissioni TV PAL. MULTI - Selezionare questo formato per sistemi TV multipli. NTSC - Selezionare questo formato per le trasmissioni TV NTSC.
Impostazioni Parental (Controllo dei contenuti non autorizzati) Questa sezione del menu di configurazione consente di controllare il contenuto dei filmati, con livelli che vanno da G ad Adult (Adulti). La funzione di controllo dei contenuti non autorizzati consente di limitare la visione in base alle proprie preferenze. 1. Utilizzare i pulsanti per scegliere tra le opzioni riportate di seguito. G (Children, Minori) PG PG 13 R NC-17 ADULT (Adulti) Nota: più è basso il valore e maggiore è la limitazione.
Impostazioni predefinite Premere il pulsante SETUP (CONFIGURA) e selezionare Defaults (Impostazioni predefinite). La configurazione delle impostazioni predefinite consente di ripristinare tutte le opzioni originali. Premere e quindi Enter (Invio) per implementare il ripristino. Nota: questa funzione non influisce sulle impostazioni del controllo dei contenuti non autorizzati. Riproduzione di DVDs 1. Premere il tasto DISPLAY sul telecomando per visualizzare la barra di stato.
Riproduzione di CD Audio Durante la riproduzione di un CD audio, viene visualizzato automaticamente il banner DISPLAY nel quale vengono indicati la traccia corrente, la durata della traccia riprodotta, la durata complessiva del disco e il tempo di esecuzione corrente del disco. Per visualizzare tale banner dal telecomando, premere il pulsante DISPLAY. Le opzioni riportate di seguito mostrano che cosa succede quando si preme il pulsante DISPLAY.
Riproduzione dei dischi con formato MP3 Il formato MP3 viene utilizzato per memorizzare l’audio digitale. Un brano audio con qualità da CD può essere compresso nel formato MP3: questo consente di perdere pochissimo in termini di qualità e di guadagnare molto in termini di spazio. I dischi CD-R codificati in formato MP3 sono compatibili con questo lettore DVD. Premere il pulsante DISPLAY sul telecomando per visualizzare il banner.
Salto di alcuni brani Utilizzare il pulsante Successivo ( ) del telecomando per passare al brano successivo. Utilizzare il pulsante Precedente ( ) per spostarsi all’inizio del brano in esecuzione. Premere due volte il pulsante per passare al brano precedente. Selezione di una modalità di riproduzione È possibile scegliere in quale ordine riprodurre temporaneamente i brani di un disco. La modalità di riproduzione standard è FOLDER.
Accensione o spegnimento del MMD85 1. Far scorrere in avanti il dispositivo di sblocco dello schermo per sbloccare lo schermo LCD e farlo scendere lentamente verso il basso. Girare lo schermo verso il basso fino a trovare l’angolazione visiva adeguata. L’angolo di attrito dell'apparecchio consente di mantenere lo schermo nella posizione desiderata durante il suo utilizzo. 2. Premere il pulsante di accensione sull’unità o sul telecomando per accendere o spegnere l'apparecchio.
Plafoniere Le luci integrate nel MMD85 sono controllate da un interruttore a scorrimento a tre posizioni. Per accendere le luci, far scorrere l’interruttore in posizione ON. La posizione OFF impedisce alle luci di accendersi in qualsiasi momento, mentre la posizione AUTO consente l’accensione e lo spegnimento delle luci in sincronia con l’illuminazione interna del veicolo. Per il cablaggio, consultare il Manuale di installazione.
Accessori Optional Cuffie auricolari senza fili Il MMD85 è dotato di un trasmettitore integrato a infrarossi da utilizzare con le cuffie auricolari senza fili Audiovox (cod. art. IR2CHS a doppio canale). È possibile regolarne il volume mediante i controlli su ciascuna cuffia. Le cuffie auricolari senza fili devono essere utilizzate in direzione del trasmettitore, poiché le trasmissioni a infrarossi, come le trasmissioni di luce visibile, viaggiano soltanto in linea retta.
Informazioni principali sul DVD Per ottimizzare l'uso della funzione DVD, leggere tutta la presente sezione. Codifica regionale Sia il lettore che il disco DVD dispongono di un codice regionale. Per riprodurre il disco, tali codici devono corrispondere. In caso contrario, il disco non viene riprodotto. Questa unità è progettata per riprodurre esclusivamente i supporti della zona 2. Se si cerca di riprodurre il supporto di una zona diversa, viene visualizzata la scritta “WRONG REGION” (ZONA ERRATA).
Risoluzione dei problemi PROBLEMA SOLUZIONE Sensore a infrarossi non funzionante • Verificare che le batterie del telecomando siano nuove. • Verificare che la cellula del sensore remoto non sia ostruita. Il disco non viene riprodotto • Inserire un disco con l’etichetta rivolta verso l’alto. • Controllare il tipo di disco inserito nell’alloggiamento. Il lettore DVD riproduce soltanto DVD, CD audio e MP3. • Sia l’unità che il disco dispongono di un codice regionale.
PROBLEMA SOLUZIONE Impossibile scorrere direttamente al filmato • Non è possibile scorrere velocemente attraverso i titoli di testa e le informazioni di avvertimento visualizzate all'inizio del filmato perché il disco è stato programmato per impedire tale azione. Sullo schermo viene visualizzata l’icona ( ) La funzione o l’azione non può essere momentaneamente completata perché: 1. il software del disco prevede una restrizione; 2. il software del disco non supporta la funzione (es. angoli); 3.
Specifiche LCD retroilluminato Neon a filo Risoluzione 480 x 600 Pixel 864.000 Temperatura di esercizio 0 - 60 ºC (32 -140 ºF) Temperatura di conservazione -20-80 ºC (-4 -176 ºF) Durata retroilluminazione 10.000 ore Sistema di visualizzazione video NTSC/PAL Uscita audio cuffia auricolare 0,03W a 32 ohm Uscita video 1,0 V p-p a 75 ohm Alimentazione 12 V c.c.
La Vostra garanzia Gentile Cliente, grazie per aver acquistato questo prodotto Audiovox, prodotto studiato secondo i più elevati standard di qualità e sottoposto a test rigorosi. Se utilizzato correttamente, esso funzionerà perfettamente per molti anni. La garanzia copre la sostituzione gratuita dei ricambi e la prestazione di manodopera per tutti i prodotti Audiovox di elettronica di consumo venduti in Italia.
D Wir gratulieren Ihnen! Durch Ihre kluge Wahl sind Sie Besitzer eines Audiovox Mobile Video-Produktes geworden. Audiovox Mobile Video-Produkte erfreuen sich aufgrund der hohen Qualität eines ausgezeichneten Rufes weltweit. Dieser hohe Qualitätsstandard ermöglicht es für Audiovox Mobile Video-Produkte 2 Jahre Garantie zu gewähren. Die Produkte werden während des gesamten Fertigungsvorganges laufend kontrolliert und geprüft. Im Servicefall beachten Sie bitte folgendes: 1.
G ARANTIEKARTE WARRANTY C ARD Typ/ Type Serien-Nr./Serial-No.
Audiovox Audio Produkte GmbH Lise-Meitner-Str. 9 · 50259 Pulheim Tel.: +49 2234/807-0 · Fax: + 49 2234/807-399 www.audiovox-germany.