5 CD MINI HI-FI SYSTEM OPERATING INSTRUCTION - E1 -
WARNING To reduce the risk of fire or electric shock, do not expose this appliance to rain or moisture. EXPLANATION OF GRAPHICAL SYMBOLS: The lightning flash with arrowhead symbol, within an equilateral triangle, is intended to alert the user to the presence of uninsulated "dangerous voltage" within the product's enclosure that may be of sufficient magnitude to constitute a electric shock to persons.
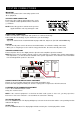
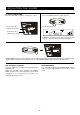
SYSTEM CONNECTIONS IMPORTANT Switch off the power before connecting speakers and other equipment. SPEAKER CORD CONNECTION Connect the wires with the printed white lines to the red (+) terminals and the plain-black wires to the black (-) terminals. NOTE: Connecting speakers other than the speakers supplied with the unit, may damage the unit. POWER CORD CONNECTION 1. Make sure that all the components and speakers are connected correctly. 2.
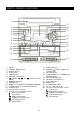
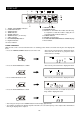
PARTS IDENTIFICATIONS 1 15 16 17 18 2 3 4 5 6 19 7 8 20 9 21 22 23 10 11 12 24 13 25 14 1) 2) 3) 4) 5) 6) 7) CD door STEREO WIDE indicator MUTE indicator MUTE button POWER button VOLUME control buttons PRESET , SKIP and MIN / HOUR buttons 8) REMOTE SENSOR 9) PHONES jack 10) MODE selector (BEAT CUT/FM MODE/DUBBING) 11) FUNCTION button (TUNER/TAPE/CD/AUX) 12) X-BASS button 13) Cassette holder ( Deck A) 14) Cassette deck A operation controls REC (record) button PLAY button REW (rewind) button F.
DISPLAY 11. MEMORY indicator. 12. RANDOM indicator. 13. Indicators to show which disc holder of the disc tray is occupied. If a certain disc holder is empty, the corresponding number indicator will be off. 14. STEREO indicator. 15. REPEAT mode indicators. 16. CLOCK/CD TIMING/BROADCAST STATION display. 17. Track number. 1. TRACK and CHANNEL indicators. 2. FUNCTION indicators. 3. SLEEP indicator. 4. TIMER indicator. 5. ON/OFF indicators. 6. AM/PM indicators. (for 12 hours) 7. X-Bass indicator. 8.
ADJUSTING THE SOUND TO USE THE X-BASS Press the X-BASS button to adjust the bass. TO ADJUST THE VOLUME Press the VOLUME +/- buttons to adjust the sound. MUTE To increase the volume press here. The display will show: To decrease the volume press here. X-BASS is designed specifically to boost the low frequency sound to obtain a more powerful bass. MUTE STEREO WIDE creates the feeling that the sound is being spread to the left and right, beyond the actual position of the speakers.
SETTING THE CLOCK To set the current time (Select POWER STANDBY mode) 1. Press the MEMORY/ mode. Hours flash. CLOCK button in clock 2. Press the HOUR button repeatedly to set current hour. PRESET SKIP HOUR MEMORY CLOCK SKIP MIN TIMER CLOCK button to 3. Press the MEMORY/ make the correct minutes flash. PRESET buttons to set the minutes and 4. Press the CLOCK button to start the clock.
SETTING THE SLEEP TIMER 1. Press the SLEEP button while the power is on. "SLEEP 90" lights in the display. NOTE: SLEEP can only be adjusted in TUNER, TAPE and AUX modes. TIMER 2.Press and hold the SLEEP button to select the length of remaining time until the unit turns off. It changes the indicator in the following way: SLEEP 90 SLEEP 80 SLEEP 10 ........SLEEP 20 The Sleep Timer is set and the SLEEP indicator lights in the display. Let go when required sleep time (in minutes) is shown.
FOR BETTER RECEPTION FM MW/AM Fully unwind the wire antenna. Then extend the wire antenna and place it in the position that sounds best. NOTE: Do not connect to outside antenna. Connect the loop aerial (provided) to the 'MW/AM LOOP ANTENNA' snap terminals at the back of the unit. TUNING INTO A STATION MANUALLY 2. Press the BAND button to select the desired band. 3. Tune into a station. M O DO WN T UNING UP RE PE A T RA N D 1. Press the FUNCTION button to TUNER.
TUNING INTO A PRESET ST ATION STA 1. Press the FUNCTION button to TUNER. 2. Select a band. 3. Press the PRESET tons to preset number. but- PRESET BAND SKIP HOUR SKIP MIN TO RECEIVE THE FM BROADCAST IN STEREO IF THE FM STEREO BROADCAST SIGNAL IS WEAK Set the MODE selector to FM STEREO. When the FM stereo broadcast is received, FM STEREO indicator lights up. Set the MODE selector to FM MONO. Background noise will be reduced but the signal reproduced will be mono.
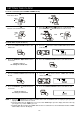
COMPACT DISC PLAYBACK 2. Press the OPEN/CLOSE button to open the disc tray. M O DO T UNING WN UP RE PE A T RA ND 1. Press the FUNCTION button to CD. STOP Y / PA USE PLA D IS C IP 4. Press the DISC SKIP button to revolve the tray clockwise. Place other disc(s) on the disc holder(s). M O WN DO TUNING UP RE PE A T RA N D 3. Place the first disc onto the disc holder, with the label side up. WARNING: • Before transporting the unit, take out all discs from CD tray.
COMPACT DISC PLAYBACK (CONTINUED) Notes: 1. During playback, disc tray can be opened to change/add disc, but DISC SKIP button will become invalid and the current disc playback will not be interrupted. 2. The / SKIP buttons can only be used to choose a track of the current disc. To choose a track of another disc, DISC SKIP button should be pressed to get to the desired disc first.
COMPACT DISC PLAYBACK (CONTINUED) SHUFFLE PLAY - PLAYING IN A RANDOM ORDER IN STOP MODE M O WN DO T UNING UP RE 2. Press the RANDOM button, the word "RANDOM" will appear on the display. PE A T RA N D 1. Press the DISC SKIP button to select a disc. RA N D T UNING UP RE PE A Y / PAUSE PLA STOP STOP WN DO T Y / PAUSE PLA M O DI SC SK IP D IS C SK IP M O DO TUNING WN UP RE PE A T RA ND 3. Press PLAY/PAUSE button.
COMPACT DISC PLAYBACK (CONTINUED) REPEAT PLAYBACK DURING PLAYBACK MODE To Repeat the Current Track UP • Press the REPEAT button until REPEAT ONE appears on the display and the currently playing track will be played repeatedly until the STOP button is pressed. • SKIP and SEARCH can still be used during this function. SKIP will go to the start of the next track, Reverse Skip will go to the start of the present track, on the second press it will then go to the start of the previous track.
COMPACT DISC PROGRAMMED PLAYBACK A program of up to 32 tracks from all the available discs in the disc tray can be played in a preset order. 2. Press the DISC SKIP button to select the desired disc (the disc symbol moves). CLOCK button (in stop mode). DO WN TUNING UP RE PE A STOP Y / PAUSE PLA MEMORY CLOCK M O T RA N D 1. Press the MEMORY/ TIMER DI SC 3. Press the track. / SKIP buttons to select the desired SK 4. Press the MEMORY/ track in memory.
STOPPING AND CANCELLING PROGRAMMED PLAYBACK M O DO WN TUNING UP RE " will be displayed. PE A RA N T D To stop programmed play for a moment: PLAY/PAUSE button and " • Press the Press this button again to resume playing. STOP Y / PAUSE PLA D IS C SK IP To add additional tracks during program playback: • Press the STOP button once, press the MEMORY/ steps 2 to 4 (see page E15).
TAPE PLAYBACK Usable tapes - use only normal (type I) tapes for playback. You can playback only the front sides of the tapes in Decks A and B. 1. Press the FUNCTION button to TAPE. 2. Press the STOP/EJECT button and load a cassette into the cassette compartment of Deck A or Deck B. 3. Press the PLAY button to begin playback. DECK A DECK B DECK A DECK B OR TO STOP PLAYBACK Press the STOP/EJECT button.
TAPE CARE TIPS Preventing accidental erasure 1. Cassette tapes have two erase-protection tabs - one for each side. To protect a recording from being accidentally recorded over or erased, use a screwdriver to remove one or both of the cassette tape's erase-protection tabs. DUBBING ---- 2. If you want to record on a tape side after you have removed the erase protection tab, place a piece of strong plastic tape over that side's eraseprotection hole.
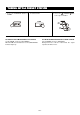
RECORDING ---- DECK A ONLY RECORDING FROM THE CD PLAYER 2. Insert a tape into the cassette compartment. 1. Press the FUNCTION button to CD. This side you want to record DECK A RA N D 4. Press the play/pause button of the CD player. WN DO DI TO STOP RECORDING Press the STOP/EJECT button of Deck A. TO INTERRUPT RECORDING Press the PAUSE button of Deck A. To resume recording, press the PAUSE button again. TUNING UP RE PE A Y / PAUSE PLA STOP DECK A M O T 3.
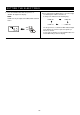
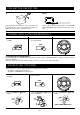
MAINTENANCE DECK B DECK A CLEANING CD If the CD skips or will not play, the disc may need cleaning. Before playing, wipe the disc from the centre out with a cleaning cloth. After playing, store the disc in its case. CLEANING THE TAPE HEADS To maintain optimum sound quality, clean the playback/record heads (a) , erase head (b), pinch roller (c) , and capstans (d) regularly ( every 10 hours of use). Use a cotton swab lightly moistened with cleaning fluid or denatured alcohol.
SPECIFICATIONS TUNER SECTION Frequency range Antenna AMPLIFIER SECTION Intermediate distortion Output power Frequency Response Power consumption Power requirements COMPACT DISC PLAYER SECTION Channels S/N ratio Wow & Flutter Sampling frequency Quantization Pick up light source Pick up wave length CASSETTE SECTION Track for mat Frequency response Signal to noise ratio Wow and flutter Tape speed Rewind time Fast forward time Recording system Erasing system Motor Heads FM 87.
MINI CHAÎNE HAUTE FIDÉLITÉ CHANGEUR 5 CD INSTRUCTIONS DE FONCTIONNEMENT - F1 -
AVERTISSEMENT Pour réduire le risque d’incendie ou de chocs électriques, n’exposez pas cet appareil à la pluie ou à l’humidité. EXPLICATION DES PICTOGRAMMES: Le symbole de l’éclair à l’intérieur d’un triangle a pour but d’avertir l’utilisateur de «tension dangereuse» non isolée, à l’intérieur de l’appareil, assez élevée pour causer un choc électrique.
RACCORDEMENTS DE LA CHAÎNE IMPORTANT Mettez l’appareil hors circuit avant de raccorder les enceintes acoustiques et tout autre appareil auxiliaire. RACCORDEMENT DES FILS DES ENCEINTES ACOUSTIQUES Raccordez les fils avec les lignes blanches imprimées aux bornes rouges (+) et les fils noirs unis aux bornes noires (-). REMARQUE: Le raccordement d’enceintes acoustiques autres que celles fournies avec l’appareil, peut endommager l’appareil. Branchement du cordon d'alimentation 1.
IDENTIFICATION DES PIÈCES 1 2 3 4 5 6 7 8 9 10 11 12 13 15 16 17 18 19 20 21 22 23 24 25 14 1) 2) 3) 4) 5) 6) 7) 8) 9) 10) 11) 12) 13) 14) PORTE DU LECTEUR DE CD INDICATEUR "stéréo étendue" INDICATEUR "coupure du son" BOUTON "coupure du son" BOUTON "POWER" BOUTONS "contrôle volume" BOUTONS "présélection+/-et réglage horloge" CAPTEUR POUR TELECOMMANDE PRISE CASQUE SELECTEUR DE MODE (interrupteur, interférences, FM, copie) SELECTEUR DE FONCTIONS (syntonisateur, cassette, CD) BOUTON "X-BASS" PLATINE CASSE
AFFICHAGE 11. Indicateur de MÉMOIRE (MEMORY). 12. Indicateur de LECTURE ALÉATOIRE (RANDOM). 13. Indicateurs montrant sur quel(s) porte-disque(s) se trouvent des DC. Si un porte-disque est vide, l’indicateur du numéro correspondant est éteint. 14. Indicateur stéréo. 15. Indicateurs de LECTURE RÉPÉTÉE. 16. Affichage HORLOGE/DURÉE DE DC/STATION DIFFUSÉE. 17. Numéro de plage. 1. Indicateurs de PLAGE et de CANAL. 2. Indicateurs de FONCTION. 3. Indicateur D’ARRÊT DIFFÉRÉ (SLEEP). 4.
RÉGLAGE DU SON RÉGLAGE DU VOLUME Pressez les touches de VOLUME CROISSANT/ DÉCROISSANT pour régler le son. AMPLIFICATION DES GRAVES X-BASS Pressez la touche X-BASS pour régler les graves. MUTE Pour augmenter le volume, pressez ici.. L’affichage indique: Pour diminuer le volume, pressez ici. La fonction X-BASS augmente les fréquences basses pour amplifier les graves.
RÉGLAGE DE L’HORLOGE Réglage de l’heure en cours (choisissez le mode Power/Standby) 1. Pressez la touche MEMORY / CLOCK en mode pour régler l’heure. Les heures clignotent. MEMORY CLOCK 2. Pressez le réglage PRESET croissant/décroissant de façon répétée jusqu’à ce que l’heure en cours apparaisse. PRESET SKIP HOUR SKIP MIN TIMER 3. Pressez la touche MEMORY / que les minutes clignotent. CLOCK pour 4.
RÉGLAGE DE L’ARRÊT DIFFÉRÉ 1. Pressez la touche SLEEP (arrêt différé) pendant que l’appareil est en circuit. «SLEEP 90» s’allume sur l’affichage. REMARQUE: L’arrêt différé ne fonctionne que sur les modes TUNER (syntonisateur), TAPE (magnétocassette) et AUX. STANDBY 2. Pressez et maintenez enfoncée la touche SLEEP pour choisir la durée de temps restant avant la mise hors circuit de l’appareil. L’affichage change comme suit: SLEEP 90 SLEEP 80 SLEEP 10 ........
AMÉLIORATION DE LA RÉCEPTION FM MW/AM Déployez complètement l’antenne filaire et placez-la dans la position qui procure la meilleure réception. Raccordez l’antenne cadre (fournie) aux bornes enfichables «MW/AM LOOP ANTENNA» à l’arrière de l’appareil. SYNTONISATION MANUELLE D’UNE STATION 2. Pressez la touche BAND pour choisir la bande désirée. 3. Syntonisez la station désirée. M O T UNING WN DO UP RE PE A T RA ND 1. Pressez le sélecteur de FONCTION jusqu’à TUNER (syntonisateur).
SYNTONISATION D’UNE STATION PRÉRÉGLÉE 1. Pressez le sélecteur de FONCTION jusqu’à TUNER (syntonisation). 2. Choisissez une bande. 3. Pressez les touches de préréglage (PRESET) jusqu’au numéro de station préréglé. PRESET SKIP HOUR FUNCTION SKIP MIN RÉCEPTION D’UNE ÉMISSION FM STÉRÉO Réglez le sélecteur de mode à FM STEREO. Lorsque l’émission FM stéréo est captée, l’indicateur FM STEREO s’allume. - F10 - SI LE SIGNAL DE L’ÉMISSION FM STÉRÉO EST FAIBLE Réglez le sélecteur de mode à FM MONO.
LECTURE D’UN DISQUE COMPACT 1. Pressez le sélecteur de FONCTION jusqu’à DC. 2. Pressez la touche OPEN/CLOSE pour ouvrir le tiroir du DC. M O WN DO TUNING UP RE PE A T RA ND FUNCTION STOP Y / PAUSE PLA D IS C IP 4. Pressez la touche DISC SELECT pour faire tourner le plateau dans le sens horaire. Placez l’autre (ou les autres disques) sur le(s) plateau(s). M O WN DO TUNING UP RE PE A T Y / PAUSE PLA STOP RA ND 3. Placez le premier disque sur le porte-disque, l'étiquette vers le haut.
LECTURE D’UN DISQUE COMPACT (SUITE) Remarques: 1. Durant la lecture, vous pouvez ouvrir le tiroir pour changer ou ajouter un disque, mais la touche DISC SELECT n’est plus fonctionnelle; cependant, la lecture du disque en cours ne sera pas interrompue. 2. Les touches de saut / ne servent qu’à choisir une plage sur le disque en cours. Pour choisir une plage d’un autre disque, il faut presser la touche DISC SELECT pour aller d’abord au disque désiré.
LECTURE D’UN DISQUE COMPACT (SUITE) LECTURE ALÉATOIRE - LECTURE AU HASARD EN MODE D’ARRÊT 1. Pressez la touche DISC SELECT pour choisir un disque. TUNING UP RE PE A 2. Pressez la touche RANDOM, le mot «RANDOM» parait sur l’affichage. T RA N D M O WN DO RA N D UP RE PE A STOP STOP TUNING Y / PAUSE PLA SK WN DO T Y / PAUSE P LA DI SC M O IP D IS C SK IP M O WN DO TUNING UP RE PE A T RA ND LECTURE/PAUSE.
LECTURE D’UN DISQUE COMPACT (SUITE) M O WN DO TUNING UP RE Répétition de la plage en cours • Pressez la touche REPEAT jusqu’à ce que «REPEAT ONE» apparaisse sur l’affichage; la lecture de la plage en cours sera répétée de façon continue jusqu’à ce que vous pressiez la touche d’arrêt. • Vous pouvez utiliser les fonctions de SAUT et RECHERCHE durant la répétition de lecture.
LECTURE PROGRAMMÉE DE DC Vous pouvez programmer jusqu’à 32 plages de tous les disques dans le tiroir pour en effectuer la lecture dans l’ordre désiré. CLOCK (en mode 1. Pressez la touche MEMORY / d’arrêt). 2. Pressez la touche DISC SELECT pour choisir le disque désiré (le symbole de disque se déplace). M O W DO N T UNING UP RE PE A T RA N D MEMORY CLOCK STOP Y / PAUSE PL A TIMER DI SC SK IP MEMORY MEMORY TRACK TRACK 3. Pressez les touches de SAUT désirée. / pour choisir la plage 4.
ARRÊT ET ANNULATION DE LA LECTURE PROGRAMMÉE Arrêt momentané de la lecture programmée: • Pressez la touche de LECTURE/PAUSE et « » apparaît sur l’affichage. Pour reprendre la lecture, pressez de nouveau . TUNING WN DO UP RE PE A T RA ND M O STOP Y / PAUSE PLA D IS C SK IP Pour ajouter d’autres plages durant la lecture programmée: • Pressez la touche D’ARRÊT une fois, pressez la touche MEMORY / |-- |, puis répétez les étapes 2 à 4 (voyez page F-16).
LECTURE D’UNE CASSETTE Bandes utilisables - utilisez seulement des cassettes normales (type I) pour la lecture. Les platines A et B effectuent la lecture du côté de la bande qui vous fait face. 1. Pressez le sélecteur de FONCTION jusqu’à TAPE. 2. Pressez la touche STOP/EJECT (arrêt/ éjection) et chargez une cassette dans le compartiment de cassette de la platine A ou B. Platine A Platine B 3. Pressez la touche de LECTURE pour commencer la lecture.
CONSEILS D’ENTRETIEN DES CASSETTES Pour éviter l’effacement accidentel 1. Les cassettes ont deux languettes de protection contre l’effacement, une pour chaque côté. Pour protéger un enregistrement d’un effacement accidentel, retirez l’une ou les deux languettes de protection de la cassette avec un tournevis. COPIE ---- 2. Pour effectuer un enregistrement sur une cassette dont les languettes ont été cassées, il suffit de fixer du ruban adhésif solide sur l’ouverture laissée par la languette cassée.
ENTRETIEN Platine A Platine B NETTOYAGE DES DC Si un DC produit des sons hachés ou si la lecture n’est pas possible, il faut peut-être nettoyer le DC. Avant d’en effectuer la lecture, essuyez le disque en allant du centre vers le bord avec un chiffon. Après son utilisation, rangez le disque dans son étui.
FICHE TECHNIQUE SYNTONISATEUR Gamme de fréquence Antenne AMPLIFICATEUR Déformation intermédiaire Puissance Réponse de fréquences Consommation de courant Exigences d’alimentation CHANGEUR DE DISQUE COMPACT Canaux Rapport S/B Pleurage et scintillement Fréquence d’échantillonnage Quantification Source de lumière du faisceau Longueur d’onde du faisceau MAGNÉTOCASSETTE Format de piste Réponse de fréquences Rapport signal/bruit Pleurage et scintillement Vitesse de la bande Durée, rembobinage Durée, avance rapide
MINI HI-FI SISTEMA DE 5 CD MANUAL DE INSTRUCCIONES - S1 -
EXPLICACIÓN DE LOS SÍMBOLOS GRÁFICOS To reduce the risk of fire or electric shock, do not expose this EXPLANATION OF GRAPHICAL SYMBOLS: appliance to rain or moistre. El símbolo del rayo con punta de flecha dentro de un triángulo equilátero, es para alertar al usuario la presencia de “ alto voltaje peligroso” (aislado dentro de la carcasa), que puede ser de magnitud suficiente como para constituir riesgo de descarga eléctrica para las personas.
SISTEMA DE CONEXIONES ¡ IMPORTANTE ! Desconecte la corriente antes de conectar los altavoces u otros equipos. Impedancia de los altavoces principales: 4 ohmios CONEXIÓN DEL CABLE DE LOS ALTAVOCES Conecte los cables de color blanco a los polos rojos (+) y los cables negros a los polos negros (-). NOTA: Conectar altavoces que no sean los provistos con el aparato, podrían casusarle daños. CONEXIÓN DEL CABLE DE ALIMENTACIÓN 1.
IDENTIFICACIÓN DE LOS CONTROLES 1 15 16 17 18 2 3 4 5 6 19 7 8 20 9 21 22 23 10 11 12 24 13 25 14 1) 2) 3) 4) 5) 6) 7) 8) 9) 10) 11) Puerta del CD Función STEREO WIDE Función MUTE Botón de encendido : MUTE Botón de encendido : POWER Botones de control de volumen : VOLUME Botón de sintonización (PRESET/SKIP/MIN/HOUR) Sensor del mando a distancia : REMOTE SENSOR Toma de auriculares : PHONES MODE selector (BEAT CUT/ FM MODE / DUBBING) Botón de función : FUNCTION (TUNER / TAPE / CD / AUX) 12) Botón
PA N T ALLA TA 11. Indicador de “MEMORIA” 12. Indicador de “RANDOM” 13. Indicadores que muestran los platos para CDs que tienen disco. Si algún plato estuviera vacío el el número indicador correspondiente se apagaría. 14. Indicador de “STEREO” 15. Indicador de la función “REPEAT” 16. Pantalla “CLOCK/CD TIMING/BROADCAST STATION”. 17. Número de pista. 1. Indicadores de “TRACK” y “CHANNEL” 2. Indicadores de “FUNCIONES” 3. Indicador de “SLEEP” 4. Indicador de “TIMER” 5. Indicadores “ON/OFF” 6.
AJUSTE DEL SONIDO PARA USAR LA FUNCIÓN “X-BASS” Presione el botón “X-BASS” para ajustar los grabes. PARA AJUSTAR EL VOLUMEN Presione los botones + / - para ajustar el sonido. MUTE Para subir el volumen presione aqui. La pantalla mostrará Para bajar el volumen presione aqui. El “X-BASS” está diseñado específicamente para aumentar las bajas frecuencias y obtener sonidos grabes más potentes.
AJUSTE DEL RELOJ Para ajustar la hora (Seleccione la función “POWER STANDBY”) 1. Presione el botón “MEMORY / CLOCK” para ajustar el reloj. La hora parpadeará. 2. Presione repetidamente el botón “PRESET /<< o >>/” para ajustar la hora. PRESET SKIP HOUR MEMORY CLOCK SKIP MIN TIMER 3. Presione el botón “MEMORY/ CLOCK” para hacer que parpadeen los minutos. 4. Presione los botones “ PRESET ” para ajustar los CLOCK” minutos y después presione el botón “MEMORY/ para terminar el ajuste del reloj.
AJUSTE DEL TEMPORIZADOR P ARA DORMIR PARA 1. Presione el botón “SLEEP” de su mando a distancia, cuando la unidad esté encendida. “SLEEP 90” aparecerá en la pantalla. NOTA: SLEEP solo se puede ajustar en las funciones TUNER, TAPE y AUX. 2. Mantenga presionado el botón “SLEEP” para seleccionar el tiempo a transcurrir para que se apague el aparato.
PARA UNA MEJOR RECEPCIÓN FM: AM/MW: Desenrolle por completo el cable de la antena. Después extiéndalo poniéndolo en la posición que mejor se escuche. NOTA: No conectar a una antena exterior. Conecte la antena circular (provista) a los terminales de la “LOOP ANTENA AN/MW” que se encuentran en la parte posterior de la unidad. SINTONIZANDO EN UNA ESTACION MANUALMENTE 2. Presione el botón para seleccionar la banda deseada. 3. Sintonice en una estación. M O DO TUNING WN UP RE PE A T RA ND 1.
PARA SINTONIZAR UNA EMISORA PRESELECCIONADA 1. Presione el botón “FUNCTION” para seleccionar “TUNER”. 2. Presione el botón “BAND” para seleccionar una banda. 3. Presione el botón “ PRESET ”hasta el número preseleccionado. PRESET BAND SKIP HOUR SKIP MIN PARA RECIBIR LA RADIODIFUSORA FM EN STEREO Situe el selector MODE a FM STEREO. Cuando la radiodifusora FM STEREO es recibida , la luz indicadora de FM STEREO se encenderá. SI LA SEÑAL RADIODIFUSORA FM STEREO ES DEBIL Situe el selector MODE a FM MONO.
FUNCIONAMIENTO DEL LECTOR DE CD 2. Presione el botón “OPEN/CLOSE” para abrir la bandeja porta discos. M O DO T UNING WN UP RE PE A T RA ND 1. Presione el botón “FUNCTION”para seleccionar CD. STOP Y / PAUSE PLA D IS C 3. Ponga el primer disco en la bandeja, con la etiqueta mirando hacia arriba. AVISO: • Antes de transportar la unidad saque todos los discos de la bandeja. SK IP M O WN DO TUNING UP RE PE A T RA N D 4.
FUNCIONAMIENTO DEL LECTOR DE CD Notas: 1. Mientras esté en marcha, la bandeja de los discos se podrá abrir para cambiar / añadir un disco, pero el botón “DISC SKIP” quedará invalidado y el disco que esté sonando no se interrumpirá. 2. Los botones “ / SKIP ” sólo se podrán usar para cambiar de pista en el disco que se esté escuchando. Para elegir una pista en otro disco, se deberá pulsar el botón “DISC SKIP” para acceder primero al disco deseado. 3.
FUNCIONAMIENTO DEL LECTOR DE CD Reproducción al azar en la situación de parada. WN DO M O T UNING UP RE 2. Presione el botón “RANDOM”, la palabra “RANDOM” aparecerá en la pantalla. PE A T RA N D 1. Presione el botón “DISC SKIP” para seleccionar un disco. RA N D UP RE PE A Y / PAUSE PLA STOP STOP T UNING WN DO T Y / PAUSE PLA M O DI SC SK IP D IS C SK IP M O DO TUNING WN UP RE PE A T RA ND PLAY/PAUSE ”.
FUNCIONAMIENTO DEL LECTOR DE CD) Repetición mientras esté sonando: TUNING WN DO UP RE PE A T RA N D M O Para repetir la pista que está sonando: • Mantenga presionado el botón “REPEAT” hasta que aparezca en la pantalla “REPEAT ONE” entonces la pista que esté sonando se repetirá continuamente hasta que se presione el botón “STOP”.
PROGRAMACIÓN DE LOS CDs Se puede programar en un orden preestablecido hasta un total de 32 pistas de las disponibles en los discos que estén en la bandeja. CLOCK” (en la función 2. Presione el botón “DISC SKIP” para seleccionar el disco que desea oír (el símbolo de disco muestra cuál es el disco seleccionado). DOWN TUNING UP R T STOP Y / PAUSE PLA MEMORY CLOCK EP EA M O RA N D 1. Presione el botón “MEMORY/ “STOP”). TIMER DI SC 3.
PARA P ARAR Y CANCELAR LA PROGRAMACIÓN DE DISCOS COMP ACTOS PARAR COMPACTOS M O DO WN TUNING UP RE PE A RA N T D Para parar momentaneamente la programación: • Presione el botón “ PLAY/PAUSE” y " ” aparecerá en la pantalla. Presione este botón una vez más para que vuelva a sonar.
OPERACIÓN DEL TOCACASETES REPRODUCCIÓN DE CASETES DE LA PLETINA A Y B. Para la reproducción utilice únicamente cintas normales (tipo I) En el caso de ambas pletinas, sólo podrá reproducir el lado del casete que esté mirando hacia fuera. I). 1. Presione el botón “FUNCTION” para seleccionar el lector de cinta “TAPE”. 2. Presione STOP/EJECT e inserte un casete en el compartimento para casetes de la pletina A o B. PLETINA A PLETINA B ” para 3. Presione el botón “PLAY poner en marcha.
CONSEJOS P ARA EL CUIDADO DE LAS CINT AS PARA CINTAS Para prevenir que se borre accidentalmente 1. Las cintas cassette tienen dos patillas protectoras antiborrado una en cada lado. Para proteger una grabación contra un borrado accidental o una sobre grabación, use un destornillador para para quitar una o las dos patillas protectoras. 2.
GRABACIÓN ---- SÓLO PLETINA A GRABACIÓN A PARTIR DE UN DISCO COMPACTO 1. Presione FUNCTION hasta llegar a la posición CD. 2. Introduzca una cinta en el compartimento para casetes. este es el lado que desea grabar PLETINA A M O WN DO STOP DI PARA DETENER LA GRABACIÓN Presione el botón STOP/ EJECT de la pletina A. PARA INTERRUMPIR LA GRABACIÓN Presione el botón PAUSE de la pletina A. Para reanudar la grabación, presione nuevamente PAUSE. TUNING UP RE PE A Y / PAUSE PLA PLETINA A RA N D 4.
MANTENIMIENTO Para limpiar el CD: Si el CD no suena o si el sonido salta, el disco podría necesitar ser limpiado. Antes de ponerlo en marcha, pasele un trapo límpio desde el centro hacia fuera. (PLETINA B) (PLETINA A) b d d a c a c Para limpiar las cabezas de la grabadora: Para mantener una calidad de sonido óptima, límpie regularmente las cabezas lectoras y de grabación (a), la cabeza de borrado (b), el cilindro giratório guia cintas (c) y los cabrestantes (d) (cada 10 horas de uso).
ESPECIFICACIONES Sección radio Radio frecuencias Antena Sección amplificador Distorsión Potencia de salida Frecuencia de respuesta Consumo de energía Requisitos de energía Sección Lector de discos compactos Canales Radio S/N Distorsión y oscilación Cuantificación Receptor de luz Receptor de longitud de ondas Sección de la grabadora Formato de pistas Frecuencia de respuesta Radio de señal de ruido Distorsión y oscilación Velocidad de la cinta Tiempo de rebobinado Tiempo de avance rápido Sistema de grabació