® ELECTRONICS CORP. DV9000 9” Color TV and DVD Player Floor Console For Customer Service Visit Our Website At WWW.audiovox.
A. Introduction The DV9000 is a self-contained entertainment center for your vehicle which will make your road trips enjoyable. This versatile floor console incorporates a 9” color TV with a built-in DVD Player, complete with speakers, foil antenna, external antenna jack, headphone jacks, AV inputs, AV outputs and a remote control. The DV9000 is easily installed between the front seats of any mini or full size van. The console is constructed to provide years of enjoyment.
. Discs Do not use irregularly shaped discs such as heart-or star-shaped discs as they may cause the unit to malfunction. Do not stick paper, tape or glue on the disc. Do not expose the disc to direct sunlight or heat sources such as hot air ducts. Do not touch the surface of disc. Handle the disc by its edge. Clean the disc by wiping the disc from the center out with a clean cloth. Remove the disc from the unit and store it in its case after playing.
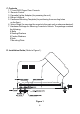
C. Contents 1. TV and DVD Player Floor Console 2. Remote Control 3. Cigarette Lighter Adapter (for powering the unit) 4. Owner’s Manual 5. Cardboard Mounting Template (for positioning the mounting holes on the floor) 6. Velcro Strips (for securing the remote to the main unit or wherever desired) 7. Hardware Package for Securing Console to Vehicle. The package contains the following: 6 Bolts 6 Sealing Washers 6 Fender Washers 6 Nuts 1 Mounting Plate D.
1. Temporarily place the cardboard mounting template in the appropriate mounting location on the floor between driver/passenger seats, with the four hole end of the template facing the front of your vehicle. Be sure to leave enough space for the disc tray to fully open. Make sure that you have checked underneath the vehicle and within the vehicle (under the carpet) for obstructions. Mark the mounting hole locations. 2.
E.
13. Video Input Jack 14. Audio L Input Jack 15. Audio R Input Jack 16. Headphone Input Jack #2 17. Play Button 18. Open/Close Button 19. DC Input Jack 20. Audio R Output Jack 21. Audio L Output Jack 22. Video Output Jack 23. Antenna Terminal 24. Disc Tray 1. Remote Control Sensor 2. Previous Button 3. Play Button 4. Next Button 5. Stop Button 6. Auto Program Button 7. TV Channel Up/Down Buttons 8. Volume Up/Down Buttons 9. Picture Select Button 10. TV/AV Select Button 11. Power Button 12.
G. Remote Control View (Refer to Figure 4) 1. TV/DVD Button* 2. DVD Select Button 3. Number Buttons 4. TV/CATV Button 5. Mute Button 6. Picture Button 1 7. Volume Up/Down Buttons 2 8. AB Button 9. Up-Down/Left-Right/Enter Buttons 10. Menu Button 3 11. Display Button 12. Stop Button 13. Reverse Scan Button 4 14. Forward Scan Button 5 6 15. Audio Button 16. Subtitle Button 7 17. Power Button 18. TV Select Button 8 19. Auto Memory Button 20. TV Display Button 9 21. Skip Search Button 10 22.
H. DVD Player 1.
3. Display (The contents vary from disc-to-disc.) 1). Playing time and remaining time a. During playback press DISPLAY to display the current title number (1), the total number of titles (2), the current chapter number (3), the total number of chapters (4), and the elapsed time for the title (5). The heading will disappear automatically in about 3 seconds. b. Press DISPLAY again to display the remaining time for the title. The heading will disappear automatically in about 3 seconds. TITLE REMAIN c.
Press DISPLAY the 4th time to display the remaining time for the chapter. The heading will disappear automatically in about 3 seconds. Press DISPLAY the 5th time to exit. 2). Subtitle During playback press SUBTITLE to select the subtitle language you desire, the current subtitle language number (1) and the total number of subtitle languages (2) displayed. Press SUBTITLE again to select other subtitle languages. The subtitle display will disappear automatically in about 3 seconds. 3).
4). A-B Repeat a. During playing press A-B to set the starting point A. b. Press A-B to set the ending point B and the player will repeat edly play the part between Point A and Point B.
c. Press A-B the 3rd time to cancel the A-B repeat playing and resume normal playback from Point A. 5). Repeat a. During playback press REPEAT to repeat the current chapter. b. During playback press REPEAT again to repeat the current title.
c. During playback press REPEAT the 3rd time to cancel the repeat play and resume normal playback. The repeat display will disappear automatically in about 3 seconds. 4. Setup (The contents vary from disc-to-disc.) Press SETUP to display the main page of the setup menu on the screen. Press SETUP again to quit and the unit will resume play back. 1). Highlight GENERAL SETUP using to enter to the general setup menu.
A. Highlight TV DISPLAY using then use the to button enter the TV DISPLAY submenu. Highlight the desired TV display mode and press ENTER to confirm the setting. Press setup to return to the movie. 1) Normal (PAN SCAN): This displays the wide picture on the screen with a portion of the left and right sides removed. 2) Normal (LETTER BOX): This displays a wide picture with black bands on the upper and lower portions of the screen.
1). Select MAIN PAGE using to the main page. , and then press ENTER to return 2). When there’s no disc inside the player, highlight PREFERENCES using and then press ENTER to enter the preferences page. a. Select AUDIO using and then press to enter the submenu. and then press ENTER to Select the audio language you desire using, confirm the setting. Press to return, to preferences. b. Select SUBTITLE using and then press to enter the submenu.
c. Select DISC MENU using and then press to enter the submenu. Select the disc menu language you desired using and then press ENTER to confirm the setting. Press to return. Note: Language selection is only available for discs recorded in above listed languages. If not, the player will play and display on the screen the original recorded language contained in the disc. d. Select PARENTAL using submenu.
Highlight the parental level you desire using . It’s listed from the lowest level (1 Child) to the highest level (8 Adult). Press ENTER to enter the password verify page. NOTE: If you have not entered a password you can use the default password (3308) Input the password in 4 digits, and then press ENTER to confirm the parental level setting. e. Highlight PASSWORD using submenu. and then press to enter the Press ENTER to enter the password change page.
Note: The default password is 3308 and this password is always effective whether you’ve changed it to another new one or not, in case that you forget the new password. To avoid others using it to set the parental level and change the password, you may note this default password by other means and delete it from this manual. Not all discs support this feature. f. Highlight DEFAULTS using and then press to enter the submenu. Press ENTER to make the setting return to the factory-set mode. g.
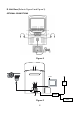
I. Watching TV 1. Refer to Figure 2. From the factory the antenna jack of the built-in foil dipole has already been connected to the antenna terminal behind the door in the rear of the console. For connecting an external antenna open the access panel on the rear of the console, and loosen the nut around the antenna jack, unplug the antenna jack, and connect the coaxial cable of an external antenna to the antenna terminal.
J. Playing a Video Game (Refer to Figure 2) Plug the video output from your game system into the yellow video jack and the Audio L and Audio R into the applicable jacks on the front of the unit. Select the AV mode by pressing TV/AV on the front of the unit. This connection takes priority to the built in DVD Player. Adjust the volume control and the picture control for individual preference. K. Wired Headphone (Refer to Figure 2) Optional wired headphones may be used with the System.
M. Specification Disc Format Color System Screen size DVD video format Dimensions (W x H x D) DVD/CD NTSC 9 inches Horizontal 720 pixel, vertical 480 pixel (NTSC) Infrared rays Built-in foil dipole 2-6 (VHF low), 7-13 (VHF high), 14-69 (UHF), 1-125 (CATV) 1.
90 DAY LIMITED WARRANTY Applies to Audiovox Video Products AUDIOVOX ELECTRONICS CORP. (the Company) warrants to the original retail purchaser of this product that should this product or any part thereof, under normal use and conditions, be proven defective in material or workmanship within 90 days from the date of original purchase, such defect(s) will be repaired or replaced with reconditioned product (at the Company's option) without charge for parts and repair labor.
© 2002 Audiovox Electronics Corp.