C HA RGE POW ER D710/D710PK D7104/D7104PK 7" Portable DVD Player PDF created with FinePrint pdfFactory Pro trial version http://www.fineprint.
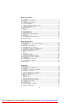
Table of Contents A. B. C. D. E. F. G. H. I. J. K. L. M. N. O. P. Q. Introduction ............................................................................................. 7 DVD and Disc Information ..................................................................... 7 Contents ................................................................................................ 8 Powering and installation ......................................................................... 8 Vehicle Installation .....
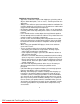
Some of the following information may not apply to your particular product; however, as with any electronic product, precautions should be observed during handling and use. l Read these instructions. l Keep these instructions. l Heed all warnings. l Follow all instructions. l Do not use this apparatus near water. l Clean only with dry cloth. l Do not block any ventilation openings. Install in accordance with the manufacturer’s instructions.
Additional Safety Information l Apparatus shall not be exposed to dripping or splashing and no objects filled with liquids, such as vases, shall be placed on the apparatus. l Always leave sufficient space around the product for ventilation. Do not place product in or on a bed, rug, in a bookcase or cabinet that may prevent air flow through vent openings. l Do not place lighted candles, cigarettes, cigars, etc. on the product. l Connect power cord only to AC power source as marked on the product.
English CAUTION WARNING: TO PREVENT FIRE OR ELECTRICAL SHOCK HAZARD,DO NOT EXPOSE THIS PRODUCT TO RAIN OR MOISTURE. FCC Information This device complies with part 15 of the FCC rules. Operation is subject to the following two conditions: (1) This device may not cause harmful interference, and (2) This device must accept any interference received, including interference which may cause undesired operation.
- Connect the equipment into an outlet on a circuit different from that to which the receiver is connected. - Consult the dealer or an experienced radio / TV technician for help. In accordance with FCC requirements, changes or modifications not expressly approved by manufacturer could void the user’s authority to operate this product. Manufacturer/Responsible Party Audiovox Electronics Corp., 150 Marcus Blvd., Hauppauge, NY 11788 This class B digital apparatus complies with Canadian ICES-003.
B. DVD and Disc Information DVD Copy Protection - This Product incorporates copyright protection technology that is protected by method claims of certain U.S. Patents and other intellectual property rights owned by Macrovision Corporation and other rights owners. Use of this copyright protection technology must be authorized by Macrovision Corporation, and is intended for home and other limited viewing uses only unless otherwise authorized by Macrovision Corporation.
C. Contents 1. 2. 3. 4. 5. 6. 7. 8. 1 x 7’’ Portable DVD Player with built in battery* 1 x AC to DC Power Adapter 1 x Automotive Power Adapter 1 x Carrying Bag** 2 x Foldable Headphones** 1 x Instruction Manual 1 x Product Registration Card 1 x eMusic Card * D710 & D710PK can operate on a fully charged battery about 2 hours; D7104 & D7104PK can operate on a fully charged battery about 4 hours. ** Only for D710PK and D7104PK. D. Powering and Installation 1.
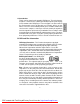
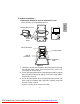
E. Vehicle Installation * English Installing the DVD Player onto the Seat Back in a Car (Refer to Figure 2) Carrying Bag Opened Carrying Bag Closed SE TUP Z O OM DI SPLAY RE PEAT M EN U AU DIO OK PUSH TOCLOSE Elastic Straps OPEN SU BTITLE Vehicle Headrest Headrest Strap Vehicle Seat Back Seat Back Strap Figure 2 1). Unfold the carrying bag, and place the DVD player on the bag beneath the elastic straps. Ensure that the unit’s corners are secured by the elastic straps. 2).
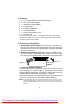
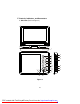
F. Controls, Indicators, and Connectors 1. Unit View (Refer to Figure 3) CHARGE P OWER M ENU AUDIO OK PUSH TO CLOSE OPEN 16 SUBTITLE VIDEO OUT AUDIO OUT REPEAT 17 18 19 2 DISPLAY 2 3 4 5 6 7 8 9 10 11 12 13 20 1 ZOOM 21 VOL. S E TUP D C 9 -1 2V 1 14 15 Figure 3 10 PDF created with FinePrint pdfFactory Pro trial version http://www.fineprint.
2) Power Button 3) Setup Button 4) Zoom Button 5) Display Button 6) Repeat Button 7) Previous Button Next Button 8) 9) Menu Button 10) Stop Button 11) UP/AUDIO button 12) OK/ OK play/pause Button 13) / Right/Fast Forward Button 14) Down/Subtitle Button 15) / Left/Fast Backward Button 16) Cover Open Button 17) DC 9-12 V Input Jack 18) Video Out Jack 19) Audio Out Jack 20) Headphone Jack 2 21) Headphone Jack 1* 22) Volume Control * Connecting to this headphone jack will disable the internal speakers. G.
H.
A DVD is divided into sections called titles and chapters. When you play a DVD, a root menu of the disc will appear on the screen of your TV or Monitor. The contents of the menu vary from disc to disc. Press MENU during playback to display the menu. Some DVDs only allow you to select disc playback options using the DVD root menu. J. Display (Display contents vary from disc to disc.) 1. Playing Time and Remaining Time a.
c. Press “DISPLAY” button a third time to display the Elapsed Time for the chapter. The heading will disappear automatically in 3 seconds. TT 01 / 01 CH 02 / 17 0 : 00 : 00 Chapter Elapsed Time Screen Display d. Press “DISPLAY” button a fourth time to display the Remaining Time for the chapter. The heading will disappear automatically in 3 seconds. TT 01/ 01 CH 02/ 17 0 : 00: 00 Chapter Remaining Time Screen Display e.
Subti tle 01 / 02 Subtitle Screen Display 3. Audio During playback press AUDIO button to select the audio language you desire*, with the current Audio Channel Number (1) and the total number of Audio Channels (2) displayed. Press AUDIO again to select another audio language. The audio display will disappear automatically if the AUDIO button is not pressed within 3 seconds. Audio Language Screen Display * Some DVDs only allow access to this function through the DVD menu. 15 English 2.
4. Zoom During playback press ZOOM button to enlarge the picture by 2x, 3x or 4X with the current zoom multiple. Press ZOOM button one time, the picture will be enlarged 2X. Press ZOOM button a second time, the picture will be enlarged 3X. Press ZOOM button a third time, the picture will be enlarged 4X. Press ZOOM button a fourth time, the picture will return to normal size. ZOOM Screen Display 5. Repeat a. During playback press REPEAT button once to repeatedly play the current chapter.
English b. Press the REPEAT button again to repeatedly play the current title. Title Repeat ON Screen Display c. Press the REPEAT button a third time to repeat all chapters and titles. All All Repeat ON Screen Display d. Press the REPEAT button a fourth time, to resume normal playback. Repeat Off Screen Display 17 PDF created with FinePrint pdfFactory Pro trial version http://www.fineprint.
K. PLAYING AUDIO CDS When a CD is Loaded into the unit, the Menu Screen will appear. You can use Up and DOWN button to choose the song you desired. Press OK to play. USING THE REPEAT FEATURE The default mode for the Repeat feature is OFF. Pressing REPEAT consecutively changes the repeat options: • Repeat One - repeats the track that is playing. • Repeat Folder - repeats the disc that is playing. • Repeat Off As you toggle through the options, the repeat option changes.
L. Playing JPEG Files 3) Press , and OK button to select a folder or a picture. If a picture is selected, photo slideshow will start with the selected picture. 4) Press the ZOOM button to enlarge the picture size by 100%,125%, 150%,200%. When the image is enlarged, you can use the navigation buttons to view the blocked parts of the picture. 5) During photo slideshow or in slideshow PAUSE mode: Press to rotate the picture counterclockwise by 90 degree. to mirror the picture horizontally.
M. Connecting to Other Equipment 1. AV Out Connecting to a TV or Another Monitor ( Refer to Figure 4) 1) Connect one end (1/8" stereo plug) of the audio cable (not supplied) into the unit’s AUDIO OUT jack, and connect the other end (2 terminals, RCA jack) to the Left and Right channel input jacks on your TV or monitor. (white = left audio channel, red = right audio channel.
N. Setup 1) Press SETUP, the ‘GENERAL SETUP PAGE’ will display on the screen. Gen eral TV Video Password Preferen Display Exit Wide OSD Lang Screen Saver ENG On Last Memory On Main SETUP Menu Screen Display a) Select ‘TV DISPLAY’ using the DOWN button, and then press RIGHT to enter the submenu. Select the TV display mode on the screen using UP/DOWN, and press OK to confirm the setting. Press the LEFT button to exit the TV DISPLAY menu.
b) Select ‘OSD LANG’ using the DOWN button, and then press the RIGHT button to enter the submenu. Choose the language you desire as the display language. Press the LEFT button to return. Gen eral TV Video Password Preferen Exit Wide Display OSD Lang Screen Saver Last Memory ENG On On English French Spanish Set OSD Language OSD Language Screen Display c)Select ‘SCREEN SAVER’ using the DOWN button. and then press the RIGHT button to enter the submenu.
Gen eral Video Password Preferen TV Display OSD Lang Screen Saver Last Memory Exit Wide ENG On On On O ff Set Last Memory Last Memory Screen Display *ON:During playback or in the pause mode, if you open the disc tray and then close without changing a disc, the unit will memorize the last playback status and resume playback from the memorized point. *OFF:The unit will not return to the last position on the disc. 23 PDF created with FinePrint pdfFactory Pro trial version http://www.fineprint.
2) Select ‘VIDEO SETUP PAGE’ by using the LEFT/RIGHT buttons, press OK button to enter the VIDEO SETUP PAGE. Gen eral Video Password Preferen Exit .. Video Setup Page .. Brightness Con trast 00 00 Go To Video Setup Page Video Setup Page Screen Display a) Select ‘BRIGHTNESS’ by using the UP or DOWN button, then press OK button. Adjust the Brightness by pressing the LEFT or RIGHT button. To exit Brightness Setting, press OK button again. Gen eral Video Password Preferen Exit .. Video Setup Page ..
Gen eral Video Password Preferen Exit .. Password Setup Page .. Password English 3) Select ‘PASSWORD’ using the LEFT or RIGHT buttons, then press the OK button to enter the submenu. Go To Passwo rd Setup Page Password Setup Page Screen Display Press OK button twice to enter the PASSWORD CHANGE PAGE. Input the Old Password or the Default Password, the New Password, and the Confirmed New Password. Press OK button to confirm the change.
4) With no disc inside the player select ‘PREFERENCE’ using the LEFT or RIGHT button, then press OK button to enter the ‘PREFERENCE PAGE’. Gen eral Video Password Preferen Exit .. Preference Page .. Audio Subtitle Disc M enu Parental Default EN G O ff EN G Go To Preference Page Preference Page Screen Display a) Select ‘AUDIO’ using the DOWN button, then press OK button to enter the submenu.
Gen eral Video Password Preferen Exit .. Preference Page .. Audio Subtitle Disc M enu Parental Default EN G O ff EN G English French Spanish Italian O ff Preferred Subtitle Language Preferred Subtitle Language c) Select ‘DISC MENU’ using the DOWN button, then press OK button to enter the submenu. Select the Disc Menu Language you desire using the UP or DOWN buttons, then press OK button to confirm the setting. Press LEFT to return. Gen eral Video Password Preferen Exit .. Preference Page ..
d) Select ‘PARENTAL’ using the DOWN button, then press OK button to enter the submenu. Gen eral Video Password Preferen Exit .. Preference Page .. Audio Subtitle Disc M enu Parental Default EN G O ff EN G 1 2 3 4 5 6 7 8 K ID S AFE G PG P G - 13 P G- R R N C - 17 A DULT Set Parental Control Parental Preference Screen Display Select the parental level you desire using the UP or DOWN button for discs with lock-out function or multiple rating levels.
Compatible DISC: DVD, CD, CD-R, CD-RW, DVD+/-R, DVD+/-RW Signal system: NTSC Panel size: 7 inch Frequency response: 20 Hz to 20 kHz Video output: 1 Vp-p/75 Ohm, unbalanced Audio output: 1.4Vrms/10kOhm Audio S/N: Better than 60 dB Dynamic range : Better than 85 dB Laser: Semiconductor Laser, Wave Length: 650 nm/795 nm Power source: DC 9-12V Power consumption: 7W Operating temperature: 41~95°F (5~35°C) Weight : 1.65 lbs (0.75 kg) Dimensions (W x D x H): 8.19 X 6.14 X1.
Each full recharge takes approximately five hours. During recharge, the red indicator will stay on. Once fully recharged, the red light will turn off. At this point you may remove the wall plug and stop charging. Precautions Related to Battery Recharge: 1. The DVD player must be set to power off. 2. Once the battery is fully discharged, immediately recharge (regardless of whether you plan to use battery or not) in order to maximize battery life. 3.
Q. Troubleshooting SOLUTION • Make sure the DVD player is connected properly. Make sure all cables are securely inserted into the appropriate jacks. Can’t advance through a movie • You can’t advance through the opening credits and warning information that appears at the beginning of movies because the disc is programmed to prohibit that action. The icon ( ) appears on screen The feature or action cannot be completed at this time because: 1. The disc’s software restricts it. 2.
Troubleshooting (Cont) SOLUTION PROBLEM Disc won’ t play Play starts, but then stops immediately • Check the type of disc you put into disc tray. This DVD player only plays DVDs and audio CDs. •Your DVD player has been designed to process regional management information that is stored on DVD discs. The regional code for your player is 1 (The U.S.,U.S. Territories and Canada). Only DVD discs that have regional codes of 1 or ALL (for all regions) can be played by your player. • The disc is dirty.
90 DAY LIMITED WARRANTY AUDIOVOX ELECTRONICS CORP. (the Company) warrants to the original retail purchaser of this product that should this product or any part thereof, under normal use and conditions, be proven defective in material or workmanship within ninety (90) days from the date of original purchase, such defect(s) will be repaired or replaced with reconditioned product (at the Company's option) without charge for parts and repair labor.