
Instruction manual


4
Servo Dip Switch Settings:
You need to set the servo DIP switches inside the servo housing for the
cruise to work. You can’t just pull the servo out of the box and install
it….the cruise won’t work.
If you are following written instructions for your vehicle, set the dip
switches as in the instructions.
If you are using Tach only for your signal source, remember to pull the
Black jumper to the left of the Dip switches inside the servo. For some
reason we all forget to add that step when we write cruise instructions.
If you are doing an installation on a motorcycle or standard transmission
automobile without the benefit of following written instructions for your
vehicle, start with these settings:
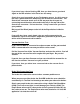
SW1
SW2
SW3
SW4
SW5
SW6
SW7
ON
OFF
OFF
OFF
OFF
OFF
ON
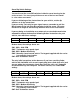
Broken down, the settings above are:
SW1, SW2: 4000 PPM
SW3: Tachometer only speed signal
SW4, SW5: Medium Sensitivity
SW6: Normally closed control switch. The keypad supplied with the cruise
is a normally closed switch.
SW7: Coil Tachometer source
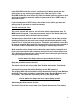
The only initial exceptions to the above are if you have a multi-cylinder
vehicle with individual coils on each spark plug (also called stick coils) and
you are taking the tachometer signal direct from the stick coil. Kawasaki
C14 and 650 Versys are examples. For these vehicles, use a 2000 PPM
setting:
SW1
SW2
SW3
SW4
SW5
SW6
SW7
OFF
OFF
OFF
OFF
OFF
OFF
ON
Broken down, the settings above are:
SW1, SW2: 2000 PPM
SW3: Tachometer only speed signal
SW4, SW5: Medium Sensitivity
SW6: Normally closed control switch. The keypad supplied with the cruise
is a normally closed switch.
SW7: Coil Tachometer source