
Owner's Manual


22
Conguration notes for the DSP sound eects
The HELIX DSP.3S oers unique DSP sound
eects like “Augmented Bass Processing”,
“ StageXpander”, “RealCenter” and many more. In
order to enjoy the DSP sound eects, specic set-
tings have to be made in the hardware and software
conguration.
Notes for Center Processing with its functions
RealCenter and ClarityXpander
If you want to use the RealCenter and ClarityXpander
function for a center speaker follow the subsequent
steps:
1. You need at least one left and one right analog or
digital input signal.
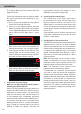
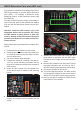
2. Open the IO menu of the DSP PC-Tool. Route the
left and the right analog or digital input signal (no
sum signal) to the output channels A and B (see
example in the following image). It does not mat-
ter, if the output channels are dened as front,
rear or center channel.
Note: You will achieve the best performance if
the input signal is a fullrange signal.
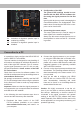
3. Generate a summation signal from the same two
input signals and route this to the output chan-
nel G.
For an active setup with a tweeter and midrange
speaker, this channel should be dened as
“ Center Low” and channel F as “Center High”.
For a passive speaker setup the output channel
G should be dened as “Center Full”. The chan-
nel F remains unconsidered.
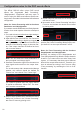
4. Only for active speaker setup: activate the “Active
Setup Link” function in the “Center Processing”
tab of the FX menu by placing a tick.
5. Repeat steps two and three for all routing matri-
ces that are used.
6. Now switch to the “Center Processing” tab of the
FX menu and activate the desired sound eect
by placing a tick.
Note: Depending on the speaker setup (active or
passive) the Center Processing aects only the out-
put channel G or the output channels F and G.
Notes for Front Processing with its functions
StageXpander and ClarityXpander
Normally, the settings of the StageXpander and
Front ClarityXpander only aect the output channels
A and B. If you want to drive an active 2-way front
system, it is necessary that these sound features
aect all four output channels A to D. Therefore, you
have to activate the routing in the FX menu under
“Front processing” by activating the “Link to C+D”
function.