Schnurloses digitales DECT−Telefon Cordless digital DECT telephone Bedienungsanleitung Operating Instructions Sprint 102
Sprint 102 Bedienungsanleitung . . . . . . . . . . . . . 3 Operating Instructions . . . . . . . . . . . .
− Inhaltsverzeichnis − 1 Sicherheitshinweise . . . . . . . . . . . . . . . . . . . . . . . . . . . . . . . 5 1.1 1.2 1.3 1.4 1.5 1.6 1.7 1.8 1.9 1.10 1.11 Bestimmungsgemäße Verwendung . . . . . . . . . . . . . . . . . . . . . . . . . . Aufstellungsort . . . . . . . . . . . . . . . . . . . . . . . . . . . . . . . . . . . . . . . . . . . Netzteil . . . . . . . . . . . . . . . . . . . . . . . . . . . . . . . . . . . . . . . . . . . . . . . . . Telefonanschlusskabel . . . . . . . . . . . . . . . . . . . . .
− Inhaltsverzeichnis − 4.13 4.14 4.15 4.16 Temporäre Tonwahl . . . . . . . . . . . . . . . . . . . . . . . . . . . . . . . . . . . . . . . Externe Anrufbeantworter . . . . . . . . . . . . . . . . . . . . . . . . . . . . . . . . . Paging von der Basisstation zum Mobilteil . . . . . . . . . . . . . . . . . . . . Kettenwahl . . . . . . . . . . . . . . . . . . . . . . . . . . . . . . . . . . . . . . . . . . . . . . 13 14 14 14 5 Das Telefonbuch . . . . . . . . . . . . . . . . . . . . . . . . . . . . . . . .
− Sicherheitshinweise − 1 Sicherheitshinweise Lesen Sie diese Bedienungsanleitung sorgfältig durch. 1.1 Bestimmungsgemäße Verwendung Dieses Telefon ist geeignet für das Telefonieren innerhalb eines Telefonnetzes. Jede andere Verwendung gilt als nicht bestimmungsgemäß. Eigenmächtige Veränderungen oder Umbauten sind nicht zulässig. Öffnen Sie das Gerät in keinem Fall selbst und führen Sie keine eigenen Reparaturversuche durch. 1.
− Sicherheitshinweise − 1.8 Hinweis für medizinische Geräte Benutzen Sie das Telefon nicht in der Nähe von medizinischen Geräten. Eine Beeinflussung von Herzschrittmachern kann nicht völlig ausgeschlossen werden. DECT1−Telefone können in Hörgeräten einen unangenehmen Brummton verursachen. 1.9 Reinigung und Pflege Reinigen Sie die Gehäuseoberflächen mit einem weichen und fusselfreien Tuch. Verwenden Sie keine Reinigungsmittel oder Lösungsmittel.
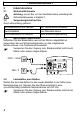
− Bedienelemente − 2 Bedienelemente 2.1 Mobilteil Telefonbuchtaste Taste Gespräch beenden / Menü verlassen Anruferliste CLIP / Auswahltaste Tastensperre / Pause Stummtaste / Löschen Menütaste / OK−Taste Intern− und Konferenzgespräche Tonruf Ein oder Aus / Temporäre Tonwahl Gesprächstaste / R−Taste Wahlwiederholung Basisstation Paging−Taste (Mobilteil suchen) 1. 2. 3. 4. 5. 6. 7. 8. 9. 10. 2.2 11.
− Inbetriebnahme − 3 Inbetriebnahme 3.1 Sicherheitshinweise Achtung: Lesen Sie vor der Inbetriebnahme unbedingt die Sicherheitshinweise in Kapitel 1. 3.2 Verpackungsinhalt prüfen Zum Lieferumfang gehören: eine Basisstation mit Netzteil ein Telefonanschlusskabel zwei Mobilteile vier Standard−Akkus eine Ladestation mit Netzteil eine Bedienungsanleitung 3.3 Basisstation anschließen Schließen Sie die Basisstation wie auf der Skizze abgebildet an.
− Inbetriebnahme − 3.5 Standard−Akkus einsetzen Drücken Sie auf den unteren Rand des Batteriefachdeckels (1) und entfernen Sie den Batteriefachdeckel nach oben (2). Legen Sie die Standard−Akkus ein (3). Achten Sie auf die richtige Polung! 2 Schließen Sie das Batteriefach. 3 1 3.6 Aufladen der Standard−Akkus Stellen Sie das Mobilteil bei der ersten Inbetriebnahme mit dem Display nach vorne für mindestens 14 Stunden in die Basisstation.
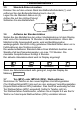
− Bedienung − 4 Bedienung 4.1 Das Display Display Beschreibung Dauerhaft: Die Verbindung zur Basisstation ist gut. Blinkend: Sie verlieren die Verbindung zur Basisstation. Zeigt den aktuellen Akkuladezustand an. Sie befinden sich im Menü Tonruf Mobilteil". Sie befinden sich im Menü Tonruf Basis". Sie befinden sich im Menü Flash−Zeit". Sie befinden sich im Menü Ton−, Impulswahl". Sie befinden sich im Menü Mobilteil anmelden". Links oder rechts befinden sich weitere Zahlen einer Rufnummer.
− Bedienung − 4.
− Bedienung − 4.5 Anrufe führen Rufnummer eingeben (max. 20 Stellen) Das Display zeigt maximal 12 Stellen an. Bei längeren Rufnummern werden nur die letzten 12 Stellen angezeigt. Bei Falscheingabe letzte Stelle löschen Verbindung herstellen Sie können auch zuerst die Gesprächstaste drücken und erhalten damit das Freizeichen. Bei Nebenstellenanlagen ist es erforderlich, eine bestimmte Nummer zu wählen (z. B. 9" oder 0 ), um ein Freizeichen für eine Amtsleitung zu bekommen (siehe Kapitel 7).
− Bedienung − 4.9 Mikrofon im Mobilteil stummschalten Sie können während eines Telefongespräches das Mikrofon des Mobilteils ausschalten. Mikrofon ausschalten Mikrofon einschalten 4.10 Tastensperre Sperren Sie das Tastenfeld, damit nicht ungewollt Tasten gedrückt werden. Trotz eingeschalteter Tastensperre können eingehende Gespräche normal entgegengenommen werden. Tastensperre einschalten 2 sec , < 1,5 sec Tastensperre ausschalten 4.
− Bedienung − 4.14 Externe Anrufbeantworter Einige Netzbetreiber stellen einen externen Anrufbeantworter (z. B. die T−Net Box) für Sie bereit. Ihr Telefon informiert Sie mit dem Symbol über neue Nachrichten. Wenn Sie sich alle Nachrichten von Ihrem externen Anrufbeantworter angehört haben, erlischt das Symbol im Display.
− Das Telefonbuch − 5 Das Telefonbuch Im Telefonbuch können Sie 10 Rufnummern mit Namen speichern. 5.1 Hinweise zum Telefonbuch S Geben Sie bei allen Rufnummern immer die Vorwahl mit ein, damit das Telefon auch eingehende Ortsgespräche einem Telefonbucheintrag zuordnen kann. S Ist die Speicherkapazität von 10 Rufnummern erreicht, zeigt . das Display beim nächsten Speichern die Meldung Um wieder Platz zu schaffen, müssen Sie zuerst einen anderen Eintrag löschen.
− Das Telefonbuch − 5.3 , , Rufnummern in das Telefonbuch eingeben Rufnummer eingeben (max. 20 Stellen) und Telefonbuchtaste drücken Namen eingeben (max. 8 Stellen) und bestätigen Rufnummer erneut bestätigen 5.4 Gespeicherte Rufnummern aus dem Telefonbuch wählen , oder , Telefonbucheintrag auswählen und Verbindung herstellen 5.
− Rufnummernanzeige (CLIP) − 6 Rufnummernanzeige (CLIP) Wenn diese Funktion an Ihrer Telefonleitung zur Verfügung steht, zeigt Ihnen das Display bereits die Rufnummer des Anrufers, wenn das Telefon klingelt. Haben Sie diese Rufnummer in Ihrem Telefonbuch gespeichert, wird anstatt der Rufnummer der Name angezeigt. Hat der Anrufer das Übertragen seiner Rufnummer unterdrückt, erscheint im Display die Meldung .
− Rufnummernanzeige (CLIP) − Zwei unterschiedliche Displaysymbole informieren Sie, ob der Eintrag in der Anrufliste schon einmal angesehen wurde oder ob der Eintrag in der Anrufliste neu ist. Display Beschreibung Die Rufnummer wurde bereits angesehen. Der Eintrag in der Anrufliste ist neu. 6.1.2 , Rufnummer zurückrufen oder , Anrufliste öffnen, Rufnummer auswählen und Verbindung herstellen 6.1.
− Nebenstellenanlagen / T−Net − 7 Nebenstellenanlagen / T−Net Die Taste Ihres Telefons können Sie an Nebenstellenanlagen und bei der Verwendung der T−Net Funktionen der Deutschen Telekom nutzen. 7.1 R−Taste an Nebenstellenanlagen Ist Ihr Telefon über eine Nebenstellenanlage angeschlossen, können Sie über die Taste alle Möglichkeiten, wie z. B. Anrufe weiterleiten, automatischen Rückruf usw., nutzen. An einer Nebenstellenanlage wird eine Flash−Zeit von 100 ms benötigt (siehe Kapitel 8.4).
− Einstellungen und Menüstruktur − 8 Einstellungen und Menüstruktur 8.1 Menüstruktur Alle Einstellungen für das Mobilteil und die Basisstation sind über ein benutzerfreundliches Menü zu erreichen.
− Einstellungen und Menüstruktur − 8.3 Tonruf am Mobilteil und der Basisstation einstellen An Ihrem Mobilteil und der Basisstation können 5 verschiedene Tonrufmelodien und entsprechende Lautstärken eingestellt werden.
− Einstellungen und Menüstruktur − 8.6 Werkseinstellungen wieder herstellen Mit dieser Funktion werden das Mobilteil und die Basisstation wieder auf die Werkseinstellungen zurückgesetzt. 8.6.1 Werkseinstellungen Mobilteil Melodie Mobilteil: 1 Lautstärke Mobilteil: 3 Melodie Basis: 1 Lautstärke Basis: 3 Hörerlautstärke: Mittel Flash−Zeit: 1 (100 ms) Wahlverfahren: 1 (MFV) Das Telefonbuch, die Anrufliste und die Wahlwiederholung werden beim Resetvorgang nicht gelöscht.
− Mehrere Mobilteile − 9 Mehrere Mobilteile Sie können vier Mobilteile an Ihrer Basisstation anmelden. Jedes Mobilteil kann gleichzeitig nur an einer Basisstation angemeldet sein. Wenn Sie angemeldete Mobilteile an einer neuen Basis anmelden wollen, melden Sie das jeweilige Mobilteil über das andere Mobilteil von der alten Basisstation ab.
− Mehrere Mobilteile − 9.1 An− und Abmelden von Mobilteilen 9.1.1 Anmelden von Sprint 100 Mobilteilen 2 sec Paging−Taste an der Basisstation drücken Hauptmenü öffnen oder , Untermenü auswählen und öffnen , PIN−Code eingeben und bestätigen Dem Mobilteil wird eine interne Rufnummer gegeben. Das bereits angemeldete Mobilteil hat die interne Rufnummer 1. Das zweite angemeldete Mobilteil erhält die interne Rufnummer 2.
− Mehrere Mobilteile − oder , Abzumeldendes Mobilteil auswählen und bestätigen , PIN−Code eingeben und bestätigen Im Display des abgemeldeten Mobilteils erscheint die Meldung . Das Mobilteil ist nun abgemeldet und kann für externe und interne Gespräche nicht mehr benutzt werden. 9.1.5 PIN−Code ändern Das An− und Abmelden von Mobilteilen ist mit einem PIN−Code vor unerlaubter Benutzung geschützt. Der PIN−Code kann aus bis zu acht Zahlen bestehen.
− Mehrere Mobilteile − 9.3 Externe Gespräche weiterleiten Haben Sie ein externes Gespräch an einem Mobilteil entgegengenommen, können Sie das externe Gespräch auf ein anderes Mobilteil weiterleiten. , oder Während des Gesprächs interne Rufnummer wählen Gespräch annehmen Gespräch weiterleiten Sollte sich das gerufene Mobilteil nicht melden, können Sie sich das externe Gespräch mit der Taste wieder zurückholen. 9.
− Fehlerbeseitigung − 10 Fehlerbeseitigung Haben Sie Probleme mit Ihrem Telefon, kontrollieren Sie bitte zuerst die folgenden Hinweise. Bei technischen Problemen können Sie sich auch an unsere Hotline unter Tel. 0180 5 00 13 88 (Kosten Telekom bei Drucklegung: 14 ct/min) wenden. Bei Garantieansprüchen wenden Sie sich bitte an Ihren Fachhändler. Die Garantiezeit beträgt 2 Jahre Fehler Lösungen − Keine Verbindung zur Basisstation möglich − Sie haben sich zu weit von der Basisstation entfernt.
− Wichtige Informationen − 11 Wichtige Informationen 11.1 Technische Daten Merkmal Wert Standard DECT−GAP Stromversorgung Eingang: 230 V, 50 Hz Ausgang: 6 VDC 400 mA Reichweite (Außen/Innen) 300 m, 50 m Standby bis zu 110 h Max. Gesprächsdauer bis zu 8 h Aufladbare Standard−Akkus 2 x 1.
− Contents − 1 1 Safety Information . . . . . . . . . . . . . . . . . . . . . . . . . . . . . . . . 31 1.1 1.2 1.3 1.4 1.5 1.6 1.7 1.8 1.9 1.10 1.11 Intended use . . . . . . . . . . . . . . . . . . . . . . . . . . . . . . . . . . . . . . . . . . . . Installation location . . . . . . . . . . . . . . . . . . . . . . . . . . . . . . . . . . . . . . . Power supply . . . . . . . . . . . . . . . . . . . . . . . . . . . . . . . . . . . . . . . . . . . . Telephone connection cable . . . . . . . . . . . . . . .
− Contents − 4.13 4.14 4.15 4.16 Temporary tone dialling . . . . . . . . . . . . . . . . . . . . . . . . . . . . . . . . . . . . External answering machine . . . . . . . . . . . . . . . . . . . . . . . . . . . . . . . Paging the handset from the base station . . . . . . . . . . . . . . . . . . . . Chain dialling . . . . . . . . . . . . . . . . . . . . . . . . . . . . . . . . . . . . . . . . . . . . 39 40 40 40 5 Phone Book . . . . . . . . . . . . . . . . . . . . . . . . . . . . . . . . . . . . . .
− Safety Information − 1 Safety Information Please read this operating instruction manual thoroughly. 1.1 Intended use The telephone is suitable for telephoning within a public telephone network system. Any other use is considered unintended use. Unauthorised modification or reconstruction is not permitted. Under no circumstances open the device or complete any repair work yourself. 1.2 Installation location The telephone is designed for use indoors in rooms with a temperature range from 10 °C to 30 °C.
− Safety Information − 1.8 Note on medical equipment Never use the telephone in the vicinity of medical equipment. It cannot be fully ruled out that it will not affect heart pacemakers. DECT1 telephones can cause an unpleasant humming sound in hearing aids. 1.9 Cleaning and upkeep Clean the housing surfaces with a soft, fluff−free cloth. Never use cleaning agents or solvents. The rubber footpads on the base station are not resistant to all cleaning agents. 1.
− Operating Elements − 2 2.1 Operating Elements Handset Phone book button End call / Exit menu button Calls list (CLIP) / Scrolling button Key lock / Pause Muting button / Delete Menu button / OK button Internal and conference calls Ringing on or off / Temporary tone dialling Call button / R button Redialling Base station 11. Paging button (locate handset) 1. 2. 3. 4. 5. 6. 7. 8. 9. 10. 2.2 10 1 2 9 3 8 7 4 5 6 11 The buttons in this operating manual are depicted with a uniform contour.
− Starting Up − 3 Starting Up 3.1 Safety Information Caution: It is essential to read the Safety Information in Chapter 1 before starting up. 3.2 Checking the package contents The package contains: a base station with power adapter plug a telephone connection cable two handsets four rechargeable batteries a charging station with power adapter plug an operating manual 3.3 Connecting the base station Connect the base station as illustrated in the diagram.
− Starting Up − 3.5 Inserting the standard batteries Press on the lower edge of the battery compartment cover (1) and remove the battery compartment by lifting it up (2). Insert the standard batteries (3). Pay attention to correct polarity. 2 Close the battery compartment cover. 3 1 3.6 Charging the standard batteries When preparing to use the handset for the first time, place it in the base station, with its display facing, the front for at least 14 hours.
− Operation − 4 Operation 4.1 Display Display Description Continuously on: The connection to the base station is good. Flashing: The connection to the base station is poor. Indicates the current battery charge status. You have activated the Handset ringer" menu. You have activated the Base ringer" menu. You have activated the Flash time" menu. You have activated the Tone − Pulse dialling" menu. You have activated the Register handset" menu.
− Operation − 4.2 Icons Used and Display Texts The icons used and display texts appear as follows throughout this manual: Remove handset from the base station Place handset in the base station Enter digits and letters 2 sec Press the button depicted for 2 seconds < 1.5 sec Press the button depicted within 1.5 seconds Acoustic signal on handset Acoustic signal on base station or Appearance of text and icons in the display 4.
− Operation − 4.5 Making a call Enter the phone number (max. 20) A maximum of 12 digits can appear in the display. In the case of longer phone numbers, only the last 12 digits are displayed. Delete the last digit if incorrect Dial the number It is also possible to press the Call button first to obtain the dialling tone for an outside line. In the case of private branch exchanges, it is necessary to dial a specific number (e.g.
− Operation − 4.9 Muting the microphone in the handset The microphone in the handset can be deactivated during a telephone conversation. Deactivate the microphone Reactivate the microphone 4.10 Key lock Lock the keys to ensure numbers or functions are not activated inadvertently. Calls can still be taken in the normal way even when the key lock function is activated. Activate the key lock function 2 sec , < 1.5 sec Deactivate the key lock function 4.
− Operation − 4.14 External answering machine Some telephone network providers provide an external answering machine (e. g. the T−Net Box) for you. If the icon appears in the display, it means new messages have been recorded for you. After playing back all the messages on the external answering machine, the icon disappears from the display.
− Phone Book − 5 Phone Book Up to 10 phone numbers can be stored, with associated names, in the phone book. 5.1 Information on the phone book S Always enter the area access code with the phone numbers so that the telephone can also assign incoming local calls to a phone book entry. S If the memory capacity of 10 phone numbers is reached, the appears when an attempt is made to store message another number. To create space, an existing entry must first be deleted.
− Phone Book − 5.3 , , Entering phone numbers in the phone book Enter the phone number (max. 20 places) and press the phone book button Enter the name (max. 8 places) and confirm Conform the phone number again Dialling phone numbers stored in the phone book or , Select the phone book entry and dial the number 5.
− Caller Number Display (CLIP Function) − 6 Caller Number Display (CLIP Function) If this function is provided by your telephone service, the number of the caller appears in the display when the telephone rings. If the caller’s number is stored in the phone book, the name appears in the display instead of the phone number. If the caller has suppressed transmission of their phone number, the message appears in the display.
− Caller Number Display (CLIP Function) − Two different display icons indicate whether the entry in the calls list has already been viewed or whether the entry is new. Display Description The phone number has already been viewed. The entry in the calls list is new. 6.1.2 , Calling back the phone number or , Open the calls list, select the phone number required and dial it 6.1.3 Storing phone numbers in the phone book A phone number stored in the calls list can be transferred directly to the phone book.
− Private Branch Exchanges / T−Net − 7 Private Branch Exchanges / T−Net The button on the handset is used in private branch exchanges and for taking advantage of T−Net functions provided by Deutsche Telekom. 7.1 R button on private branch exchanges If the telephone is connected to a private branch exchange, all the functions linked to the button, such as transferring calls, automatic call back, etc., can be used. A private branch exchange requires a Flash time of 100 ms (refer to Chapter 8.4).
− Settings and Menu Structure − 8 Settings and Menu Structure 8.1 Menu structure All the settings for the handset and base station can be set by accessing the relevant options in the user−friendly menu.
− Settings and Menu Structure − 8.3 Setting the ringing tones on the handset and base station Five different ringing melodies and volume settings can be set on the handset and base station. Open the main menu or , or Select and open the submenu or to , Select the melody and confirm or to or , Select the setting and confirm If you have deactivated the ringing melody on the handset, the icon appears in the display.
− Settings and Menu Structure − 8.6 Restoring the default settings This function resets the handset and base station settings to their status on leaving the factory. 8.6.1 Default settings handset Handset melody: 1 Handset volume: 3 Base melody: 1 Base volume: 3 Receiver volume: Middle Recall time: 1 (100 ms) Dialling method: 1 (DTMF) The phone book, calls list and redialling function are not deleted during the reset process.
− Multiple Handsets − 9 Multiple Handsets Up to four handsets can be registered on the base station. Each handset can only be registered on one base station at any particular time. If a handset, registered on a base station, is to be registered on a new base station, that handset must be deregistered from the existing base station using the other handset.
− Multiple Handsets − 9.1 Registering and deregistering handsets 9.1.1 Registering Sprint 100 handsets 2 sec Press the Paging button on the base station Open the main menu or , Select and open the submenu , Enter the PIN code and confirm The handset is assigned an internal call number. The handset already registered has the internal call number 1. The second handset registered is assigned the internal call number 2.
− Multiple Handsets − , Enter the PIN code and confirm The message appears in the display of the deregistered handset. The handset is thus deregistered and can no longer be used for external or internal calls. 9.1.5 Changing the PIN code The registration and deregistration of handsets are protected against unauthorised use by a PIN code. The PIN code can contain up to eight digits. When delivered, the PIN code is "0000".
− Multiple Handsets − 9.3 Forwarding external calls If you have taken an external call on a handset, the call can be transferred to another handset. , or Dial the internal handset call number during a call Take the call Forward the call If the handset called does not answer, take the external call back by pressing the button. 9.4 Consultation / Brokering While a call is in progress, it is possible to dial another handset in order to consult with someone.
− Troubleshooting − 10 Troubleshooting Should problems arise with the telephone, refer to the following information. In the case of technical problems, contact our Hotline, tel. 0180 5 00 13 88 (Telekom costs at time of going to print: 14 ct/min). In the case of claims under the terms of guarantee, contact your sales outlet. There is a 2 year period of guarantee Faults Corrective measures − No connection to base station possible − The handset is too far from the base station.
− Important Information − 11 Important Information 11.1 Technical data Feature Value Standard DECT−GAP Power supply Input: 230 V, 50 Hz Output: 6VDC 400mA Range (outdoors/indoors) 300 m, 50 m Standby Up to 110 h Max. talk time Up to 8 h Rechargeable standard batteries 2 x 1.
Wichtige Garantiehinweise Die Garantiezeit für Ihr AUDIOLINE − Produkt beginnt mit dem Kaufdatum. Ein Garantieanspruch besteht bei Mängeln, die auf Material− oder Herstellungsfehler zurückzuführen sind. Der Garantieanspruch erlischt bei Eingriffen durch den Käufer oder durch Dritte.