Sprechfunkgeräte-Set mit UKW-Radio Walkie-Talkie Set with FM radio Bedienungsanleitung Operating Instructions PMR Easy 010
PMR Easy 010 Bedienungsanleitung __________ 1 Operating instructions ________ 19 2
- Inhaltsverzeichnis 1 2 Bedienelemente ................................ 4 Inbetriebnahme ................................ 5 2.1 2.2 2.3 2.4 2.5 2.6 3 Verpackungsinhalt prüfen ........................ 5 Akkupacks einsetzen ............................... 5 Gürtelclip anbringen................................ 6 Ladestation anschliessen ......................... 6 Funkgeräte laden.................................... 6 Headset anschliessen .............................. 6 Bedienung ........................
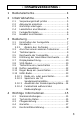
- Bedienelemente 1 Bedienelemente 11 1 2 10 3 9 8 7 4 1. 2. 3. 4. 5. 6. 4 12 5 6 Mikro- Kopfhöreranschluss Ein/Aus-Taste Kanalschalter CHANNEL Taste MODE Tastatursperre Lautstärke lauter 7. 8. 9. 10. 11. 12.
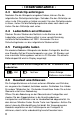
- Inbetriebnahme 2 2.1 Inbetriebnahme Verpackungsinhalt prüfen Zum Lieferumfang gehören: zwei Funkgeräte mit Gürtelclip zwei Akkupacks eine Bedienungsanleitung 2.2 eine Duo-Ladestation ein Steckernetzteil zwei Headsets Akkupacks einsetzen Ihr Funkgerät wurde mit zwei wiederaufladbaren Ni-MH Akkupacks geliefert, die vor der Inbetriebnahme eingebaut werden müssen. 1. 2. 3. Entriegeln Sie den Akkufachdeckel auf der Rückseite und öffnen Sie das Fach.
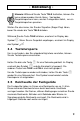
- Inbetriebnahme 2.3 Gürtelclip anbringen Nachdem Sie die Akkupacks eingebaut haben, können Sie die mitgelieferten Gürtelclips befestigen. Schieben Sie den Gürtelclip von unten in die Führung bis er hörbar einrastet. Um den Gürtelclip wieder zu lösen, ziehen Sie die Befestigungslasche etwas nach oben und ziehen Sie den Gürtelclip nach unten. 2.
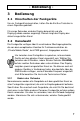
- Bedienung 3 Bedienung 3.1 Einschalten der Funkgeräte Um ein Funkgerät einzuschalten, halten Sie die Ein/Aus-Taste bis zu einem Signalton gedrückt. Für einige Sekunden wird das Display beleuchtet und alle Displaysymbole werden angezeigt. Danach zeigt das Display den aktuell eingestellten Kanal. 3.2 Kanalwahl Die Funkgeräte verfügen über 8 verschiedene Übertragungskanäle, die von dem europäischen Komitee für Funkkommunikation als „Private Mobile Radio“, kurz PMR genannt, freigegeben wurden.
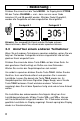
- Bedienung Drücken Sie einmal kurz die Taste MODE. Im Display blinkt CTCSS. Mit den Tasten CHANNEL + und – kann nun ein neuer Code zwischen 00 und 38 gewählt werden. Wird der Code 00 gewählt, werden alle Gespräche auf dem eingestellten Kanal geführt. Funkgerät 1 CH CTCSS ƈ Funkgerät 2 CH CTCSS ƈ Hinweis: Der ausgewählte Kanal und der Rufcode müssen übereinstimmen, damit Sie untereinander sprechen können. 3.
- Bedienung Hinweis: Während Sie die Taste TALK festhalten, können Sie keine ankommenden Anrufe hören. Von beiden Gesprächspartnern kann, wie bei Funkgeräten üblich, nur ein Gesprächspartner sprechen. Warten Sie also immer, bis Sie den Signalton (Roger Piep) hören, bevor Sie wieder die Taste TALK drücken. Während Sie die Taste TALK drücken, erscheint im Display das Symbol . Wenn Sie ein Gespräch empfangen, erscheint im Display das Symbol 3.4 .
- Bedienung 3.6 Erhöhung der maximalen Reichweite Die Funkgeräte sind mit einem so genannten AUTO-SQUELCH ausgestattet, mit dem automatisch schwache Übertragungen und unerwünschte Geräusche während der Benutzung ausgeblendet werden. Dieser AUTO-SQUELCH kann vorübergehend ausgeschaltet werden, um die Reichweite zu erhöhen. Halten Sie die Taste für mehr als fünf Sekunden bis zu einem Signalton gedrückt. Die automatische Unterdrückung ist abgeschaltet.
- Bedienung VOX-Modus einschalten 1. 2. 3. Drücken Sie mehrmals kurz die Taste MODE, bis die Anzeige UO erscheint. ƈ Mit den Tasten CHANNEL + und – kann der VOX-Modus aus- (of) oder eingeschaltet (on) werden. Bestätigen Sie Ihre Auswahl mit der Taste TALK. VOX Ist der VOX-Modus eingeschaltet, erscheint im Display die Meldung VOX. Empfindlichkeit für den VOX-Modus einstellen 1. 2. 3. 3.9 Drücken Sie mehrmals kurz die Taste MODE, bis die Anzeige L erscheint.
- Bedienung 3.10 Rufton auswählen Sie können an die anderen Funkgeräte mit der Taste CALL einen Rufton senden, sobald Sie das Gespräch beginnen möchten. Es stehen dafür 5 unterschiedliche Melodien zur Verfügung. 1. Drücken Sie mehrmals kurz die Taste MODE, bis die Anzeige CA erscheint. 2. Wählen Sie mit den Tasten 3. und den gewünschten Rufton zwischen 1 und 5 aus. Bestätigen Sie Ihre Auswahl mit der Taste TALK. ƈ 3.
- Bedienung 3.12 UKW-Radio Ihr Funkgerät ist mit einem integrierten UKW-Radio inklusive 10 Senderspeicherplätze ausgestattet. 3.12.1 1. 2. 3. 4. 3.12.2 1. 2. 3. 4. Radio ein- oder ausschalten Halten Sie die Taste MODE für FM eine Sekunde gedrückt. Im Display erscheint die Anzeige FM. MHz Mit den Tasten CHANNEL + und ƈ – können nun die verschiedenen Radiofrequenzen angewählt werden. Oder starten Sie den automatischen Sendersuchlauf, indem Sie die Taste CHANNEL + oder – für 1 Sekunde gedrückt halten.
- Bedienung 3.12.3 1. 2. Anwählen der Senderspeicherplätze Halten Sie die Taste CALL für eine CH Sekunde gedrückt. Im Display erscheint die Anzeige CH. Mit den Tasten CHANNEL + und – können Sie nun den gewünschten ƈ Senderspeicherplatz zwischen 1 und 10 auswählen. Nach einer Sekunde wird wieder die Frequenz der Radiostation angezeigt. Hinweis: In diesem Modus funktioniert nur die Anwahl der 10 Senderspeicherplätze.
- Wichtige Informationen 4 4.1 Wichtige Informationen Werkseinstellungen Funkgerät Funkkanal Rufcode CTCSS Lautstärke VOX-Modus VOX-Empfindlichkeit Rufton Tastentöne Roger Beep Kanalsperre Radio Radiolautstärke Funkbetrieb während Radioempfang Belegung der Sendertasten 4.
- Wichtige Informationen Squelch Empfindlichkeit Ansprechzeit Schliesszeit Tonfrequenzverhalten bei 400 Hz bei 2500 Hz Signaldistanz Bandbreite Kanaltrennung Intermodulationsunterdrückung Störunterdrückung Sender: Effektive Ausgangsleistung Trägerfrequenzbeständigkeit Modulationsbegrenzung Ansprechzeit Träger Tonfrequenzverhalten bei 400 Hz bei 2,5 kHz Tonverzerrung Brummen und Rauschen Vorübergehendes Frequenzverhalten Sender ein Sender aus Stromversorgung: Gemischter Betrieb Standby Ladezeit für eine voll
- Wichtige Informationen 4.4 Garantie AUDIOLINE - Geräte werden nach den modernsten Produktionsverfahren hergestellt und geprüft. Ausgesuchte Materialien und hochentwickelte Technologien sorgen für einwandfreie Funktion und lange Lebensdauer. Sollte Ihr Gerät dennoch einen Defekt innerhalb der Garantiezeit aufweisen, wenden Sie sich bitte unter Vorlage Ihrer Kaufquittung ausschließlich an das Geschäft, in dem Sie Ihr AUDIOLINE - Gerät gekauft haben.
- Wichtige Informationen 4.5 WIR IN Konformitätserklärung AUDIOLINE GMBH Hellersbergstr. 2a D-41460 Neuss GERMANY ALS INVERKEHRBRINGER IN DER EU ERKLÄREN VOLLVERANTWORTLICH, DASS DAS PRODUKT MODEL: BESCHREIBUNG: PMR Easy 010 Sprechfunkgerät Frequenz 446 MHz mit UKW-Radio KONFORM IST MIT DEN GRUNDLIEGENDEN ANFORDERUNGEN DER RICHTLINIE: 1999/5/EC BEVOLLMÄCHTIGTER: Unterschrift: Name: Position in der Firma: Datum der Ausstellung: ________________________________ MANFRED ZINNOW GESCHÄFTSFÜHRER 15.03.
- Contents 1 2 Operational Elements ........................... 20 Commissioning .................................... 21 2.1 2.2 2.3 2.4 2.5 2.6 3 Check contents of pack................................ 21 Fitting the battery packs .............................. 21 Fitting the belt clip ...................................... 22 Connecting the charging station ................... 22 Charging the walkie-talkies .......................... 22 Connecting the headset ...............................
- Operational elements 1 Operational Elements 11 1 2 10 3 9 8 7 4 1. 2. 3. 4. 5. 6. 20 12 5 6 Microphone and headphone connection On/Off button CHANNEL switch MODE button Keypad lock Volume louder 7. 8. 9. 10. 11. 12.
- Commissioning 2 2.1 Commissioning Check contents of pack The following items are supplied two walkie-talkies with belt clip two battery packs one instruction manual 2.2 one double charging station one mains power supply two headsets Fitting the battery packs Your walkie-talkie is supplied with two rechargeable Ni-MH battery packs, which must be fitted before using the equipment. 1. 2. 3. Unclip the battery compartment cover on the rear and open the compartment.
- Commissioning 2.3 Fitting the belt clip After you have installed the batteries, you can fit the belt clip supplied with the unit. Slide the belt clip into the guide from below until it audibly engages. To remove the belt clip again, pull the fixing strap up slightly and pull the belt clip downwards. 2.4 Connecting the charging station Insert the plug of the power supply into the socket on the charging station and plug the power supply into a properly installed 230 V mains socket.
- Commissioning 3 Operation 3.1 Switching on the walkie-talkies To switch on the walkie-talkie, hold the On/Off button pressed until a signal tone sounds. The display will be illuminated for some seconds and all the symbols will be shown in the display. After this the display will show the currently selected channel. 3.
- Operation Press the MODE button briefly once. CTCSS will flash in the display. A new code between 00 and 38 can now be selected using the CHANNEL + and – buttons. If the code 00 is selected, all calls will be signalled on the selected channel. Walkie-Talkie 1 CH CTCSS Walkie-Talkie 2 CH ƈ CTCSS ƈ Note: The channel selected and the call code must correspond in order for you to be able to talk to one another. 3.
- Operation Note: While you are holding the TALK button, you will not be able to hear any incoming calls. As is usual with walkietalkie units, only one of the two participants in the call can speak at any one time. Therefore, always wait until you hear the signal tone (Roger Peep) before pressing the TALK button again. While you are pressing the TALK button, the the display. When you receive a call, the the display. 3.
- Operation 3.6 Increasing the maximum range The walkie-talkies are equipped with a so-called AUTO-SQUELCH system, by means of which weak transmissions and undesirable noises are automatically filtered out during use. This AUTOSQUELCH system can be temporarily switched off in order to increase the range. Hold the button pressed for more than five seconds until you hear a signal tone. The automatic suppression is switched off.
- Operation Switching on VOX mode 1. 2. 3. Press the MODE button repeatedly until UO appears in the display. The VOX mode can be switched on and off using the CHANNEL + and – buttons. Confirm your selection with the TALK button. ƈ VOX When VOX mode is activated, the message VOX appears in the display. Setting the sensitivity for VOX mode 1. 2. 3. 3.9 Press the MODE button repeatedly until L appears in the display. The VOX sensitivity can be set in 5 steps using the CHANNEL + and – buttons.
- Operation 3.10 Selecting a call tone You can transmit a call tone to the other walkie-talkies using the CALL button when you want to begin a call. 5 different melodies are available for this purpose. 1. 2. Press the MODE button repeatedly until CA appears in the display. Select the required call tone between 1 and 5 using the 3. and buttons. Confirm your selection with the TALK button. ƈ 3.11 Switching the Roger beep on/off The Roger beep signals to the other caller that it is now possible to speak.
- Operation 3.12 FM Radio Your walkie-talkie is equipped with an integral FM radio including 10 station memories. 3.12.1 1. 2. 3. 4. 3.12.2 1. 2. 3. 4. Switching the radio on or off Press and hold the MODE FM button for one second. The message FM will appear in the display. MHz The different radio frequencies ƈ can now be selected using the CHANNEL + and – buttons. Or start the automatic station search by pressing and holding the CHANNEL + or – button for 1 second.
- Operation 3.12.3 1. 2. Selecting the station memories Press and hold the CALL button CH for one second. The symbol CH will appear in the display. You can now select the required station memory between 1 and 10 ƈ using the CHANNEL + and – buttons. After one second, the frequency of the radio station will be displayed once more. Note: Only the selection of the 10 station memories will work in this mode. To return to the normal frequency selection once more, press and hold the CALL button for one second.
- Important Information 4 4.1 Important information Factory Settings Radio channel Call code CTCSS Volume VOX mode VOX sensitivity Call tone Key tones Roger beep Channel lock FM Radio Radio volume Walkie-talkie operation during radio reception Assignment of station buttons 4.
- Important Information Squelch Sensitivity Turn on time Turn off time Audio frequency response at 400 Hz at 2500 Hz Signal distance bandwidth Channel separation Intermodulation suppression Interference suppression Transmitter: Effective output power Carrier frequency persistence Modulation limit Reaction time, carrier Audio frequency response at 400Hz at 2,5 kHz Audio distortion Hum and noise Transient frequency response Transmitter on Transmitter off Power supply: Mixed usage Standby Charging time for ful
- Important Information 4.4 Warranty AUDIOLINE equipment is manufactured and tested in accordance with the most up to date production methods. Selected materials and highly developed technology ensure trouble-free operation and long life. If your unit should develop a fault within the guarantee period, however, please contact the shop where you bought your AUDIOLINE equipment exclusively and have your purchase receipt available for inspection. The warranty period is 24 months from the day of purchase.
- Important Information 4.5 WE OF Declaration of Conformity AUDIOLINE GmbH Hellersbergstr. 2a D-41460 Neuss GERMANY DECLARE UNDER OUR SOLE RESPONSIBILITY AS EU DISTRIBUTOR THAT THE PRODUCT MODEL: DESCRIPTION: PMR Easy 010 Walkie Talkie Frequence 446 MHz with FM radio IS IN CONFORMITY WITH THE BASIC REQUIREMENTS OF DIRECTIVE: 1999/5/EC AUTHORISED SIGNATORY: Signature: Name: Position in the company: Date of issue: __________________ MANFRED ZINNOW MANAGING DIRECTOR 15.03.
AUDIOLINE GmbH Neuss Service Hotline 0180 5 00 13 88 Internet: www.audioline.de E-mail: info@audioline.