
User`s manual

MediaPack SIP
MediaPack SIP User’s Manual 208 Document #: LTRT-65405
Table 10-1: Customizable Logo ini File Parameters
Parameter Description
LogoFileName The name of the image file containing your corporate logo.
Use a gif, jpg or jpeg image file.
The default is AudioCodes’ logo file.
Note: The length of the name of the image file is limited to 47 characters.
LogoWidth Width (in pixels) of the logo image.
Note: The optimal setting depends on the resolution settings.
The default value is 339, which is the width of AudioCodes’ displayed logo.
10.5.1.2 Replacing the Main Corporate Logo with a Text String
The main corporate logo can be replaced with a text string.
• To replace AudioCodes’ default logo with a text string via the Web Interface, modify the two
ini file parameters in Table 10-2 according to the procedure described in Section
10.5.4 on
page 210.
• To replace AudioCodes’ default logo with a text string via the ini file, add/modify the two ini
file parameters in Table 10-2 according to the procedure described in Section
6.2 on page
163.
Table
10-2: Web Appearance Customizable ini File Parameters
Parameter Description
UseWebLogo 0 = Logo image is used (default).
1 = Text string is used instead of a logo image.
WebLogoText Text string that replaces the logo image.
The string can be up to 15 characters.
10.5.2 Replacing the Background Image File
The background image file is duplicated across the width of the screen. The number of times the
image is duplicated depends on the width of the background image and screen resolution. When
choosing your background image, keep this in mind.
Note: Use a gif, jpg or jpeg file for the background image. It is important that the
image file has a fixed height of 59 pixels. The size of the image files (logo
and background) is limited each to 64 kbytes.
¾ To replace the background image via the Web, take these 6 steps:
1. Access the MediaPack Embedded Web Server (refer to Section 5.3 on page 48).
2. In the URL field, append the suffix ‘AdminPage’ (note that it’s case-sensitive) to the IP
address, e.g., http://10.1.229.17/AdminPage.
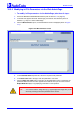
3. Click the Image Load to Device, the Image load screen is displayed (shown in Figure
10-6).
4. Click the Browse button in the Send Background Image File from your computer to
gateway box. Navigate to the folder that contains the background image file you want to
load.
5. Click the Send File button; the file is sent to the device. When loading is complete, the
screen is automatically refreshed and the new background image is displayed.