
User Guide


Thank
you
for
choosing
a FOCUS
mixing console.
We
are sure that it will
provide
you
with
many
years
of reliable
service.
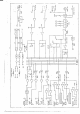
FOCUS
mixers
are available
with 8,12,16
and24
channels. Each channel
offers Mic
and Line Inputs,
an lrsert
poin!
Gain control
with
peak
LED,
3 bands
of Equalisation,
3
Auxiliary
sends, Pan
control,
Cue switch and
a
master
slider.
The
output
section
consists
ofleft and Right
master
sliders, balanced
and unbalanced
outputs,
2 retums,
headphone
socket
and
phantom
power
switches.
The
use ofthese
controls
will be discussed
throughout
this manual.
A correctly
set up mixer is
the key
to a
good,
clear
sound. This
section is
designed
to
help
the
you
with
an
initial
set up of all
the
levels
and
controls.
Connect
the mixer
to mains
power
and
switch
on. A red LED
on the far
right
hand
side
will indicate
power.
You
will need
two microphone
leads
(3 pin
XLR)
or two
guitar
leads
(l/4"
jacks)
to
connect the mixer
to
your
amplifier.
These leads run
from
the
GRP/OUTPUT sockets
just
left
of the
power
switch
to the Left
and Right
(or
A & B) inputs
of
your
amplifier.
After checking
that
the master faders
are
hrned down,
switch on
your power
anplifier.
The next
step is
to
plug
all
your
inputs into
the mixer.
Microphones
should
be
plugged
into
the 3
pin
)(LR
socket, while
line inputs
such as
cD
players,
tape decks, keyboards
etc,
should
be
plugged
into
the l/4" line
socket.
A very important
section of
any
mixer
is
the
gain
contol,
which is
the first knob
on
each channel. The
idea
is to
set this conhol as hi&
as
possible
without
the
Peak
LED
coming
on. Adjust
each charmel
individually
while the mics
or inputs
are being used
in
their normal
way.
The
cenfre
position
is
a
good
starting
point.
The
next
three
controls are for Equalization.
tIF
stands for high frequency,
MID for
Middle
frequency,
and LOW
for low frequency.
These
confiols
allow
you
to tailor
the sound