USB Stereo Turntable System AT-LP2D-USB Installation and Operation
Automatic Stereo Turntable System Installation and Operation Warning: To prevent fire or shock hazard, do not expose this appliance to rain or moisture. Attention: Pour prévenir feu ou choc électrique, ne pas exposé l’appareil à la pluie ou à l’humidité. CAUTION RISK OF ELECTRIC SHOCK DO NOT OPEN AVIS RISQUE DE CHOC ÉLECTRIQUE NE PAS OUVRIR To prevent electric shock, do not remove the cover. There are no user-serviceable parts inside. Internal adjustments are for qualified professionals only.
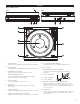
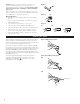
Controls Figure 1 Main Features 10 Front Back PHONO START STOP 1 2 3 LINE 15 USB 16 9 9 8 6 7 11 SPEED 4 12" SIZE 5 7" 33 45 1. START BUTTON Engages the motor/platter and begins automatic operation. 9. 2. STOP BUTTON Disengages the motor/platter and returns tone arm to rest. 10. DUST COVER 3. TONE ARM LIFT BUTTON Lifts and lowers tone arm for manual selection. 4. PLATTER SPEED BUTTON Select 33 RMP (button in high position) or 45 RPM (button in low position) platter speed. 5.
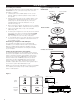
Setup & Operation Assembling the Turntable The AT-LP2D-USB requires some assembly before first use. IMPORTANT: Do not connect the AC power cord until assembly is complete. 1. Carefully place the turntable platter on the center spindle, making certain the platter is fully seated on the spindle. 2. While holding both ends of the red tape ribbon on the turntable belt, carefully pull the belt over the motor pulley (Fig. 2a).
Connecting to Stereo System 1. Connect the red RCA-type pin-plug to the right channel input and the white RCA-type pin-plug to the left channel input of your stereo system (Fig. 3, page 4). 2. With the tone arm still fastened to the tone arm rest, slowly turn the turntable platter clockwise ten times, to make certain the automatic mechanism is fully cycled. 3. Remove the vinyl tie that holds the tone arm on its rest. 4. Connect the power cord plug to an AC outlet. 5.
Caution: When the tone arm reaches the end of the record, it will lift and return to the tone arm rest automatically. When this happens, do not interfere with the tone arm’s motion, or damage to the mechanism may occur. If the tone arm does not return automatically to the tone arm rest after the record has finished playing, simply press the STOP button to complete operation. Figure 6 Figure 7 SPEED Manual Operation 1. Remove the stylus guard from the stylus assembly (Fig. 4). 33 2.
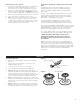
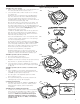
Troubleshooting Figure 11 Checking the drive belt Turntable does not operate 1. Make certain the turntable’s AC cord is plugged into an 11a AC outlet, and that the AC outlet is “live.” 2. Check the drive belt to make certain it is on correctly. (See Figure 11.) A) Remove the record mat from the turntable platter (Fig. 11a). Place the mat in the cardboard packaging sleeve for safekeeping. Through an opening in the turntable platter, visually inspect to see if the drive belt is around the motor pulley (Fig.
Specifications Tips For Better Performance • When opening or closing the turntable cover, handle it gently, moving it either at the center or equally from both sides. • Do not touch the stylus tip with your fingers; avoid bumping the stylus on the turntable mat or a record’s edge. • Clean the stylus tip frequently, using a soft brush with a back-to-front motion only. • If you use a stylus cleaning fluid, use it very sparingly. • Wipe the dust cover and turntable housing gently with a soft cloth.