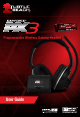
Programmable Wireless Gaming Headset User Guide
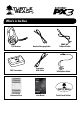
What’s in the Box PX3 Headset Headset Charging Cable XBOX 360® Talkback Cable ® c® PC/Ma PS3™ XBOX PX3 Transmitter Transmitter USB Cable RCA Splitter Cable TURTLEBEACH.
Table of Contents About the Ear Force® PX3 pg 1 PX3 Headset pg 2 PX3 Transmitter pg 5 Pairing the Headset and Transmitter pg 8 PS3 Setup pg 9 ® XBOX 360 Setup pg 13 PC/Mac Setup pg 15 Presets pg 17 Recharging the Headset pg 18 Technical Specifications pg 19 Troubleshooting and Support pg 20 Maintaining Your Headset pg 21 Important Safety Information pg 22 download PX3 software and additional presets at: www.TurtleBeach.com product support and warranty information: www.
About the Ear Force PX3 The Ear Force PX3 is an advanced wireless headset that is engineered for the PS3, and also works with XBOX 360 and PC/Mac gaming. To get the most from your gaming experience with your PX3, please take a few minutes to review this user guide. Digital RF Technology The PX3 provides wireless CD-quality game and chat sound on the PS3 via digital RF (radio frequency) that communicates with the PX3 transmitter.
PX3 Headset GAME 1 T A H C 2 3 M A IN 1. Main Power Button with LED Powering ON: Press and hold for 3 seconds. A double high tone will sound and the LED will begin to blink about once per second. Powering OFF: Press and hold for 3 seconds. A double low tone will sound and the LED will turn off.
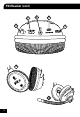
PX3 Headset (con't) 7 6 5 8 4 9 10 3
4. Game Volume Control Turn to adjust game volume level. NOTE: This is a continuous-turn control and does not stop at each end of the rotation. 5. Mini USB Input Used for charging the headset or for connecting the headset to a computer. The headset may be charged by connecting this Mini USB input to the USB input on the transmitter using the included Headset Charging Cable.
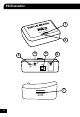
PX3 Transmitter 1 ® ac® PC/M PS3™ XBOX 2 5 4 3 PAIR GAME USB 6 AUX 7 5
1. Mode Selection Switch Slide to change between PS3, XBOX 360, and PC/Mac modes. 2. LED Indicator A solid LED indicates the Transmitter is powered on and communicating with the Headset. A slowly blinking LED indicates the Transmitter can’t communicate with the headset because it is powered off, not paired, or out of range. If this occurs, please refer to “Pairing the Headset and Transmitter” on pg. 8. 3. Pairing Button Press and hold for 3 seconds to activate pairing mode.
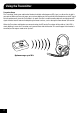
Using the Transmitter Transmitter Range The Transmitter sends game audio to the Headset via digital radio frequency (RF) signal, so a direct line of sight is not required. When you’re out of range, you may hear popping or clicking sounds if the Headset loses the RF signal. For best performance, place the Transmitter in an open area that is unobstructed by objects that might absorb RF signals from the internal antenna. Avoid placing it on metal surfaces, such as the top of a home theater A/V receiver.
Pairing the Headset and Transmitter The Headset and Transmitter in this package are “paired”, which means they’re synchronized to ensure they work together. When they are communicating, the LED on the Transmitter will be solid. If this LED is slowly blinking, it means the Transmitter can’t communicate with the Headset. This could happen if the Headset is turned OFF or out of range. If the LED is slowly blinking when the Headset is ON and within range, then they might need to be “paired” as described below.
PS3 Setup (HDMI) PS3 AV Cable Transmitter USB Cable (included) HDMI RCA Splitter Cable (included) Configure PS3 Sound Settings In the PS3 menu select: "Settings > Sound Settings > Audio Multi-Output > On" 0 12/14 12:15 PM Audio Output Settings On Sets to output audio through multiple connectors simultaneously. Audio output to connectors that are not selected in [Audio Output Settings] is downscaled to 2 Ch.
PS3 Setup (Composite) PS3 AV Cable Transmitter USB Cable (included) RCA Splitter Cable (included) Configure PS3 Sound Settings Step 1 In the PS3 menu select: “Settings” > “Sound Settings” > “Audio Output Settings”. Audio Output Settings Select the connector on the TV or AV amplifier (receiver). Step 2 Select ”Audio Input Connector / SCART / AV MULTI” to send the audio output to the PX3. Step 3 Press “X” to save this setting. Turn on the power of the connected device.
Configure PS3 Accessory Settings 0 12/14 12:15 PM Manage Bluetooth Devices Camera Device Settings Step 1: In the PS3 menu select “Settings” > “Accessory Settings” > “Audio Device Settings”. Audio Device Settings Sets the audio input and output devices for voice/video chat and other communicatin features. Vocie Changer Keyboard Type Key Repeat Interval Key Repeat Speed Mouse Type Audio Device Settings Step 2: Set the Input Device and Output Device to Turtle Beach PX3 (PS3).
XBOX 360 Setup (HDMI) Transmitter USB Cable (included) HDMI RCA Splitter Cable (included) XBOX 360 Audio Adapter Cable* (Alt. Setup) HDMI Transmitter USB Cable (included) RCA Splitter Cable (included) * All XBOX 360 models require an XBOX 360 Audio Adapter Cable for audio output when used with an HDMI connection (available from third party sellers). NOTE: If your HDMI TV has red/white AUDIO OUT RCA jack you can use it to feed the sound from your TV to your Turtle Beach headset.
XBOX 360 Setup (Composite) XBOX 360 AV Cable Transmitter USB Cable (included) RCA Splitter Cable (included) 13
XBOX LIVE Chat Setup XBOX 360 Controller XBOX 360 Controller Jack XBOX 360 Talkback Cable (included) Configure XBOX 360 Voice Settings 1. Press the XBOX 360 Guide Button, select "Settings > Preferences > Voice" Voice 2. Voice Volume = 10 Voice Volume 10 Game Volume 10 3. Game Volume = 10 4.
PC/Mac Setup (wireless) Wireless Mode (switch Transmitter to PC/Mac mode: presets are deactivated) PAIR GAME USB AUX c® PC/Ma PC/MAC PS3™ PS3™ ® XBOX XBOX® Transmitter USB Cable (included) The PX3 functions as a wireless USB stereo headset when connecting the Transmitter to a PC or Mac, and appears as Turtle Beach PX3 (PC) in Windows® and Mac operating systems. This lets you assign the PX3 microphone and chat in your game software as a USB audio device.
PC/Mac Setup (wired)* Wired Mode (presets are deactivated) USB Standard-A to USB Mini-B Cable (sold separately)* USB/CHARGE The PX3 functions as a wired USB stereo headset by connecting a USB Standard-A to USB Mini-B cable* (sold separately) from a PC or Mac directly to the headset (the PX3 Transmitter is not used for this setup). Insert the USB Mini-B end of cable into the headset and the USB Standard-A end of the cable into your computer.
Presets Main and Alternate Presets The PX3 includes 2 preset modes that are optimized for the PS3 and XBOX 360. Each mode contains 9 presets that are grouped into (1) Main preset and (8) Alternate presets. The Main preset is “flat”, meaning that it does not process the sound, while the Alternate presets are optimized for specific game conditions. Each Alternate preset has different settings to modify the game audio, so as you cycle through them you'll hear the sound change as it’s processed by the DSP.
Recharging the Headset The PX3 features a rechargeable lithium polymer battery that provides more than 10 hours of continuous game play. When your headset battery power is low, a tone will begin to sound every 10 seconds until the headset powers off. You can recharge your headset while still gaming with the included Headset Charging Cable. Simply plug the mini USB end into your headset USB/CHARGE port and plug the other end into the CHARGE port on the Transmitter.
PX3 Headset Technical Specifications · 50mm diameter speakers with neodymium magnets · Digital Wireless RF (2.
Troubleshooting Tips No sound • Check that the Headset volume control is turned up. • Check that the Transmitter power and audio cables are properly connected. • Check that the Headset is powered on. The LED under the POWER button on the right ear cup should be blinking. • Check if the Transmitter LED is on. If the LED is blinking, it indicates that the Transmitter isn't communicating properly with the headset.
Maintaining Your Headset Avoid Heat: Avoid resting or storing the headset or cables in or on top of units that generate heat. Gaming consoles are known to generate and dissipate unusually high levels of heat, and the heat can degrade the plastic resulting in twisting and eventual exposure of the internal wiring. Storage: To help prevent damage to your Turtle Beach Headset, store it in a dry location where there is no risk of heavy items falling on your headset.
Safety Notice To avoid potential damage to the device, always disconnect all cables before transporting it. WARNING: Permanent hearing damage can occur if a headset is used at high volumes for extended periods of time, so it is important to keep the volume at a safe level. Over time, your ears adapt to loud volume levels, so a level that may not cause initial discomfort can still damage your hearing.
Notes 23
For more products, accessories and general product information, please visit TurtleBeach.com For warranty information and product support, please visit http://turtlebeach.com/support IC Radiation Exposure Statement for Canada This equipment complies with IC radiation exposure limits set forth for an uncontrolled environment. To maintain compliance with IC RF exposure compliance requirements, Please avoid direct contact to the transmitting.
TB521-2240-01 Programmable Game and Chat Sounds Includes18 interchangable audio presets for different gaming situations. Wireless Game & Chat on PS3 Experience wireless digital CD-quality game sound and wireless chat on PS3. (XBOX LIVE requires included chat cable) Rechargable Battery Provides more than 10 hours of uninterrupted gameplay. Ear Guard™ with Blast Limiter Limit the intensity of deafening sounds such as explosions and gunfire. Microphone Monitor Let’s you hear what you’re saying.