MultitrackStudio Bremmers Audio Design Manual, Version 6.1, March 2010 http://www.multitrackstudio.
Version History 1.0 November 2001 Initial release 1.2 February 2002 New MultitrackStudio 1.2 features added. General improvements. 2.0 June 2002 New MultitrackStudio 2.0 features added. 3.0 October 2003 New MultitrackStudio 3.0 features added. General improvements. 3.1 4.0 May 2004 October 2005 New MultitrackStudio 3.1 features added. New MultitrackStudio 4.0 features added. 4.1 May 2006 New MultitrackStudio 4.1 features added. General improvements. 4.2 November 2006 MultitrackStudio 4.
Contents 1. Introduction l Overview l Quick Start: Recording a Song 2. Songs l Songs l Song Properties l Song Versions l Songlists 3. Transport Control l Transport Control l Position Indicator l Overview Bar and Markers l VariSpeed 4. Recording l Recording l Audio Recording l MIDI Recording l Multiple Takes l Alternate Takes l Partial Takes l Punch In/Out l Sound on Sound recording l Cycle Recording l Delay Before Recording l Click Track l Monitoring l Practice Mode 5.
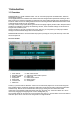
1 Introduction 1.1 Overview MultitrackStudio is a virtual multitrack studio. You can record and play audio and MIDI tracks, edit them, and mixdown to stereo. The straightforward and uncluttered user-interface has been designed with tape-based recording in mind. Mixer sections are oriented horizontally (as opposed to the more familiar vertical layout), allowing them to include an editor as well. The editing tools are aimed at correcting mistakes.
1.2 Quick Start: Recording a Song Note: after installing the program you can go to the Studio menu's Devices option to select the audio and MIDI devices you want to use. Follow these steps to record a song and make a CD: Step 1: Make new Song Make a new (empty) Song using the Song->New menu option. A new (empty) folder is created automatically. Step 2: Add Click Track (optional) If you're recording a song from scratch you'll probably want to add a Click track (metronome).
2 Songs 2.1 Songs MultitrackStudio project files are called "songs". A song file (.hdr file extension) contains all information that is required to reproduce the mix you made. This includes: l l l l l l l The number of tracks and other mixer sections. The position of all their knobs, effects, names of audio/MIDI files etc.
Typical applications of versions include: l l l Create a version before making major changes to the song, so you can revert to the old version if it's not such a good idea after all. Try different mixes and store as versions. Note that you can not only change mixer settings, but edit audio and MIDI tracks as well. Create a version of any mixes you send to someone, just in case they later feel the old one was better.
a single audio file without any processing. Outputs (Pro Plus edition only) determines the number of audio outputs. This is always an even number, the minimum value is two (stereo), the maximum value is 64. If the value is greater than two all Group and Effect Return sections will have an Output Selector. Note that the Outputs value can exceed the number of outputs the audio device actually has. Any mixer sections using these nonexisting outputs will not be heard.
The Songlist menu The Songlist bar contains the Songlist menu, which offers the following options: l l l New, Open, Save, Save As, Rename, Close Comments: Read or write text which is stored in the songlist file. You can use this to document the project. Songlist Properties: Show the songlist's properties.
3 Transport 3.1 Transport The transport controls are similar to a tape recorder's transport controls. The transport controls The transport is controlled by five buttons (from left to right): l l l l l Home: Go to start of song. Rewind Fast Forward Stop: Stop the transport. Start: Start the transport (use the Shift key to start at the last start position).
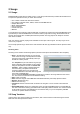
Navigating through a song becomes significantly easier using markers. The Transport Options menu, accessible via the down arrow on the right hand side of the position indicator, features an Add Marker option which adds a marker at the current transport position. If there's a marker at the current position a Delete Marker option is presented instead. Alternatively markers can be added by rightclicking the overview bar.
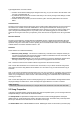
4 Recording 4.1 Recording The first thing to do when starting to record a track is to add a track with an audio or MIDI file that will contain the recording. You can do this using the Add Track menu, which also lets you define templates for tracks. Add Audio Track window (Pro Plus edition) Add MIDI Track window If the track contains an audio file (like the default .wav format), the track will record audio (using a microphone or a line input), if it contains a MIDI file (.
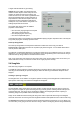
Manual assignment Click the Input button and turn off Automatically assign channels to tracks. Now all audio tracks will show a down arrow on the right hand side of the Rec button. Clicking this down arrow pops up the input channel selector. The input channel is displayed on the Rec button itself. Note: an audio input channel can be recorded by one track at a time only. Input channel selector Input assignment (WinSound driverset) On Windows XP/2000 the Input button pops up the Windows Recording Mixer.
instead. In a similar way this option can be used to 'freeze' a track that uses effects that require a lot of processing power. The new (audio) track will include the effects, thereby freeing up the processing power used by them. 4.3 MIDI Recording MIDI tracks always record the MIDI In Device(s) and/or the Onscreen MIDI Keyboard, regardless of the type of MIDI instrument being used. If the Autodetect Keyboard option is enabled (default) your keyboard's MIDI channel will be detected automatically.
hand part. MIDI messages on one channel are intercepted and separated. All notes below the split note are routed to the left hand channel. All other notes and all controller events are routed to the right hand channel. Each output channel can be transposed up to three octaves up or down. Keyboard Splitter window Autodetect Keyboard If the Recording options menu's Autodetect Keyboard option is active (this is the default setting) recording MIDI tracks will respond to messages on all channels.
is what happens: 1. The last recorded track's Play and Rec buttons are deactivated. 2. A new track is added and switched to Record mode. 3. A file is created having the same name as the last recorded file, but with a number added. If the name ended with a number, that number is incremented. 4. The transport's position rewinds to the position the last recording started. You can keep down the Shift key while clicking to keep the transport from rewinding.
Punch-In Recording step-by-step l l l l l l l l Open the editor of the track you want to record. Select the part you want to record in the editor. Move the transport position to the point where you want to start playback. This will typically be at least a couple of seconds before the point where you want the punch in recording to start. Make sure the Punch button at the top of the screen is red. Make sure the track's Rec button is red. Start the transport. Record the part and stop the transport when done.
l Now you can use the editor's Undo and Redo buttons to select the best version. 4.10 Delay Before Recording Delay Before Recording window The Delay Before Recording window has several options that can be useful when you are recording on your own. Delay Before Recording allows you to walk to your guitar/microphone etc. before recording starts. There are two ways of doing this: 1. Wait : The transport simply waits for a specified number of seconds to elapse. 2.
4.12 Monitoring Monitoring means: hearing the track you're recording. The best way to achieve this is in hardware ("direct monitoring"), as this doesn't introduce a delay. Soft Monitoring can be used if you need to hear effects like the Guitar Amp while recording. It can also be used if your hardware doesn't support direct monitoring. Direct Monitoring If you're using the WinSound driverset you can access the sound device's internal mixer using the Studio menu's Audio Output Control option.
5 Playback and Mixing 5.1 Playback and Mixing In order to be able to play audio or MIDI files they should be opened in a track. To play a track you should activate its Play button (it turns green) and start the transport. Tracks have mixing and effect processing capabilities. You can expand the mixer by adding any number of Group or Effect Return sections. All Tracks, Groups and Effect Returns are routed through the Master section.
Close: Unload the file. Properties : Shows the file's properties. If it's an .mp3 file you can edit its tags from it as well. ¡ New Stream: (MIDI track only). Adds a stream to the MIDI file. ¡ Split Streams: (multiple stream MIDI track only). Splits the MIDI file in separate single-stream files, these new files will be opened in new tracks. ¡ Alternate Take: Creates and opens a new file and puts the track in record mode, so you can quickly record an alternate take.
MIDI track (Instrument: Sampler) 5.3 Group Audio tracks can send their output straight to the Master section, or to a Group section. The Group section's output is routed to the Master section (they can be routed to sound device output channels as well using the Pro Plus edition). Group sections can be added using the Add Track menu and removed by dragging them to the Garbage Bin.
l Level Meter: The Level Meter shows the actual output level (that is the level after applying effects and volume/pan). A Label can be stuck to an Effect Return to show its purpose (ie. 'Reverb'). The order in which the Effect Returns appear can be changed using drag-and-drop. 5.5 Master The Master section affects all Tracks, Groups and Effect Returns (except MIDI tracks using a External MIDI Instrument).
5.8 Mixer Section Templates Templates of mixer sections can be created by dragging a mixer section to the Add Track menu button and dropping it there. A small window will pop up where you can specify the name of the template. The Add Track menu will show an 'expander' icon on the left if templates are available for a certain mixer section type. After clicking it the menu shows the templates. If you click a template a mixer section will be added based on the template (ie.
6 Mastering and Mixdown 6.1 Mastering Traditionally the multitrack recording is mixed-down to a stereo tape recorder. This stereo recording is then 'mastered', which usually means that EQ and (multi-band) compression is applied. When mastering for vinyl, EQ and compression had to be applied to keep the needle from jumping out of the groove.
6.4 Realtime Mixdown Certain sample based VSTi plugins can suffer from audio drop-outs using offline mixdown. This typically happens if the samples don't fit the computer memory. In this case realtime mixdown can be used to record a master file. Follow these steps to record a master file in real time: l l l l Add a new track with an audio file (for instance: mix.wav). Use a stereo 16 bit .wav if the file is to be burned to CDR. Activate the Record Master option in the Recording Options menu.
7 Effects MultitrackStudio features a large number of built-in high-quality effects. In addition VST and DX plugins can be used. Effects are reached via Effect Slots. Effects can be selected by clicking the slot's down arrow (or by right-clicking the slot). The Effect Slot Effect Selector contains all native MultitrackStudio effects, VST and DX plugins, Convolutor impulse responses and effect presets. A search text can be typed to filter the list.
Automated Fader window (two dots selected) The fader will move in a linear fashion from one dot to another. Dots can be added, removed or moved using the editor. The editor can work in one of three modes: l l l Select: clicking a dot selects it, pressing the mouse in "empty space" and moving it selects dots. Selected dots can be moved. Add: clicking in "empty space" adds a dot, clicking a dot selects it. Moving the selected dot(s) is possible as well.
Band Effect window 7.3 Chorus The Chorus effect adds thickness and warmth to the signal. The output signal is a mix of the input signal and a delayed copy of it. The delay time is modulated. Chorus window The Delay knob sets the average delay time. The Speed and Depth knob control the modulation. The Mix knob sets the dry/wet ratio (0% being dry only, 100% being wet only). If you use an Effect Return for adding Chorus set Mix to 100%. If used as an insert effect Mix will usually be set below 50%.
Attack controls how fast the Compressor will attenuate loud signals, while Release controls the time it takes to stop attenuating after a loud signal ended. Low Release times can cause distortion at low frequencies. Gain sets the amount of gain applied after the compressing action is done. As the Compressor attenuates loud parts the overall level drops. The Gain control compensates for this level drop. By activating the Auto Gain button the Compressor will automatically adjust the Gain control.
Use the Use mono impulse on mono input button if you don't want mono input signals to be converted to stereo (this happens if the impulse file is stereo). Doing this halves the Convolutor's CPU usage. Clicking the Mono Button has no effect until the Transport is restarted. kHz should be set to the samplerate of the impulse response file (MultitrackStudio can't detect it automatically). Impulse response file are typically sampled at 44.1 kHz. Volume controls the output level.
unnatural sounding vocals. Threshold controls the level above which the Deesser becomes active. Range controls the dynamic range the Deesser operates on. The threshold can be made to float within a certain range, so low-level parts can also be effectively deessed. Frequency controls the frequency above which 'S' sounds are detected. If this control is set too low the Deesser will be too sensitive (i.e., sounds that are not a 'S' will be attenuated).
Attack controls how fast the Compressor and Limiter will attenuate loud signals, while Release controls the time it takes to stop attenuating after a loud signal ended. Low Release times can cause distortion at low frequencies. Gain sets the amount of gain applied after dynamics processing has been done. Limiter Threshold controls the level above which the limiting action takes place. The Expander can be used to attenuate background noise. The Transfer Curve shows the effect of the current settings.
EQ window Lo Cut The Lo Cut section is a lo cut filter. The cut off rate can be 6,12 or 18 dB/octave. The cut-off frequency can be 20 Hz up to 2 kHz. Bass The Bass section can be a shelving or bell-type equalizer. Boost/Attenuation can be -12 dB to +12 dB. Frequency can be 20 Hz to 1 kHz. If the Vintage button is active the equalizer follows the classic Baxandall curves: cutting low frequencies will be accompanied with a slight boost of the lower-middle range and vice versa.
The actual frequency spectrum of the audio signal can be shown in the graph. This can be a great help in setting up the EQ.
7.12 Flanger Flanging is the effect that occurs when two tape recorders playing back the same signal run slightly out of sync. Flanger window The Delay knob sets the average delay time. The Speed and Depth knob control the modulation. The higher the Feedback position, the more effective the effect is. When the Stereo button is active the delay times of both stereo channels will be modulated with out-ofphase signals. With low delay settings this sounds like a rotating speaker. Reverse St.
It's best to connect your guitar to a high impedance input. Low impedance inputs compromise the guitar pickup's treble response. Some sound devices have a dedicated instrument input. A high-impedance DI box or preamp can be used if your sound device doesn't have one. You can also try using a stomp box effect as DI box. A guitar's sound can be made less bright by turning it's volume knob down a bit. This can be desirable, especially when overdriving an amp using single coil pickups.
the more time). Also, the current input level is shown horizontally at the bottom. This Level History makes it very easy to set up the Drive knob. There's a colored 'curtain' on the right side of the display that can be moved using the Drive knob. The signal bars that are covered by the curtain are limited. The statistic display will be reset when either the Transport is started or the Limiter window pops up.
horizontally at the bottom. This Level History makes it very easy to set up the treshold. There's a colored 'curtain' on the left side of the display that can be moved using the Treshold knob. The signal bars that are covered by the curtain are muted (the gate is closed). The Level History will be reset automatically when either the Transport is started or the Noisegate window pops up. You can be reset it manually using the F5 key.
Phaser window Frequency controls the tonal character of the effect. Range determines the distance the notches move. High values can lead to noticeable pitch shifts. Speed controls the speed used to move the notches. Depth controls how deep the notches are (the deeper the notches, the more intense the effect). The Stereo button can be used to create a stereo effect by moving the left and right channel notches in opposite directions. 7.
Reverb window The Main section contains the most important controls. Rvrb time controls the reverb time. Mix mixes the wet (ie. reverb) and the dry (ie. input) signal. 0 % is dry only, 100% is wet only. 100% will be used if the effect is used in an Effect Return section. Width controls the stereo width of the reverb. Pre Delay controls the time it takes for the first reflection to appear. The Color section contains controls that affect the tonal character of the reverb.
If the button is inactive the output is clipped at 0 dBFS. In this situation the effect can be used as a 'dirty' master limiter/maximizer (use the Drive knob to boost the signal level as much as possible without unacceptable distortion). Tube The tube simulator consists of a preamp and a power amp simulator. The preamp mainly generates second order harmonics, the power amp generates lower order odd harmonics.
Modulation Speed and Depth can be adjusted. The Stereo button can be used to create a stereo effect by modulating the right channel with phase shifted version of the sine wave. If the Vintage button is checked the characteristics of a vintage analog tremolo effect are emulated. The Tremolo effect can also be used as an 'analog warmer' (set Depth to zero). Tremolo window 7.26 Tuner The Tuner effect can be used to tune instruments like guitar, bass etc.
There are a couple of 'powered' plugins on the market that come with their own dedicated hardware to run on. These kind of plugins are not supported. Note: if you install VST plugins while MultitrackStudio is running you may have to restart MultitrackStudio in order for the new plugin to be listed (the plugins are collected only once). 7.29 DX Plugins DX (DirectX) plugins can be loaded in an effect slot using the slot's down arrow.
Using Effect Send bus as sidechain input In this example the level of the lower track will be muted when the upper track is loud. The upper track's Effect Send (the rotary knob with the black dot) sends the track's signal to the Effect Send bus. The lower track's output is sent to Group 1. One of this Group's Effect Slots contains a Compressor effect using Effect Send 1 as sidechain input. Effect Return 1's fader is all the way down in order to avoid sending the signal to the Master section.
8 MIDI Instruments MIDI Instruments are used to convert MIDI messages to audio. These instruments are available: 1. External MIDI Instruments, can be either an external hardware synth, a synth on your soundcard, or a software emulation of such a device. 2. Sampler, generates audio using samples. 3. Electric Piano, emulates electric pianos. 4. Wheel Organ, emulates wheel organ. 5. VST Instrument, a VST Plugin that can convert MIDI events to audio. 6.
"Freezing" software instruments MIDI tracks using a software instrument can be saved to an audio file using the track's Save As option. This can be very useful if a software instrument uses a lot of CPU power. The software instrument is effectively replaced by an audio file, but all effects and mixer settings etc. stay the same, so the sound is identical. The track's File Options Menu can be used to load the MIDI file again (it appears in the File History at the bottom of the menu).
properties can be altered, so you can select the MIDI Out devices you want to use. The MIDI In and MIDI Out port are connected by default (messages received on an incoming channel are forwarded to the corresponding outgoing channel). When a software instrument is used in record mode the MIDI In channel being used is disconnected from the MIDI Out channel. Note: Interconnecting a MIDI In and MIDI Out port creates a loop that will slow down (and ultimately halt) your computer.
The Sampler responds to messages on all MIDI channels, so the Channel value typically doesn't matter. It does matter if you're recording using the Keyboard Splitter or using multiple keyboards: it these situations you want only messages received on this channel will to be recognized. The Sampler supports the following MIDI messages: l l l l l l l l Note On/Off Volume (cont. 7) Pan (cont. 10) Expression (cont. 11) Sustain (cont. 64) Legato (cont. 68) Brightness (cont.
The new patch will be placed in the category that's highlighted in the Category box. New categories can be added using the New button. Typically, categories will be called Piano or Drums etc. Alternatively the Browse button can be used to specify a custom folder. Patch Converter window 8.3 Electric Piano The Electric Piano is a software version of two classic electric pianos. Electric Piano window Instrument The Instrument sections offers a choice of two different electric pianos: 1.
Wheel Organ window ("Upper Manual" instrument) Instrument The Instrument sections offers a choice of four different combinations of organ manuals / pedals: 1. Upper Manual: The upper manual spans five octaves ranging from C3 (note 36) to C8 (note 96). 2. Lower and Upper Manual: The lower manual spans five octaves ranging from C0 (note 0) to C5 (note 60). The upper manual spans five octaves (minus the lower C) ranging form C#5 (note 61) to C10 (note 120). 3.
(Chorus) positions will be used. The V positions provide Vibrato. Vibrato is applied to all manuals and pedals. Playing instrument 2 or 3 with one MIDI keyboard MultitrackStudio's Keyboard Splitter can be used to play instrument 2 or 3 using only one MIDI keyboard. Follow these guidelines to set up the Keyboard Splitter: l l l Make sure the Left Hand and Right Hand section's Channel values equal the Channel Indicator in the bottom-right corner of the Wheel Organ window.
To work around this limitation VSTi plugins can run 'bridged', or 'out-of-process' in computer lingo. Each bridged plugin can access up to 2 GB of memory. To run a plugin bridged you can right-click it in the instrument selector, and check the Run bridged option. From now on, all new instances of the plugin will run bridged. The window title bar of a bridged plugin reads "VST pluging (bridged): name".
9 Automation Note: this feature is available in the Pro Plus edition only. The mixer sections and audio effects can be automated (ie. the knobs can be programmed to turn automatically while the transport is running). This can be used to change a track's pan position, to add more reverb to part of a track etc. All automation movements have to be programmed using a control's Automation Editor, which works just like an Automated Fader effect. It's not possible to record fader or knob movements directly.
VST and DX plugins can be automated too. To pop up the effect's Automation Editor you should click the Automation button in the bottom right corner of the main window first, and then click the right hand side of the effect window (the area where the Bypass and OK buttons are). Right clicking this area also works, and even right clicking the plugin's user interface will work with many plugins. The plugin user interface knob movements will lead by approximately 0.
10 Editing Each track has an editor that can be opened using the Edit button located on the right hand side of the track. The Tempo Editor affects the tempo of MIDI tracks, and optionally audio tracks as well. The Song Editor can remove or insert parts and affects "everything" (tracks, automation, markers etc.). All editors feature a "needle" which indicates the current transport position (its position equals the value of the transport's position indicator).
Stretch (use Alt key), before and after Warp (use Alt key), before and after Tweakable Edits MultitrackStudio features 'tweakable edits', which means that after performing an edit (for instance pasting some audio) you can tweak the edit (for instance adjust position and length of the pasted part, adjust volume, or even add effects). Every time you make an adjustment the initial edit will be completely redone, thus ensuring optimal sound quality.
l l l l l l This might require the use of a weird time signature like 27/4 in the first measure. Song Editor: shows the Song Editor. Insert: When active pasted (or drag-and-dropped) parts will be inserted. Existing data will be overwritten otherwise. Insert will usually be off in order to avoid misaligned tracks. Snap: Turning on Snap makes the start and end point of all currently selected parts snap to the (visible) grid. All subsequent mouse movements will snap to the grid as well.
Clip Shelf Dropping audio/MIDI files on track editors Audio and MIDI files can be dragged from Windows Explorer to a track's editor. Some VST plugins allow dragging audio or MIDI from their user interface to a track editor as well. 10.2 Editing Audio Tracks The Edit button shows/hides the track's editor. The editor shows a graphical representation of the audio signal. A part of it can be selected using the mouse (press left button and drag).
Audio Edit Control window Audio Edit Controls have the following features: l l l l l l l Volume fader: Changes the volume of the selected part. Note: In most cases it is better to use an Automated Fader effect to change volume levels of certain parts of a track, as this leaves the audio file untouched. Fade: Performs a fade in or fade out on the selected part. Reverse: Reverses the select part. Transpose: Pitch shifts the audio signal by the specified amount of semitones and cents.
Scrubbing The editor has a built-in "scrubber", meaning that you can actually hear the part being selected. This can help in finding the desired location, in addition to the visual clues given by the editor. With tape recorders this was done by moving the reels manually ("reel rocking"), now it can be done by moving the mouse. The scrubber is active while moving the needle, while selecting a new part, and while resizing an existing selection.
to MIDI conversion feature to create a MIDI track: 1. Add a MIDI track using the "Add Track" menu. 2. Open the MIDI track's editor and the vocal track's editor. 3. In the vocal track editor select the part you're interested in, drag it to the MIDI track editor and drop it there. Now you can use this MIDI track to guide the pitch correction: 1. In the Audio Edit Control make sure the "Pitch correction options" are visible. 2. Select the MID track in the "MIDI guide track" box. 3.
MIDI Edit Control window MIDI Edit Controls have the following features: l l l l l l l l Volume fader: Changes the volume of the selected part. Fade: Performs a fade in or fade out on the selected part. Dynamics: Compress (0..100%) or expand (100..400%) the dynamic range of the notes. Reverse: Reverses the select part. Transpose: Transpose all notes in the selected part by a number of semitones. Legato: Note durations are adjusted to make note-to-note transitions smoother.
Selecting Notes In Select Notes or Add Notes mode a note can be selected by clicking it. Multiple notes can be selected by keeping the Ctrl key down while clicking a note. In Select Notes mode you can also lasso a rectangular region. Selected notes appear in red. Lasso in action Moving Notes Notes can be moved using the mouse. The editor will scroll automatically if the mouse approaches any of the four sides of the editors. Notes that are being added, dragged or selected are audible.
10.6 Pianoroll Editor Pianoroll editor In Add Notes mode notes can be drawn by moving the mouse horizontally while keeping the left mouse button down. Clicking the mouse without dragging it will add a note having the same duration as the last one. Notes can be dragged or resized using the mouse in both Select Notes and Add Notes mode. The name of the chord constituted by the selected notes will be displayed in the editor while selecting.
clicking the editor, and picking one out of the items in the menu's Add Tuplet section. Clef and Key Signature The section on the left shows the clef and the key signature. Clicking this section pops up the editor's Notation Settings window. In this window you can choose the clef, possible values are Bass, Treble, both Bass and Treble, Tenor and Alto. The Oct setting, which is available for single staff only, can be used for instruments which are notated one octave off.
having the same time signature. You can use this feature to, for example, select all hihat hits which are on beat 1 and make them all a bit louder. If multiple notes are selected "Select similar notes" will work on the selected notes only. You can, for example, lasso all choruses and then select a particular note within the choruses. 10.9 Controller Editor MIDI instruments can use controller events to alter the sound they generate.
Drum track with patterns A pattern is a small piece of MIDI music. It will generally have a size that makes sense in musical terms (eg. a bar, four bars, or a verse). A new pattern can be created in two ways: l l Select a part of the Pattern Bar and click the New Ptn button. The Pattern Editor will appear automatically. Select a part of the track editor and click the New Ptn button. A new pattern will be created and all notes that were in the selected part will be moved to the pattern.
Clicking the Menu button will bring up a menu with three items: l l l Clone: Create a new Pattern that is identical to this one. All other instances of the original pattern will remain untouched. Import: Import a pattern from a MIDI file. Export: Export the pattern to a MIDI file. The Name box contains the name of the pattern. All instances of the pattern will have the same name. This name doesn't mean anything to the program, ie.
Dragging tempo line vertically, before and after If the right hand side of the selected part is dragged while keeping the Alt key down the tempo will be adjusted accordingly: Stretch (use Alt key), before and after Any grid line in the selected part can be moved if the Alt key is down: Warp (use Alt key), before and after The Tempo Editor features tweakable edits, thereby minimizing any rounding errors. The Paste and Repeat buttons take into account the global Insert setting.
The song editor affects "everything": l l l l l l l Audio / MIDI files opened in the tracks Tempo and Time Signature Key Signature (as seen in Notation editors) Chords and Lyrics Markers Automated Fader effects Automation data (Pro Plus edition) Song Editor window The song editor doesn't show any information like audio or MIDI data. You can open a suitable track editor to get some visual where-am-I feedback. 10.
Notation Each track gets it's own staff (or a system of both bass and treble staffs). Selected notes can be moved to another staff using drag-and-drop. Drum The colored buttons at the top only serve to show the names of the tracks. The drum instruments appear in the same order, and the notes appear in the corresponding colors. The Drum Instrument Selector, which appears on clicking the NEW INST button lists the instruments available in all the track's MIDI instruments.
Here are examples of chords and lyrics: || empty bar for count in Intro: | C | Am | F |Gsus4-Gsus4- G - G | | C | Am | Bb | G7 | Chords example || | The sky | is blue | and - I | love -- you | | It's true | it's true | it's true | it's true| Lyrics example Note that any text which is not in a bar is ignored, and thus can be used to add comments. Spaces can be used anywhere you like. However, spaces aren't allowed in chord names (ie. you must type 'Gsus4' instead of 'G sus 4').
11 Devices A 'driverset' is used to make your audio and MIDI devices available for use by MultitrackStudio. This driverset can be selected in the Studio->Devices window, currently the AsioSnd and WinSound driversets are available. On Windows Vista or newer there's also the VistaSound driverset. Clicking the Properties button will show the driverset's Properties window, which is where you can select the actual devices to be used.
and low latency. If the buffers are too small glitches will occur. This may not be a problem when playing back audio or recording MIDI, as the driver will usually stay in sync so any glitches will not appear in the final master. It's strongly recommended to use large enough buffers when recording audio, as glitches in the recorded track do appear in the master. In the MIDI In Devices section you can select the device that is used for MIDI recording.
samplerates probably aren't equal. This can be quite a problem, as recorded tracks will slowly go out-ofsync during playback. Audio devices are opened in exclusive mode in order to ensure low latency and good synchronization. This means other programs can't use these audio devices while MultitrackStudio runs. If, for example, you want to record the audio output of another program you'll have to temporarily select 'None' in the Audio Out Device section so the other program can playback.
In the Audio Out Devices (Low Latency) section you can select the device that will be used when there are one or more recording soft instruments. The devices listed are DirectSound devices (which can have a lower latency). In general you will use MME and DirectSound devices that use the same sound device. WinSound will automatically open/close the appropriate device.
11.4 MIDI Out Device Options The MIDI Out Device Options window (available from the Studio menu's Devices window) determines the behavior of the MIDI Out devices, and consequently the External MIDI Instruments. MIDI Out Device Options window (this example is from the Pro Plus edition) Default Patch Map: Here you can select a patch map that matches the synthesizer connected to the MIDI Device.
Step 3 Click the Studio menu's Devices option and click the Settings button. The driverset's Settings window will appear. Now close this window using the OK button, thus forcing the program to create sections in a file that you will be editing in the next step. Note that 'default' devices (Default, MIDI Mapper or Primary Sound Driver) can't be compensated, so any devices you want to compensate must be selected explicitly. Step 4 Record the first track to the second track for about one second.
The _samples values must be integer values, the _millisecs and _buffers values can be fractional. ASIO Delay A small delay can be introduced to the AsioSnd driverset's ASIO buffer processing. This can sometimes be used to work around certain sound device/mainboard/driver incompatibilities if these symptoms occur: 1. Recording a MIDI track using a soft instrument sounds fine while recording. 2. But it sounds gargled or extremely glitchy when played back.
12 Control Surfaces A hardware control surface is device which typically has faders, knobs and buttons. It can be used to control MultitrackStudio's transport, mixer and effects. Control surfaces connect to a MIDI port on the computer. The MIDI In device to be used for the control surface can be selected in the Studio menu's Devices window. The MIDI Out device should be specified as well if the control surface has LEDs or motorized faders.
Actions The following actions can be controlled by the control surface. Actions marked (cc) should be controlled by a continuous controller (rotating knob or fader), all other actions are supposed to be controlled by a button. l What Is: Keep this button down while using another button or knob. A description of the associated Action will be shown in the bottom left corner of the screen.
l l l l l l l Master Fader: controls the Master section's volume fader. Clear Solo: turn off any active Solo buttons. Level Meters: turn on/off the control surface's level meters Faders Silent: suspend/resume motor fader control. Can be used to keep the (automated) faders from making noise while recording in the same room. Slot Select Button: press this button before pressing the Section Slot button. Now a Section Select Slot action will be sent instead of a Section Slot action.
provided the control surface is set up to control effects. The name of the current View is shown on the righthand side. This typically indicates the function of the control surface's rotary knobs (pan, effect send 1 etc.). Mapping Mixer Sections Songs can have more mixer sections than the available number of control surface channels. Most control surfaces have Bank Up/Down and/or Section Up/Down buttons so any number of mixer sections can be accessed. These buttons can be used with MultitrackStudio.
13 Audio and MIDI Files 13.1 Audio Files The following audio file formats are supported: l l l l l l l l .WAV files: 16 bit mono or stereo (Pro Plus edition also supports 24 bit, 32 bit and 32 bit floating point files). .GJM files: 16 bit mono using lossless compression (Pro Plus edition also supports 24 bit). .GJS files: 16 bit stereo using lossless compression (Pro Plus edition also supports 24 bit). .SAM files: 16 bit mono headerless raw data files. .
13.2 MIDI Files The following MIDI file formats are supported: l l .MID files : standard MIDI files. .MPT files : MIDI Pattern Track files (see MIDI Pattern Editing). .MID file can be saved as .MPT files and vice versa. A MIDI file can contain more than one stream ('track' in MIDI terms, but renamed to avoid confusion). MultitrackStudio supports using multiple streams, although we don't recommend it. MultitrackStudio does not support patch changes in a stream.
14 Keyboard Shortcuts Transport These shortcuts work in the main window, effect/instrument windows and editor windows: l l l l l l l l l Home: Go to start of song. End: Go to end of song. Space Bar: Toggle transport start/stop. Shift+Space Bar: Start at last start position (if transport stopped), Stop and move to start position (if transport running). Left/Right Arrow: Rewind/Fast Forward. Several modifier keys can be used combined with the left/right arrow keys: ¡ M: To previous/next Marker.
l l l l l l l l l l l l l l l l l l l l Insert: Toggle Insert button. Ctrl+G: Toggle Snap button. Ctrl+B: Toggle Bars button. Ctrl+Alt+B: Switch time grid to bars. Ctrl+Alt+S: Switch time grid to seconds. Ctrl+E: Show Tempo / Time Signature Editor. Ctrl+Alt+E: Show Song Editor. Ctrl+Alt+U: Show Multi MIDI Editor. Ctrl+U: Show Multitrack Editor. Ctrl+H: Show Chords Editor. Ctrl+Alt+H: Show Lyrics Editor. Ctrl+O: Show Audio Output Control. Ctrl+F: Show Control Surface window. Ctrl+D: Show Devices window.
Alt shortcuts Most windows, including the main window, feature shortcuts using the Alt key. If you press the Alt key the shortcut characters will appear underlined. The shortcuts will hide again when the Alt key is released. The shortcut key should be pressed before the Alt key is released. In the main window, only the mixer section which has focus can be controlled using Alt shortcuts. A dot appears on the left hand side of the mixer section indicating it is focused.
mouse button. You can select an item by moving the mouse while the mouse button is still down. The Drum Editor doesn't support mouse modifiers which don't make sense for percussion instruments (like Duration, Sharpen, Expand to chord etc.).
15 Touchscreens Introduction MultitrackStudio features a touchscreen mode which makes the program easy to use with touchscreens. Touchscreen support has been designed to turn the computer in a recording and mixing device, while allowing some editing as well. You can interact with the knobs you see on the screen directly without having to find your mouse and move it to the right location first. In fact you're not even supposed to have a mouse or keyboard within reach.
Full screen mode It's highly recommended to use the Studio menu's Full Screen option. The knobs at the top, and the status bar at the bottom are much easier to operate this way, and you avoid the risk of touching the 'X' button or Windows task bar inadvertently. Controlling user interface elements Some user interface elements work a bit different with touch than with the mouse: Mixer faders Put a finger on the fader and move it horizontally.
Lists with a vertical scrollbar You can put a finger on the contents of these lists and move it, without using the scrollbar. Windows 7 with a multi-touch screen features inertia scrolling: the list moves on for a while after you've lifted your finger. Scrolling a list Text in Comments window and Chords/Lyrics editors. See "Lists with a vertical scrollbar". Text can be selected by moving your finger horizontally. Once it's clear you're selecting rather than panning you can move vertically as well.
l Hence a very short note which is selected can only be resized, not moved. Unselect the note first if you want to move it. Pianoroll showing resize grip on selected note and transparent needle thumb. Up/down buttons You can't push the up/down arrows because they're too small. Instead, put a finger on the button and move it approx. 2 centimeters up or down to increase/decrease the value. If you keep the finger on the screen the button will continue to increase/decrease automatically.
16 Preferences The Preferences window contains some general settings: User Interface: l l l l l l Color Theme : Choose a color theme. The Classic themes make the program look like pre-version 5 MultitrackStudio. Knob Style : The round knobs can respond to either rotary or vertical mouse movements. Show full path : Show the full file path of the songs in the song menu (instead of just the name). Show tooltips : Turn on/off the tooltips that appear on moving the mouse over a control.
17 Tools The following tools are available from the Studio->Tools menu: l l Sample Rate Converter Stereo Merger Sample Rate Converter Changes the samplerate of a file. Can be used (for instance) for CD(44.1 kHz)/DAT(48 kHz) conversion. Samplerate can be thought of as being the digital equivalent of the analog tape recorder's tape speed. The Noise Shaping button determines whether or not to apply noise shaping to the dither signal.
18 Miscellaneous 18.1 Patch Editor The Patch Editor allows you to modify existing patches or create new patches. Patch Editor window A patch consists of one or more samples. A sample is an audio file containing a single note of the instrument the patch is for (for instance a single piano key hit). Samples Samples can be triggered by three trigger sources: "Note On", "Note On with Sustain" and "Note Off". Most patches use "Note On" samples only.
l l Pan: Pan position, 50 is center Excl: Exclusive Group, can be 1 or higher. Only one note can be active at once per group, so currently playing notes will be stopped if a new one arrives. This can be used to mute a hi-hat when it's closed. All parameters can be edited while the Transport is running. Layer Thresholds The Layer Thresholds control contains 15 sliders. You can drag the sliders. If your patch contains less than 16 layers you can drag any unused sliders all the way left.
big. Left-clicking a meter pops up a much larger version in a new window. This can be used if you need to watch the meter from a distance (to set up recording levels for example). Track Level Meters will automatically be activated when the track's Rec button is activated. This behavior can be turned off in the Studio -> Preferences window. 18.3 Dither MultitrackStudio's internal data format is 32 bit fixed point.
19 Requirements MultitrackStudio can be used on any computer that runs Windows 7/Vista/XP/2000 SP4, including the 64 bit versions of Windows 7/Vista/XP. Some performance issues are discussed in the following sections. With newer computers the sound device usually is the only thing to worry about. Sound Device At minimum, a 16 bit/44.1kHz/stereo sound device capable of full-duplex operation (ie., simultaneous playback and recording) is needed for audio recording/playback.
20 Troubleshooting I can't load my master file in my CD writer program. Make sure the file is a stereo .wav file. If you're using the Pro Plus edition then also make sure it's a 16 bit file (CDs are always 16 bit). All other tracks are on the track I recorded. What's wrong? Your sound device's analog mixer is sending its own output to the audio input so it gets recorded.
I hear glitches when opening windows etc. in Windows Vista. - Try turning off the Aero Vista looks (switch to the Windows Classic display theme). - If you're using the AsioSnd driverset: try turning on MMCSS (see Compensating for bad drivers). The file open/save dialogs hang on Vista This happens to a small number of users. Just terminate the program using the Task Manager and run MultitrackStudio again. MultitrackStudio will now revert to using the old style dialogs automatically.