
USER MANUAL

-----------------------------------------------24 ----------------------------------------------
8. Now increase the volume on your source unit to your normal
listening level. For some of you, this may be louder than others!
9. At this point you may nd yourself going back and adjusng the
Output Level controls on your LC6i to balance the front, rear,
and subwoofer secons of your system to accommodate speaker
placement and eciency. Speakers on the rear deck of your car
will probably sound louder than the ones in your doors!
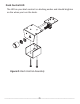
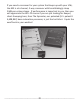
ACR-1 Dash Control (available separately)
Placement and Mounng
The dash control may be mounted under
the dash using its own bracket or through
a custom hole in the dash. It should be
within reach of the driver and in a spot
where the LED is plainly visible.
Dash Bracket Installaon
The dash control mounts with two screws, which aach to the under-
side of the dashboard. Slide under the dash and place the dash control
in its mounng posion, mark the two mounng holes, drill pilot holes,
and secure with two screws.
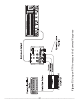
Custom Installaon
For that custom, nished look, the dash control can be ush-mounted
directly on the dashboard (or anywhere else). Disassemble the dash
control from the mounng using the diagram at the right as a guide.
Make sure you are not about to drill into any exisng wiring,
fuel or oil lines, or hydraulic pipes. Drill a 9/32" (7 mm) hole in
the dashboard for the control, along with a 3/32" (2.3 mm) hole for the
lock tab, and a 1/8" (3 mm) hole for the LED. Reassemble the ACR-1
components in their new custom locaon.