
USER MANUAL

-----------------------------------------------16 ----------------------------------------------
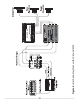
LC6i Power Wiring
WARNING: Failure to disconnect the negave terminal of your
baery prior to the installaon of your LC6i can result in a warm
ngly feeling.
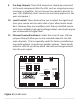
(+12V) Posive Connecon: Insert a 12 to 18 gauge wire into the
connector labeled “+12” on the niy connector of your LC6i. Connect
it to a good constant source of 12 Volts (we suggest the baery), fused
at 1 amp.
Ground Connecon: Use the same gauge wire as you did for the posi-
ve connector and run it from the “Ground” connector on your LC6i to
the negave terminal of the baery, a ground bus, or a veried ground
locaon. The factory head unit ground is not a good ground!
Remote In: Connect a 22 to 18 gauge wire from the source unit’s re-
mote turn-on or other trigger to the Remote connector on the LC6i. As
we previously menoned, your LC6i is equipped with GTO signal sens-
ing which allows it turn on when it detects a signal at the Main speak-
er-level inputs so you may not need to use the “Remote In” feature.
Remote Out: If you are going to use the LC6i to turn on any external
signal processors or ampliers, connect an 18 to 22 gauge wire from
the Remote Out on the LC6i to the remote turn-on of the processors or
ampliers. The remote output is relay operated and capable of 1 Amp
out.
Once the electrical connecons are complete, you will want to recon-
nect the negave terminal to your baery, however connue to act
posively.