
USER MANUAL

-----------------------------------------------11 ----------------------------------------------
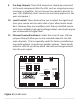
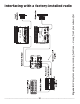
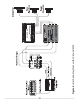
1. Speaker-level Inputs: The LC6i has three sets of speaker-level
inputs. These inputs get their signals from the speaker-level
outputs of your factory-installed source unit or amplier (if your
vehicle is so equipped). If your source unit has front, rear, and
subwoofer speaker-level outputs, connect them to the three sets
of inputs on your LC6i. If the source unit only has front and rear
inputs, the Auto Mode circuitry in your LC6i automacally routes
the Channel 2 input channels to Channel 3.
2. Ground: Connect to a good, veried chassis ground (the baery
comes to mind.) Warning: Factory ground wires typically already
have mulple devices connected to them and are not recom-
mended.
3. +12 Volt: Connect to a good source of power (the baery comes
to mind again).
4. Remote In: Allows your LC6i to be turned on remotely with a 12-
Volt signal.
5. Remote Out: Outputs 12 Volts when the LC6i is powered up so
you can turn on external devices like signal processors and exter-
nal ampliers. DO NOT USE FOR SYSTEM POWER!!
6. Maximized Indicator: This brightly colored LED indicates when
your signal level is just below clipping your LC6i. When properly
level matched, this LED should icker occasionally when your
system is playing at its maximum volume level.
7. Power: If you have connected all of your power wires correctly,
this light should be bright red when your system turns on.
8. Remote Subwoofer Level Control Input: This input allows you
to add an oponal (sold-separately-not-included) ACR-1 remote
that will allow you to control the subwoofer output of the LC6i
from your dashboard.