AUDIO ANALOGUE maestro STEREO LINE PREAMPLIFIER SPECIAL EDITION OWNER’S MANUAL MANUALE D’ISTRUZIONI Manual rev1.
INTRODUCTION AUDIO ANALOGUE does not take any responsibilities in the following cases: Whenever the operational procedures related to the use and the maintenance of the equipment as described in this manual are not respected. Whenever damages to the equipment occur because of fixing and modifications made form non-authorized staff or because of normal deterioration of the system.
PREMESSA AUDIO ANALOGUE non accetta responsabilità nei casi in cui: Le procedure operative di utilizzo e manutenzione dell’apparato descritte nel manuale non siano rispettate. I danni si verifichino in seguito a riparazioni o modifiche dell’apparato eseguite da personale non autorizzato o a seguito di normale deterioramento dell’apparato.
Dear Audiophile, Congratulations and thank you for choosing Maestro Line Preamplifier Special Edition. You’re now the owner of a unit that establishes a new reference in the category of high-quality and high-versatility stereophonic products. Maestro Line Preamplifier Special Edition provides circuital solutions with no compromises and features capable to satisfy advanced users’ demands.
Caro Audiofilo, Congratulazioni e grazie per aver scelto il Maestro Line Preamplifier Special Edition. Sei ora in possesso di un apparecchio che stabilisce il nuovo riferimento nella categoria di prodotti stereo caratterizzati da una eccezionale qualità e versatilità. Il Maestro Line Preamplifier Special Edition associa infatti soluzioni circuitali senza compromessi con caratteristiche funzionali tali da soddisfare anche l’utente più esigente.
1 6 3 9 7 8 4 5 2 Front panel 1) Multifunctional and input selector. It allows choosing the sound source visualizing it on the display. It also allows sending the sound source to the tape out and modifying set-up settings. 2) Volume control. Fading level is shown on the display. 3) “Tape” button. When this button is pressed, the input selector works as tape bar selector. On the display is shown the source available on the analogical tape out.
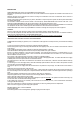
11 3 6 10 6 7 5 13 4 8 1 4 3 Chassis A back panel 1) IEC standard power inlet. Connect here the provided power cord. 2) Fuses(T2A). 3) RS-232 serial port. 4) 25-pin connector for digital control signals. 5) 4-pin XLR connector for left analogic power supply. 6) 4-pin XLR connector for right analogic power supply. Chassis B back panel 1) 25-pin connector for digital control signals. 2) 4-pin XLR connector for left analogic power supply. 3) 4-pin XLR connector for left analogic power supply.
11 3 6 10 6 7 5 13 4 8 1 4 3 12 14 2 2 5 1 Descrizione del pannello posteriore telaio A 1) Presa di rete a norma IEC. Collegare il cavo di alimentazione di rete fornito in dotazione. 2) Fusibili(T2A). 3) Porta seriale RS-232. 4) Connettore a 25 poli per i segnali digitali di controllo. 5) Connettore XLR a 4 poli per alimentazione analogica left. 6) Connettore XLR a 4 poli per alimentazione analogica right.
1) 2) 3) 4) 5) Remote controller “STBY”. Standby. It activates/deactivates standby mode. “VOL+/VOL-“. Volume setting. “MUTE”. It activates/deactivates muting “IN+/IN-“. It allows source selection and navigation through the set-up. “SET”. It activates the set-up. Descrizione del telecomando “STBY”. Stand-by. Attiva e disattiva lo stand-by. “VOL+/VOL-“. Regolazione del volume. “MUTE”. Attiva e disattiva il mute. “IN+/IN-“. Seleziona la sorgente per l’ascolto e permette la navigazione nel setup 5) “SET”.
Where to place Maestro Line Preamplifier SE Maestro Line Preamplifier SE is a complex unit that may generate heat. Please locate the unit in a well-ventilated place. In particular, you should leave at least 5cm around and above the unit and avoid placing it close to heat sources (radiators, heaters, amplifiers, television sets). Scelta del luogo in cui posizionare il Maestro Line Preamplifier SE Il Maestro Line Preamplifier SE è un apparecchio complesso e può generare calore in misura non trascurabile.
Volume settings and silencing (mute) The volume knob on the front panel and the Vol+/Vol- buttons on the remote controller changes the general sound level. It means that the volume of the two channels is altered identically. It is possible to modify the relative level of each channel changing the balance option in the setup. The mute buttons on the front panel and on the remote controller allows lowering the sound level by 20dB.
preamplifier into a multi-channel system, so that you can connect it to high-quality stereophonic sources while connecting the multi-channel processor to audio/video sources. Note sul by-pass degli ingressi E’ disponibile una opzione del set-up che permette di inviare sulle uscite il segnale di ingresso bypassando l’amplificatore quando l’apparecchio si trova in stand-by. E’ possibile operare anche una scelta tra le 8 sorgenti possibili.
repeatedly press the “SET UP” button on the front panel or the “SET” button on the remote controller. It is possible to modify the parameters of the selected option by rotating the left selector on the front panel or pressing the “IN+/IN-“ buttons on the remote controller. To exit set-up, choose the “EXIT” option and press the “SET” button. To exit set-up, press the button since when the preamplifier functioning status is shown on the display.
Specifications In/out configuration Unbalanced input Unbalanced output Parameter Channels: Line gain Frequency response: Noise level: Signal/noise ratio: Line gain Frequency response: Balanced input Unbalanced output Noise level: Signal/noise ratio: Line gain Frequency response: Unbalanced input Balanced output Noise level: Signal/noise ratio: Line gain Frequency response: Balanced input Balanced output Noise level: Signal/noise ratio: Measurement conditions 20Hz-20kHz Attenuation 0dB Band limit
Specifiche Tecniche Configurazione in/out Ingresso sbilanciato Uscita sbilanciata Parametro Numero di canali: Guadagno stadio linea Risposta in frequenza Livello di rumore Rapporto segnale/rumore Guadagno stadio linea Risposta in frequenza Ingresso bilanciato Uscita sbilanciata Livello di rumore Rapporto segnale/rumore Guadagno stadio linea Risposta in frequenza Ingresso sbilanciato Uscita bilanciata Livello di rumore Rapporto segnale/rumore Guadagno stadio linea Risposta in frequenza Ingresso bil
TROUBLESHOOTING Symptom Cause Power cord incorrectly plugged Display is off No sound Burned-out fuses Volume knob completely rotated anticlockwise Faulty or incorrectly plugged connectors between frames Display is on No sound Recording is impossible Power amplifier is off Faulty or incorrectly plugged connectors between Maestro Line Preamplifier and the amplifier Rotate the volume knob clockwise Check that the three cords that connect the frames are correctly plugged Turn power amplifier on Check
RICERCA GUASTI Sintomo Causa Cavo di alimentazione non correttamente collegato Display spento Nessun suono Fusibili di rete bruciati Manopola del volume ruotata in senso antiorario Cavi di collegamento tra i due telai staccati Display acceso Nessun suono Amplificatore di potenza spento Cavi di segnale tra Maestro Line Preamplifier e amplificatore di potenza non connessi correttamente oppure difettosi Sorgente spenta o non selezionata correttamente La registrazione è impossibile Cavi di segnale tra
A. INFORMATION ON DISPOSAL FOR USERS (PRIVATE HOUSEHOLDS) 1 In The European Union Attention: If you want to dispose of this equipment, please do not use the ordinary dust bin. Used electrical and electronic equipment must be treated separately and in accordance with legislation that requires proper treatment, recovery and recycling of used electrical and electronic equipment.
Audio Analogue Manufactured and Distributed by: AUDIO FUTURA spa Via Maestri Del Lavoro 583 51015 Monsummano Terme (PT) Italy Tel. 0572 954513 fax 0572 958099 www.audioanalogue.com - info@audioanalogue.