
Specifications


6
2.2. Setting up the multimedia interface before installing it:
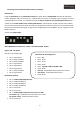
DIP Switches:
Using the DIP Switches of the multimedia interface you will be able to enable/disable the external multimedia
devices, Navigation, DVD, rear cameras, etc… anything that you connect. For example, if you are going to connect a
multimedia device in the AV1, and another in the AV3, we will just enable the corresponding DIP Switches (DIP2
and DIP 4) and we will disable all the remaining DIP Switches, if we do like this, we will only have that 2 enabled
sources in the interface (AV1 and AV3), and when you change from one source to the other, the interface will skip
the ones that are disabled. Doing this, we get a faster change between sources. Dip 1 is used for navigation source
(RGB connection).
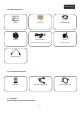
See the next sample image:
VERY IMPORTANT: DIP Switch UP - Enable / DIP Switch DOWN - Disable
(Ignore “ON” inscription)
Like this in the sample image:
• DIP 1 - (up) Enabled
• DIP 2 - (down) Disabled
• DIP 3 - (down) Disabled
• DIP 4 - (up) Enabled
• DIP 5 - (up) Enabled
• DIP 6 - (up) Enabled
• DIP 7 - (down) Disabled
• DIP 8 - (up) Enabled
DIP Switches function:
• DIP 1 - Enable/disable RGB (GPS Box)
• DIP 2 - Enable /disable AV1
• DIP 3 - Enable /disable AV2
• DIP 4 - Enable/ disable AV3
• DIP 5 - No function
• DIP 6 - No function
• DIP 7 - Enable/disable aftermarket rear camera or OEM
DIP Switch 7 up - enable OEM camera/ without rear camera
DIP Switch 7 down - enable aftermarket camera
• DIP 8 - No function
NaviTOUCH A1 Q3 Configuration:
• DIP 1 - Up
• DIP 2 - Down
• DIP 3 - Down
• DIP 4 - Down
• DIP 5 – Up (400 x 240) Down (800 x 480)
• DIP 6 - Down
• DIP 7 Up - enable OEM camera/ without rear camera
• DIP 7 Down - enable aftermarket camera
• DIP 8 - Down